
Husqvarna MZ 6128 Support Question
Husqvarna MZ 6128 Support Question
Find answers below for this question about Husqvarna MZ 6128.Need a Husqvarna MZ 6128 manual? We have 2 online manuals for this item!
Question posted by Larabys on July 20th, 2021
What Position Does The Electronic Pulley Or Clutch Need To Be In On The Bottom O
The person who posted this question about this Husqvarna product did not include a detailed explanation. Please use the "Request More Information" button to the right if more details would help you to answer this question.
Current Answers
Answer #1: Posted by SonuKumar on July 20th, 2021 7:23 AM
SonuKumar

Member since:
May 9th, 2021 Points: 16,667,060

Member since:
May 9th, 2021 Points: 16,667,060
https://www.youtube.com/watch?v=Lj6QrriJ7CA
https://www.youtube.com/watch?v=Lj6QrriJ7CA&t=20s
https://www.youtube.com/watch?v=Lj6QrriJ7CA&t=24s
https://www.youtube.com/watch?v=Lj6QrriJ7CA&t=28s
https://www.youtube.com/watch?v=Lj6QrriJ7CA&t=31s
Please respond to my effort to provide you with the best possible solution by using the "Acceptable Solution" and/or the "Helpful" buttons when the answer has proven to be helpful.
Regards,
Sonu
Your search handyman for all e-support needs!!
Answer #2: Posted by Technoprince123 on July 20th, 2021 6:21 AM
Technoprince123

Member since:
February 8th, 2021 Points: 1,205,200
Member since:
February 8th, 2021 Points: 1,205,200
https://www.pc-specs.com/gpu/Nvidia/700_Series/GeForce_GTX_750_Ti/883/Compatible_Motherboards
https://forums.tomshardware.com/threads/which-motherboard-with-my-gtx-750-ti-2gb.3059216/
Please response if this answer is acceptable and solw your problem thanks
Related Husqvarna MZ 6128 Manual Pages
Owners Manual - Page 5
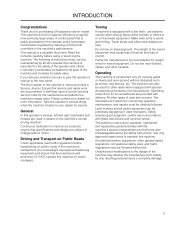
... the safety of instructions (use extreme caution when towing. Do not tow on public roadways. Lawn mowers and all who are provided with a tow hitch, use , service, maintenance) by all power...accessible to improve our products require that the machine is constructed only for mowing grass on mower. Travel slowly and allow children or others .
This machine is a valuable document. ...
Owners Manual - Page 6

... at the rear.
©2010 HTC. Printed in this operator's manual. The machine's type designation (I.D.). 2. INTRODUCTION
Good Service
Husqvarna's products are : 1. This ensures that you need spare parts or support in specialized retail stores with the manufacturing number:
Engine
Transmission
Manufacturing Number
The machine's manufacturing number can be found on one...
Owners Manual - Page 9

...'s manual before starting the machine
Clear the area of objects before dismounting.
• Disengage blades when not mowing. This symbol means that important safety instructions need to a complete stop engine, and remove keys before mowing
8011-513
9 WARNING!
Owners Manual - Page 18

...turn right while moving the other .
1. Forward 2. Neutral 3. Furthermore, there is a neutral position, which steering control is locked if the steering controls are moved outward. Reverse Motion control lever pattern...is moved much further forward than the other steering control forward from its neutral position.
For example, to the right. The rotation direction when zero turning is ...
Owners Manual - Page 19
...-043 8058-044
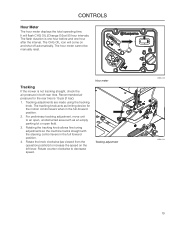
19 Tracking
If the mower is 15 psi (1 bar).
1. Recommended air pressure for the motion control levers when in the full forward position.
4. Rotate counter clockwise to increase the...tuning adjustments so the machine tracks straight with the steering control levers in the full-forward position.
2. The tracking knob acts as an empty parking lot or open , unobstructed area...
Owners Manual - Page 21

accessory
Fuses
8066-005
8011-420
21 RUN position For using "accessory", turn the key counter clockwise.
8058-046
Fuses
Fuses are two fuses with ratings and functions:
1. 20 A, Primary fuse
2. 7.5 A, Mower deck coupling
Ignition switch - There are located on the left hand side of the machine. Fuses are accessed by tilting the...
Owners Manual - Page 22
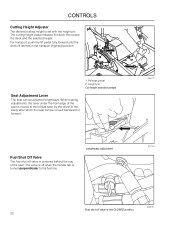
... Lever
The seat can be adjusted lengthways.
When making adjustments, the lever under the front edge of the seat is off valve in the CLOSED position.
8065-010
22 The cutting height pedal releases the deck lift to the left (as seen by the driver in the transport (highest...
Owners Manual - Page 24

... turn to the left While moving in a forward direction pull the left lever back towards the neutral position while maintaining the position of the control lever(s) on control levers to the neutral position and mower should push mower (see Before Starting in the Operation section), adjust engine speed to idle, disengage parking brake, do not...
Owners Manual - Page 27

... contains carbon monoxide, which is automatically regulated during starting and warm up. Do not use the machine in the OPEN position
8. Fuel valve in enclosed spaces. Set the desired engine speed with Electronic Fuel Management (EFM). USE FULL THROTTLE WHEN MOWING.
8065-013 80658-050
Release ignition to the start , wait about...
Owners Manual - Page 32

...; Hose the mower deck underside with a high engine speed (the blades rotate rapidly) and low speed (the rider moves slowly).
Never drive the rider on top surface, engine and electrical components.
• When the mulching kit is poorer because the wheels sink into the transport position. For healthier and better looking lawns, mow...
Owners Manual - Page 35
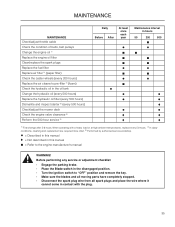
...the condition of belts, belt pulleys Change the engine oil 1) ... 500 hours) Dismantle and inspect starter 3) (every 500 hours) Check/adjust the mower deck Check the engine valve clearance 3) Perform the 500-hour service 3)
Daily Before.... • Place the Blade-switch in the disengaged position. • Turn the ignition switch to "OFF" position and remove the key. • Make sure the blades...
Owners Manual - Page 36
... terminal guard. 8. Adding or checking level of the terminal guard and lift off guard. 5. Positive terminal must be connected first to positive (+)
battery terminal with a maintenance free battery and does not need servicing. WARNING! Carefully remove the battery from the mower. 6. Open the terminal access doors. 2. First connect RED battery cable to prevent sparks...
Owners Manual - Page 37

...equipped with a safety system that there is not engaged and the operator leaves the seated position. Only use O.E.M. WARNING! IMPORTANT INFORMATION
The machine must sit in the seat and release ...again.
Check that the engine stops if the mower blades are in reduced braking ability and can only be moved into the neutral position, otherwise the engine will cause premature failures. Conditions...
Owners Manual - Page 38
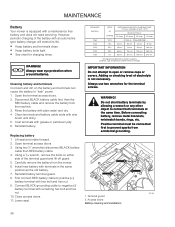
...off the mower deck.
Check that there are not twists in installing the deck belt, refer to tension belt.
6. Remove the belt from around the electric clutch on ...on the belt.
3. Lower the deck into the lowest cutting position.
1. Push inward on the engine shaft.
2. Carefully roll the belt over stationary idler pulley. Apply park brake. Wrap the deck belt around the cutter ...
Owners Manual - Page 39

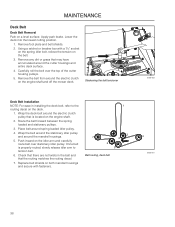
...mower: 3. Remove fan covers
3 1
1. Replacing Pump Belt Park the mower on the engine pulley.
5.
Tilt seat forward to hold the tension off the belt while removing the implement used as a brace in the extended position... pump pulleys over the right and left idler pulleys.
4. Place the belt on a level surface. Replace and secure clutch stop.
7. Belt Installation 1. Electric clutch 2. ...
Owners Manual - Page 51

BRAKE SWITCH IN OFF POSITION 3. PTO IN OFF POSITION
RIGHT MOTION CONTROL LEVER
YEL
LEFT MOTION CONTROL LEVER
YEL BRN
BRN
GRN
BRAKE SWITCH
...T-5
TIMER T-3
T-4
BRN
BLU
WHT GRN PUR
PUR
BLK BLK
BRN PUR
HOURMETER
YEL/RED
PTO
7.5 AMP
ELECTRIC
SWITCH PUR
CLUTCH
BLK
BLK
ACCESSORY
BLK
OUTLET
ENGINE GROUND WIRING DIAGRAM
51
SOLENOID YEL
NOTES: 1. MOTION CONTROL LEVERS OUT 4.
Owners Manual - Page 57
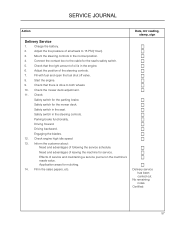
.... Application areas for the mower deck. Driving backward. Check that the right amount of leaving the machine for the seat's safety switch. 5. Inform the customer about:
Need and advantages of service and... parking brake. Mount the steering controls in the normal position. 4. Adjust the position of all wheels to both wheels. 10.
Date, mtr reading, stamp, sign
Delivery ...
Owners Manual - Page 61

... filter 11. Inspect idler arm bearings 18. Check neutral position 24. Inspect battery connections 25. Inspect safety guards and shields 29. Check brake adjustment
Date, mtr reading, stamp, sign
61 Change air filter 9. Inspect deck belt and blades 17. Inspect deck idler pulleys 19. Check safety system 26. Inspect hardware 6. Clean underside...
Owners Manual - Page 62
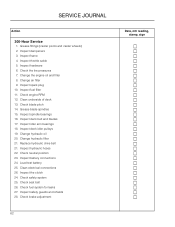
...10. Check blade pitch 14. Inspect idler arm bearings 18. Inspect deck idler pulleys 19. Inspect safety guards and shields 28. Inspect dampeners 3. Change air filter ... reading, stamp, sign Clean electrical connections 26. Replace hydraulic drive belt 21. Inspect the clutch 24. SERVICE JOURNAL
Action
300-Hour Service
1. Grease fittings (caster pivots and caster wheels)...
Parts Manual - Page 7

... 608801 1 PLATE, ENGINE w/ DECAL 2.. 574 846402 1 PLATE, IDLER SUPPORT 3.. 574 811001 1 PULLEY, V 11/8 BORE 4.. 539 976688 1 PULLEY, IDLER 5.. 539 107620 1 PULLEY, IDLER 6.. 574 870901 1 BELT 7.. 525 435601 1 PIVOT, IDLER 8.. 510 206301 1 PIVOT, BEARING 9.. 510 041603 1 ARM, IDLER w/ BEARINGS 10.. 574 607001 1 CLUTCH, 200 FT-LB 11.. 510 254401 1 SPRING, PUMP 12.. 510 254501...
Similar Questions

Location Of Battery On A Hu675fe Lawn Mower.
Where is the battery located on a Husqvarna HU675FE lawn mower
Where is the battery located on a Husqvarna HU675FE lawn mower
(Posted by wrileythree 3 years ago)

Starter Positive Post Has Continuity To Ground. Is This A Normal?
(Posted by Bndb104 3 years ago)

The Mower Will Start The Blades Will Turn But It Wont Drive
(Posted by erickmorris89 8 years ago)