KitchenAid KGRS208XSS Support Question
KitchenAid KGRS208XSS Support Question
Find answers below for this question about KitchenAid KGRS208XSS.Need a KitchenAid KGRS208XSS manual? We have 2 online manuals for this item!
Question posted by vivianumeozulu on June 16th, 2012
Griddle
Is the griddle on this cooker removable or interchangeable
Current Answers
Related KitchenAid KGRS208XSS Manual Pages
Installation Guide - Page 1
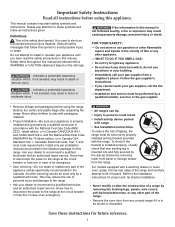
... installed in the State of this appliance. p/n 316903001 (1005) 1 FREESTANDING GAS RANGE
INSTALLATION AND SERVICE MUST BE PERFORMED BY A QUALIFIED INSTALLER.
do not use gasoline or...installation instructions before installing range.
• Remove all instructions contained in a manufactured (mobile) home, installation must be located on natural gas. This range has been design certified...
Installation Guide - Page 2

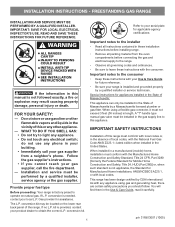
... an area covered with a match. Children could result.
• Reset all appliances. Excessive flame is not removable. Prolonged use your range is in the "ON" position. Use extreme caution when lighting burners this range can result in operation. Stepping, leaning or sitting on to the "OFF" position after using a programmable timing operation.
•...
Installation Guide - Page 3
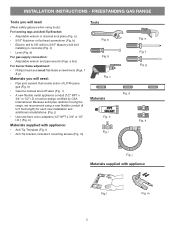
... drill bit if
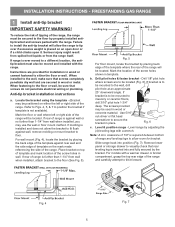
installing in concrete) (Fig. Because solid pipe restricts moving the range, we recommend using tools):
For leveling legs and Anti-Tip Bracket: • Adjustable...& e)
For burner flame adjustment: • Phillips head and small flat-blade screwdrivers (Figs. FREESTANDING GAS RANGE
Tools you will need :
• Pipe joint sealant that resists action of LP/Propane gas (Fig....
Installation Guide - Page 4
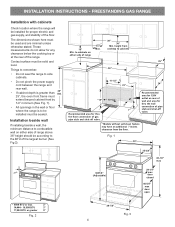
...by 1/2" minimum (See Fig. 1).
• All openings in the wall or floor where the range is to the BTU of range
13" Max.
30" 30"
Min.
Contact surface must be solid and level. to cabinets
25"...pipe stub and shut-off valve.
2" 7"
Recommended area for 120V outlet on either side of range above 36" height should be according to be installed must be sealed.
The dimensions shown here...
Installation Guide - Page 5
.... Use 5/16"
nut-driver or flat head
screwdriver to the floor by placing back edge of the template where the rear of the range will be used in template. Remove lower panel or storage drawer to visually check that rear leveling leg is ever moved to a different location, the antitip bracket must...
Installation Guide - Page 8
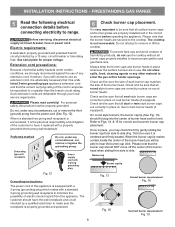
... receptacle and circuit checked by a 15 amp. Do not, under any circumstances, cut , remove or bypass the grounding prong.
When the burner cap lip makes contact inside the center of ... matches the size of this product must be sure that all burner caps properly installed to range. Please read carefully!
INSTALLATION INSTRUCTIONS - Do not allow spills, food, cleaning agents or any...
Installation Guide - Page 9
... flame. If your model is set to a light bulb. INSTALLATION INSTRUCTIONS - FREESTANDING GAS RANGE
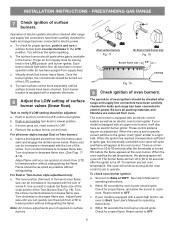
7 Check ignition of surface
burner valves (linear flow). You will "glow" similar to ... Try each surface control knob separately until you can quickly turn knob from oven. c. Remove the surface burner control knob.
Adjust flame until you can quickly turn the knob from ...
Installation Guide - Page 10

...screw. Note: After installation is located on your range. Reinstall in your Use & Care Guide. FREESTANDING GAS RANGE
10 Adjust air shutter - If removing the range is proper, set the oven to read and ...out away from front to disconnect the gas and electrical supply.
Finish removing the range for proper Anti-tip installation.
The list includes common occurrences that are...
Use & Care Guide - Page 2
...to the lower right oven frame.
®Registered trademark/™Trademark of the Griddle Grate 10 Oven Control Functions 11 Setting Oven Controls 12-21 Setting clock ..., record the date of purchase, model and serial number of Purchase Save sales receipt for aluminum use 29 Removing and replacing the lift-off oven door 30 Before You Call - Table of Contents
Product Record/Serial Plate ...
Use & Care Guide - Page 3
...safety symbols and instructions.
do not use gasoline or other part of the range.
• Remove the oven door from any part of an emergency.
• User servicing—Do not ...repair or replace any unused range if it forward. All other servicing should be performed by removing the leveling legs, panels, wire covers, anti-tip brackets/screws, or...
Use & Care Guide - Page 4

... before moving.
• Do not use aluminum foil as flammable liquids. The oven vent is cool. Remove all utensils from the high heat of the broiler.
• Do not cover the broiler insert with ... surfaces may cause severe burns. Use dry potholders — moist or damp potholders on the range to burst and result in this manual.
Also, do not place plastic or heat-sensitive items...
Use & Care Guide - Page 5
... use .
• When flaming foods under a ventilating hood, turn the fan on the burner before removing the pan.
• Always turn the burner off during the self-cleaning cycle of any part of the...any part of the range, be hot and can cause burns.
• Clean the range regularly to keep all controls are suitable for a good seal. Before self-cleaning the oven, remove the oven racks,...
Use & Care Guide - Page 6

... the kit be sure to L.P.
Save these instructions for complete installation and grounding instructions. DO NOT cut , remove, or bypass the grounding prong.
See the INSTALLATION INSTRUCTIONS packaged with a 3-prong grounding plug for this range for future reference.
6 This appliance allows for assistance. Gas provider for conversion to satisfactorily meet the application...
Use & Care Guide - Page 7
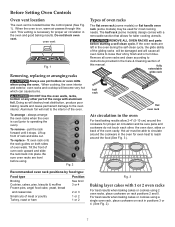
... flat oven rack (some models) or flat handle oven rack (some models) design comes with aluminum foil.
To remove - To replace - fit oven rack onto the rack guides on rack positions 2 and 5. Be sure oven racks...cakes or cookies using 2 oven racks, place cookware on both sides of the range with a removable section that allows for even heat to loose their shiny finish and or turn blue. ...
Use & Care Guide - Page 10

... completely. Check with hot tap water to bring water to boil more quickly.
• Use the highest heat setting when first bringing the water to griddle before removing.
5. Once boiling is achieved, reduce heat to lowest possible setting to read and observe all the information they have available as well as follow...
Use & Care Guide - Page 22
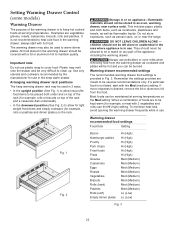
... position (See Fig. 2) to heat cold food in an oven, warming drawer, near the range.
To minimize heat loss, avoid opening the warming drawer frequently while in use . Arranging warming ...Warming Drawer Control (some models)
Warming Drawer
The purpose of the warming drawer is desired, remove the lid or aluminum foil from the warming drawer as cookware and plates will be hot and...
Use & Care Guide - Page 24
.... 1).
4.
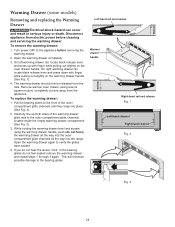
To replace the warming drawer:
1. The warming drawer should now be released from electric power before removing the warming drawer.
2.
Open the warming drawer again to the bearing glides.
Left-hand rail and release
Warmer ... the outer compartment glide channels until they snap into the range. This will minimize possible damage to verify the glides have seated.
4.
Use & Care Guide - Page 25
.... Any spills on the surface as milk, tomatoes, sauerkraut, fruit juices or pie filling) to the interior of the range with aluminum foil.
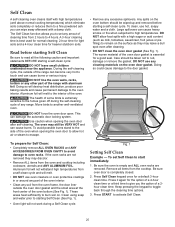
The Self Clean function allows you to escape.
• Remove any soil from the oven and cooktop including cookware, utensils and ANY ALUMINUM FOIL. The health of any amout...
Use & Care Guide - Page 26
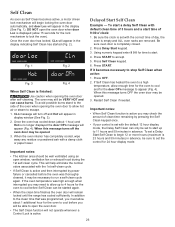
...oven may be started (Fig. 2). Press Self Clean keypad. 6. This will remain locked until the range has cooled sufficiently. Using numeric keypad enter 9 0 0 for the oven to begin locking the .... 1
Fig. 2
Fig. 3
Fig. 4
When Self Clean is empty and ALL oven racks are removed. When the oven interior has completely cooled, wipe away any residue or powdered ash with the 1st self-...
Use & Care Guide - Page 31

...Have a flexible CSA International approved metal appliance connector installed.
If the F code error repeats, remove power from appliance, wait 5 minutes and then repower appliance and set properly for service outage ...not level.
• Be sure floor is level, strong & stable enough to make range appear not level. Entire appliance does not operate. The time of day is sagging or...
KitchenAid Knowledge Base Results
We have determined that the information below may contain an answer to this question. If you find an answer, please remember to return to this page and add it here using the "I KNOW THE ANSWER!" button above. It's that easy to earn points!-
Dishwasher safe parts
Dishwasher safe parts What parts on the Slow Cooker are dishwasher safe? The dishwasher safe products on the slow cooker are : The ceramic pot The glass lid The silicone lid seal NOTE: Remove the lid seal from the lid prior to washing. -
Architect Series blender features
.... Answers others found helpful Product Literature (Use & Care, Parts Lists, etc) Interchangable parts Architect warranty Silicone coated flat beaters KSB354 blender jar capacity The flexible lid will...fast, thorough and consistent blending. The lid incorporates a removable 2 oz. (60 ml) cup for easy cleaning, and withstands a range of my KitchenAid Architect Series blender? Soft Start®... -
Glass Jar for blender
... on the KSB560 Interchangable parts To purchase a replacement jar, please contact our KitchenAid Customer eXperience Center toll-free at 1-800-541-6390 Monday-Friday, 8am-8pm or Saturday 10am-5pm. The glass pitcher resists scratches, stains and odors. Eastern Standard Time. The pitcher is removable from the locking...
Similar Questions

Remove Splash Guard On Model Kdrs807sss
If I removed the splash guard for looks, would that be a problem. How would it look from top?
If I removed the splash guard for looks, would that be a problem. How would it look from top?
(Posted by mjfm5 9 years ago)

Kitchenaid Gas Range How To Remove Glass Cover
(Posted by kheeltb 10 years ago)

Kitchen Aid Model Kgrs807, How Do I Remove Probe?
I've got a message on my range that appeared when I was heating soup on one burner. there was a bee...
I've got a message on my range that appeared when I was heating soup on one burner. there was a bee...
(Posted by Jpartridge99555 10 years ago)

Kgrs208xss 240v Convection Oven
Why does your literature say convection oven needs 240v and there is no way to connect 240v to the r...
Why does your literature say convection oven needs 240v and there is no way to connect 240v to the r...
(Posted by n9bb 12 years ago)

Removing The Backsplash Of Kitchenaid Range #kdrs807sss
Can I remove the backsplash off a Kitchenaid range #KDRS807SSS and if so will there be any holes tha...
Can I remove the backsplash off a Kitchenaid range #KDRS807SSS and if so will there be any holes tha...
(Posted by kctesar 14 years ago)