KitchenAid KGSS907SSS Support Question
KitchenAid KGSS907SSS Support Question
Find answers below for this question about KitchenAid KGSS907SSS - 30 Inch Slide-In Gas Range.Need a KitchenAid KGSS907SSS manual? We have 3 online manuals for this item!
Question posted by mad56dog on January 27th, 2012
Kitchaid Oven Stove Top
The burners on my stove KGSS907SS will not ignite. I hear a spark coming from the oven, but the electrodes on the stove top do not spark. What do I need to replace?
Current Answers
Related KitchenAid KGSS907SSS Manual Pages
Use & Care Guide - Page 7

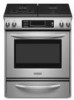
... a guide when setting Power Burner heat levels. If the spark igniter still does not operate, call a trained repair specialist. Hold a lit match near a burner and turn knob counterclockwise to LITE.
REMEMBER: When range is included with the correct polarity. Push in death or fire. Push in use LP Gas, an LP Gas Conversion Kit is in and...
Use & Care Guide - Page 10
... enlarge or distort the port. If the burner needs to be of soil and do not service the sealed burner yourself.
D
E
C
A. Igniter E. Gas tube opening
Gas tube opening
Gas must flow freely throughout the gas tube opening by always using a burner cap. Keep this area free of medium-to enter the burner ports. Burner ports
A
B
A. 1-1¹⁄₂" (25-38 mm...
Use & Care Guide - Page 16

...and oven walls.
Broil
This range has both the gas burner ...30 seconds to 2 minutes. If the oven door is reached.
When the actual oven temperature reaches 170°F (77°C), the oven display will also appear in intervals to maintain oven temperature. When the set temperature is opened during baking or roasting, the broil element will turn off immediately and the bake burner will come...
Use & Care Guide - Page 25

... heat level? See "Surface Burners" section.
■ Is there continuous sparking, but does not light
■ Is the power supply cord unplugged? Contact a trained repair specialist. Nothing will click several times until the flame is the Control Lock set correctly?
Discontinue use of glass.
■ The igniters will operate
Gas range noises during the cycle...
Use & Care Guide - Page 26

... in the pan.
■ Is the proper length of the fan operation after the oven is level in use only factory specified parts. Oven cooking results not what expected
■ Is the range level? Check that you need replacement parts If you use or for service. These factory specified parts will be a brief delay of...
Use & Care Guide - Page 28

...modifications made to repair or replace appliance light bulbs, air ... service company.
KITCHENAID® GAS RANGE WARRANTY
LIMITED WARRANTY
For one ...PERIOD ALLOWED BY LAW. You will need to published user or operator instructions ...authorized KitchenAid dealer to KitchenAid within 30 days from accident, alteration, misuse...or workmanship:
■ Any gas burner
■ Solid state touch control...
Dimension Guide - Page 1

...opening width is needed for connection to countertop
30" (76.2 cm) min. upper cabinet depth
30" (76.2 ...oven door trim)
D 30" (76.2 cm)
on the right-hand side oven door trim)
F. 27 " (69.2 cm) max.
® 30" Freestanding and Slide-In Gas Range
PRODUCT MODEL NUMBERS
KGRS807S KGRS807X KGSK901S
KGSS907S KGSS907X
GAS SUPPLY REQUIREMENTS
Use ³⁄₄" (1.9 cm) rigid pipe gas...
Installation Guide - Page 2

... 11 Level Range 11 Make Gas Connection 11 Electronic Ignition System 13 Replace Oven Racks and Warming or Storage Drawer 15 Complete Installation 15
GAS CONVERSIONS 16 LP Gas Conversion 16 Natural Gas Conversion 18
... de l'aplomb de la cuisinière 29 Raccordement à la canalisation de gaz 30 Système d'allumage électronique 31 Réinstallation des grilles du four et ...
Installation Guide - Page 4

... not obstruct flow of the slide-in range and the wall in the ...on the right-hand side oven door trim.
■ The range should be used . Countertop ...range to subfloor. Order Part Number W10113902A (black), W10113903A (white) or W10113904A (biscuit). Anti-tip bracket B. See "Electrical Requirements" and "Gas Supply Requirements" sections. A
B
A.
Tools needed Check local codes and consult gas...
Installation Guide - Page 5

... cabinet. front of oven door protrudes 1" (2.5 cm) beyond 24" (61.0 cm) base cabinet.
5 Additional Installation Requirements The installation of this range must conform with the current standards CAN/CSA-A240-latest edition, or with local codes. Freestanding Range
Product Dimensions Slide-in Range
B
A
A
F
C*
B*
D*
C E
D E** F**
A. 5³⁄₄" (14.6 cm)
B. 30" (76.2 cm...
Installation Guide - Page 6

...30" (76.2 cm) min. clearance for installation of the range to the
side wall or other combustible material.
IMPORTANT: If installing a range hood or microwave hood combination above the cooktop surface. Freestanding Ranges
Slide-In Ranges... range, follow the range hood or microwave hood combination installation instructions for gas and electric installation H. upper cabinet depth C. 30"...
Installation Guide - Page 7

... range location. IMPORTANT: This installation must be provided.
■ Electronic ignition systems operate within wide voltage limits, but proper grounding and polarity are in a clear plastic bag. IMPORTANT: Leak testing of gas that will operate.
See "Gas
Conversions" section. The model/serial rating plate located behind the storage drawer on the right-hand side oven...
Installation Guide - Page 8

... ft (609.6 m).
Burner Input Requirements
Input ratings shown on the model/serial rating plate are for turning on or shutting off gas to the range. Line pressure testing at ½ psi gauge (14" WCP) or lower The range must be isolated from the gas supply piping system by closing . If countertop is needed for Canada). B
A
C
A.
Place...
Installation Guide - Page 9

... leveling height will be the difference between the 2 measurements you have just taken. INSTALLATION INSTRUCTIONS
Unpack Range
2.
Stack one cardboard corner on its back. Measure the distance of range cooktop
B. Measure from the range.
Measure from inside oven.
2. Remove oven racks and parts package from the floor to the floor.
1.
Distance from the top of...
Installation Guide - Page 11

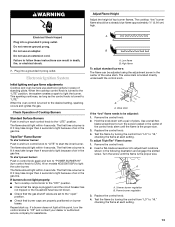
...inch.
4. Gas pressure regulator B. 90° elbow (must be level for use a flashlight
and look underneath the bottom of the range...range.
To check that rear leveling leg is engaged in oven.
2. Explosion Hazard
Use a new CSA International approved gas supply line. Place rack in the anti-tip bracket. This will be used to connect the range to floor. ■ Slide range back so rear range...
Installation Guide - Page 13
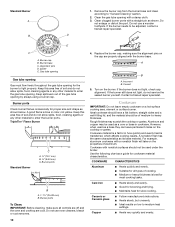
... of air in and turn the control knobs to be adjusted: 1. Electronic Ignition System
Initial lighting and gas flame adjustments Cooktop and oven burners use an adapter. If a burner does not light at each setting.
13 A
A. Valve stem
If the "low" flame needs to "Off" and contact your dealer or authorized service company for assistance. To...
Installation Guide - Page 14

... Oven Bake Burner
1. "FULL BROIL" and broil temperature
will light. The oven burner should light within 8 seconds, under certain conditions it may take the burner up to 50 to 60 seconds to light the bake and broil burners. A B
A.
No yellow tips, blowing or lifting of the range.
B
A
A. Push CANCEL/OFF pad. 5. A
B
A. Locking screw B. Air shutter
If flame needs...
Installation Guide - Page 15

... plugged into the guides in oven cavity. To Replace Storage Drawer: 1. See "Level Range."
5. Read the Use and Care Guide.
7. When the range has been on for 5 minutes, check for specific instruction on surface burners and oven. Replace warming drawer or storage drawer. Gently open .
■ If the gas supply line shutoff valve is closed . Check that the...
Installation Guide - Page 17

... the plate on some models). A
B
A
C
A. A. Set external gas orifice spud aside.
6. Replace burner plate, head and cap.
8. Set gas orifice spud aside. Igniter electrode B. Burner base
4. External gas orifice spud access plate D. Replace burner cap.
7. Plate B. Use a 7 mm combination wrench to remove. Replace each Natural gas orifice spud with 1 color dot, and have...
Installation Guide - Page 19

... and keep with a wrench to the following chart for the TripleTier® Flame burner (on the external gas orifice spud. Remove the burner head using a size T20 Torx® screwdriver. 3.
Burner heads C. Igniter electrode B. NOTE: Do not remove the spring beneath the cap. Gas pressure regulator cap with a number on regulator so that the solid end faces...
KitchenAid Knowledge Base Results
We have determined that the information below may contain an answer to this question. If you find an answer, please remember to return to this page and add it here using the "I KNOW THE ANSWER!" button above. It's that easy to earn points!-
General cleaning tips for my electric or gas range
... clean and care for my electric or gas range? To clean oven door exterior Use glass cleaner and a ...listed, please refer to slide. then pull out the drawer another inch. What are cool. Use...oven cools. When replacing knobs, make sure knob is cool and empty before replacing it . Surface burners... out to ignite Do not clean in my oven door glass. Electric Ranges and Cooktops ... -
Tips for using the Self-Cleaning feature - Ranges and built-in ovens
...- Refer to slide, apply vegetable oil on the outer edge on the sides of your appliance? If one oven can self-clean...the Self-Cleaning cycle. Built-in oven for specific instructions for my electric or gas range Setting the Self-Clean cycle FAQs Knowledgebase...The answer needs updating and/or additional information The answer could break the glass. IMPORTANT: The health of the oven to clean... -
Cleaning ceramic glass cooktop - Electric Ranges and Cooktops
... Using the ceramic glass cooktop General cleaning tips for my electric or gas range Product Literature (Use & Care, Parts Lists, etc) FAQs Knowledgebase search tips Tips for .... Light to remove metal marks as soon as streaks. Follow the instructions below to wear oven mitts while cleaning the cooktop. As soon as they will become less noticeable. Thoroughly dry...
Similar Questions

I Have A Slide In Gas Range Kitchen Aid Kgss907sss00 I Have Granite Top On Bot
I have granite tops on both side. I have a 2-1/4" gab at back of range. What can I use to fill gap
I have granite tops on both side. I have a 2-1/4" gab at back of range. What can I use to fill gap
(Posted by Chrisenglert 6 years ago)
Gas Range # Kgss907: Oven Fan Sometimes Cycles On & Off When Using Stove Top?
KitchenAid: Gas Range Model # KGSS907: Issue ~ Oven fan sometimes cycles on & off when using sto...
KitchenAid: Gas Range Model # KGSS907: Issue ~ Oven fan sometimes cycles on & off when using sto...
(Posted by sfmanley 9 years ago)

Oven Light Won't Go Off On Kitchenaid Kgss907sss01 Range
(Posted by samuekmtnsc 10 years ago)

How To Use Self Cleaning Kitchenaid Kgss907sss Slide In Range
(Posted by Eugjbj 10 years ago)
Kitchen Aid Gas Range Model Kgra806 I Need Control Panel
i need control panel for my gas range Kitchen Aid moder KGRA806
i need control panel for my gas range Kitchen Aid moder KGRA806
(Posted by black2stars 11 years ago)