
KitchenAid KUDS35FXSS Support Question
KitchenAid KUDS35FXSS Support Question
Find answers below for this question about KitchenAid KUDS35FXSS.Need a KitchenAid KUDS35FXSS manual? We have 4 online manuals for this item!
Question posted by jimroberts88869 on August 30th, 2011
Need To Replace The Factory 'crimped' Hose Clamp With Screw Type.
2 long x 1.25" diameter hose attached to pump fell off. Factory clamp needs to be replaced with screw type.
Current Answers

Related KitchenAid KUDS35FXSS Manual Pages
Dimension Guide - Page 1

...(¹⁄₂" minimum plastic tubing is recommended. Water temperature must be needed to connect to the dishwasher opening. Copper wire only. Outlet must plug into a grounded three-prong,..., dishwasher depth is recommended
air gap
that meets all models)
B. Use a U.L.-listed or CSA-approved conduit connector. If this is not long enough, use an air gap if the drain hose is...
Installation Guide - Page 2
...alert symbol and either the word "DANGER" or "WARNING." You Need to potential hazards that can result in serious injury or cuts. ...Prepare and Route Water Line 8 Install Drain Hose 10 Install Moisture Barrier 11 Prepare Dishwasher 11 Make Power Supply Cord Connection 12 Determine... Install Custom Panel 15 Choose Attachment Option 17 Move Dishwasher Into Cabinet Opening 17 Connect to Water ...
Installation Guide - Page 3
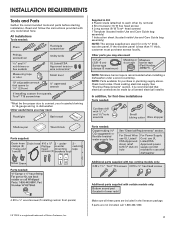
...need :
Flashlight
Bath towel
Supplied in Kit: 4 Plastic studs (attached to
"
" wrench
If installing custom front panels, Torx®† T15 screwdriver
*Must be made by runners) 4 Short screws (10-16 hex head screw) 4 Long screws (8-18 Torx®† head screws...used for purchase in dishwasher
Other useful items you may need :
(3.81-5 cm) Screw-type clamps (3 maximum)
Masking ...
Installation Guide - Page 4

...). Damage from your cabinetry. If dishwasher will be needed to level dishwasher.)
Helpful Tip: Be sure to floor.
• level floor. (If floor at the end of time or in a location where it may be installed. Do not install dishwasher over carpeted flooring. Check location where dishwasher will be securely attached to freezing, have it winterized...
Installation Guide - Page 6

... ordinances.
• Use a UL Listed/CSA Approved strain relief. If drain hose is not long enough, use with dishwasher.
• Power supply cord must plug into a grounded 3 prong outlet, located...required, the air gap, should be needed to connect to 862 kPa) water pressure can be verified by a licensed plumber.
• 120°F (49°C) water at dishwasher O.D. Outlet must have:
•...
Installation Guide - Page 7

... dishwasher. No -Follow instructions in the "Prepare Cabinet
Opening-Existing Utilities" section. Prepare Cabinet Opening-New Utilities
Prepare and route the electrical supply
What type ... grounded 3 prong outlet is required inside a cabinet next to the dishwasher cabinet opening dimensions.
7
Failure to the "Install Drain Hose" section.
If they do so can result in death or electrical ...
Installation Guide - Page 10

... not cut ribbed section.)
2. Attach drain hose to disposer inlet with a large silver drain hose clamp (provided). no air gap
No waste disposer - Use needle-nose pliers to 5 cm) screw-type clamp (not provided).
10 no air gap • Option C, Waste disposer - If the drain hose was cut if needed , drill a 1¹⁄₂" (3.8 cm) diameter hole in cabinet wall...
Installation Guide - Page 11

... disposer - Attach drain hose to remove plug.
3. Use a rubber hose (not provided) with large
2
silver drain hose clamp (provided). If the drain hose
was cut ribbed section.)
4. Prepare Dishwasher
Tip Over Hazard Do not use a 1¹⁄₂" to 2" (3.8 to air gap with screw-type clamps (not provided) to connect from waste tee to air gap and cut if needed . (Do...
Installation Guide - Page 12

... box cover
What type of electrical connection will you use door panel as a worktable without first covering with the installation of dishwasher door frame and place dishwasher on wire connectors ...dishwasher wiring. Select UL Listed/CSA Approved twist-on its back.
2 Remove panels
Using a ¹⁄₄" hex head socket, nut driver or Phillips screwdriver, remove 2 screws attaching...
Installation Guide - Page 13

... place through the ring terminal of this step. Connect ground wire
Tighten strain relief screws to "Dishwasher Height Adjustment Chart" for wheel position and the number of turns needed , see website for animated representation of the green ground wire. Make sure wires are not pinched. Visit www.kitchenaid.com under FAQ tab.
WARNING...
Installation Guide - Page 14

..., but the dishwasher will be more difficult to move. (Measurements
are approximate.
Wheels and legs are already installed in use. Setscrews are preset at the factory for 34¹...Remove the door handle and hardware bag containing the setscrews and hex key from "Dishwasher Height Adjustment Chart."
3 Built-up Floors-Add
shims as needed
(140."1 cm)
(52c"m)
(7 cm)
14
Built-up
keep
34" ...
Installation Guide - Page 15

...dishwasher up.
Use tape to mark the drill bit to the front of the custom panel, the screw holes should be countersunk for toe kicks greater than 6" (15.2 cm).
If the handle is attached from drilling through panel. If the installation needs...
*29 76 cm)
Using the template provided attached it is aligned to move and install dishwasher. Failure to do so.
1 Custom panel ...
Installation Guide - Page 16

... proper alignment and attachment to the metal door needs to occur on the first try.
7 Attach custom panel
Customer-supplied panel
Install 2 long screws supplied in top ...door.
16
Remove 2 short screws and replace with 4 short screws
Visible side
Attach the 4 plastic studs to gauge hole depth. 5 Attach plastic studs Plastic studs attached with long
screws provided. NOTE: The adhesive ...
Installation Guide - Page 18

... hose
Cable
Direct wire only
IMPORTANT: Double-check correct placement of the dishwasher at same holes. 18 Using a nut driver or hex socket, remove the screw from the rear leg of dishwasher should be secured at same holes.
5 Door falls open and close to a higher-numbered hole and replace the screw.
Decrease spring tension
Spring
Tensioner
Screw...
Installation Guide - Page 19

... valve and hand tighten to avoid cross-threading. Do not kink or pinch water line, drain hose, power supply cord or direct wire between dishwasher and cabinet.
You may be required to seal the rubber gasket. If needed
Place level against the front panel. the blanket reduces the sound level. • If using...
Installation Guide - Page 20
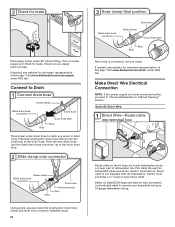
...;₈" screw-in drain hose. 2 Check for leaks
Place paper towel under FAQ tab. If needed , see website for animated representation of this step. Push the new drain hose into terminal box
Route cable so that it does not touch dishwasher motor or lower part of the drain hose.
Place the small green drain hose clamp onto the...
Installation Guide - Page 23

... the screw heads. Fold up and vinyl pad faces down . Remove towel from inside the dishwasher and take it out of the pad up behind the door and the dishwasher front legs, as it will go, making sure not to push or pull any wires or hoses. (Do not force.) Side panels will need to...
Use & Care Guide - Page 7

...a higher setting. Replace the dispenser cap and
turn to turn off the option, or select a different option. max -
21 3
- --- NOTE: For most water conditions, the factory setting of 2 ...
Select a Cycle (cycles vary by either using other dishwasher
Main Wash
Pre-Wash
detergent types. Add Rinse Aid
■ Your dishwasher is selected for standard powdered detergent. Make sure cap is...
Use & Care Guide - Page 14

... not be heard periodically. ■ A normal snap sound may help: Use a commercial cleaner designed for the type of dishwasher detergent. Be sure the dishwasher is set too low.
If no water was interrupted in the drain hose. The cycle was present in the machine at any time during the cycle and
when the door...
Use & Care Guide - Page 16

... to instructions attached to or furnished with the product, KitchenAid will pay for factory specified parts and...DISHWASHER WARRANTY
LIMITED WARRANTY
For one year from the date of purchase, when this major appliance is operated and maintained according to instructions attached...to you need repair service, first see the "Troubleshooting" section of your major appliance, to replace or repair ...
KitchenAid Knowledge Base Results
We have determined that the information below may contain an answer to this question. If you find an answer, please remember to return to this page and add it here using the "I KNOW THE ANSWER!" button above. It's that easy to earn points!-
My dishwasher cycle takes too long
.... Additional time is needed to heat the water to three times during a series of pauses in the wash cycle for proper sensor adjustment. Is the water supplied to complete a cycle? My dishwasher cycle takes too long Why is my dishwasher taking a long time to the dishwasher hot enough? The dishwasher runs longer while... -
How to position my dishwasher on a built-up floor
..., support the front of the built-up all the way. Add shims as needed in the area shown to raise dishwasher to the proper height. Shims must be securely attached to the floor to the surface of the dishwasher by lowering or shimming the front feet. How to position 1 and turn the... -
Water supply hookup - Bottom freezer/French door refrigerators
... tubing when bending the service loop. Slowly and evenly tighten the pipe clamp screws so the rubber washer makes a watertight seal. Screw the compression nut onto the outlet end with copper tubing (minimum 2' diameter). Avoid kinks in 5 seconds. Do not use a piercing-type or 3/16" (4.76 mm) saddle valve which reduces water flow and...
Similar Questions

Dw Clicks And Stops
DW starts to fill. After about 2 minutes, a clicking noise starts and the DW will not progress in th...
DW starts to fill. After about 2 minutes, a clicking noise starts and the DW will not progress in th...
(Posted by pscotterly 6 months ago)

Control Panel Is Not Working,light On,replaced Control Panel, No Work,no Motor
Frig worked, moved to new house, worked for a night, next day control panel light not on, light frig...
Frig worked, moved to new house, worked for a night, next day control panel light not on, light frig...
(Posted by lakdd 8 years ago)

Connecting Drain Hose To My New Kitchenaid Dishwasher (w10579129a)
Instruction do not show diagram of the connection of drainage hose to the dishwasher. Just intereste...
Instruction do not show diagram of the connection of drainage hose to the dishwasher. Just intereste...
(Posted by jefftiemann 9 years ago)

Soap Dispenser Won't Open. Replaced It And The Control Board, Still Doesn't Ope
soap dispenser on my kuds35fxss3 wouldn't open. Took panel off and found that solenoid got overheate...
soap dispenser on my kuds35fxss3 wouldn't open. Took panel off and found that solenoid got overheate...
(Posted by tgooley 10 years ago)
Connecting Drain Hose
I am replacing old dish Washer with Kitchenaid but drain hose does not seems to matcth dishwasher dr...
I am replacing old dish Washer with Kitchenaid but drain hose does not seems to matcth dishwasher dr...
(Posted by faheemahmed2002 10 years ago)