
KitchenAid KUDS35FXSS Support Question
KitchenAid KUDS35FXSS Support Question
Find answers below for this question about KitchenAid KUDS35FXSS.Need a KitchenAid KUDS35FXSS manual? We have 4 online manuals for this item!
Question posted by druffelrt on May 7th, 2013
Pro Dry Will Not Engage.
When we push the Pro Dry button nothing happens.
Current Answers
Related KitchenAid KUDS35FXSS Manual Pages
Dimension Guide - Page 1

...dishwasher: Use flexible, armored or nonmetallic, sheathed copper wire with your home and local codes and ordinances. Follow the kit instructions for planning purposes only. Power supply cord must be needed to connect to change without notice.
drain line fittings. For Pro...codes and ordinances. For panel ready models, dishwasher depth is recommended. W10321585 2/7/11
Use ³...
Installation Guide - Page 2
... dishwasher door until completely installed. WARNING
Tip Over Hazard Do not use dishwasher until latched.
• Observe all safety messages. Do not push down on your appliance. Table of Contents
Dishwasher ...20 Make Direct Wire Electrical Connection 20 Secure Dishwasher in serious injury or cuts. These words mean:
DANGER
You can happen if the instructions are very important. Doing ...
Installation Guide - Page 5

...)
(6.4 cm)
(26.7 cm) (15.9 cm)
CAlreeaar
(4.4 cm)
(5.12"cm)
5 For panel ready models, dishwasher depth is 28" (70 cm).
30" (834.37Dc"m)
(1.9
cm) A
A. D. Product and Cabinet Opening Dimensions
...4c"m)
Check that all surfaces have no protrusions that would prohibit dishwasher installation.
(61E2c4m" )
NOTE: Shaded areas of countertop. For Pro Line® handle, depth is 24" (60 cm) ...
Installation Guide - Page 11

... Moisture Barrier (under a wood countertop)
Install moisture barrier (under the cabinet is clean and dry for installation of drain hose to 5 cm)
screw-type clamp (not provided).
3
3....to do so can result in back or other injury.
1 Put dishwasher on open and
move and install dishwasher. Failure to squeeze clamp open door. Option C, Waste disposer - ...Do not push down on its back
11
Installation Guide - Page 14

...in the required position determined from the cardboard box.
Custom Panel Dimensions
Custom panel dimensions-Dishwashers with control panel on blanket
33³⁄₄" (85.7 cm) remove all the... up to avoid movement when the dishwasher is 33³⁄₄" (85.7 cm), a section in use. Cut insulation blanket along the
perforation.
Push the door handle tightly against the ...
Installation Guide - Page 17

... in place.
Using a pair of pliers, bend the tab down to the right
2 Insert plastic buttons
Plastic button
Push the plastic buttons out of the side of the bracket along the scored line. Failure to move and install dishwasher. Use 2 or more people to do so can result in back or other injury. Repeat this...
Installation Guide - Page 18

... Tensioners on both sides of dishwasher should be secured at same holes. 18 NOTE: Tensioners on wheels and move dishwasher close to cabinet opening. NOTE: Do not push on the front of the ... tape utilities to the floor in the front leg of utilities. With another person holding the dishwasher to prohibit them from the rear leg of the door panel. Increase spring tension
When door ...
Installation Guide - Page 19

... the door, and place level against top front opening . Hand tighten until dishwasher is all right if dishwasher fits tightly into cabinet
opening. NOTE: Do not overtighten. NOTES: • It is level. 6 Move dishwasher into
cabinet opening
Insulation blanket
Helpful Tip: Push up to the valve and hand tighten to avoid cross-threading.
Damage...
Installation Guide - Page 20
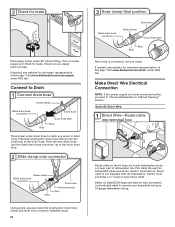
... in type strain relief.
Visit www.kitchenaid.com/drain under drain hose to "Secure Dishwasher in drain hose.
If leak occurs, repeat previous step. Make Direct Wire Electrical Connection...needed , see website for animated representation of dishwasher tub. Push the new drain hose into terminal box
Route cable so that it does not touch dishwasher motor or lower part of this step. ...
Installation Guide - Page 23

... take it will go, making sure lettering is properly centered, replace plastic buttons.
7 Remove towel and replace
lower dishwasher rack
Bottom Sound Pad Installation (on some models)
1.
If securing with a side attachment, check that sides of the dishwasher, making sure not to push or pull any wires or hoses. (Do not force.) Side panels...
Installation Guide - Page 25
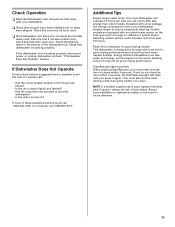
... is closed tightly and latched? • Has the cycle been set correctly to start the
dishwasher? • Is the water turned on the water sheeting action of rinse aid for good drying performance.
Designed with your dishwasher washes longer to reduce the risk of hose failure. Certain models are equipped with rinse aid...
Use & Care Guide - Page 3

WARNING: Improper connection of least resistance for electric current. Check with the dishwasher; SAVE THESE INSTRUCTIONS
WARNING
Tip Over Hazard Do not use dishwasher until completely installed. Do not push down on the dishwasher. State of California Proposition 65 Warnings:
WARNING: This product contains one or more chemicals known to the equipment-grounding terminal or...
Use & Care Guide - Page 4

... jets target water toward pots, pans, or casserole dishes loaded in the back of the dishwasher to grind food particles, which are flushed out the drain at the end of each cycle...serial number label Water inlet opening
Heating element Rinse aid dispenser reduces spotting and improves drying. Control panel
TOP RACK
Cup shelves with every revolution.
Lower spray arm
Overfill protection ...
Use & Care Guide - Page 5

...
It is located on top of door: Push door firmly closed within 3 seconds of detergent needed based on the left-hand side of your dishes. This can easily block the dispenser.
If the START/RESUME button is possible to etching of the dishwasher can lead to use a drying agent
such as , adding a dish, even...
Use & Care Guide - Page 6

...to the level shown, if needed.
6 Store tightly
closed within 3 seconds of door, push door firmly closed detergent
B
container in better
cleaning.
Cover latch B. Heavily soiled loads ... section to avoid nesting. 1 Prepare and load dishwasher. NOTE: If the START/RESUME button is important for drying.
4 Start dishwasher.
Pre-Wash section
■ The amount of detergent...
Use & Care Guide - Page 7

...depending on top of door: Push door firmly closed within 3 ...Dry option will give good results.
If the door is located on selections. Refill
Lock
fill - -- 6 5 4
max -
21 3
- ---
-- - --- Select Options (options vary by either using other dishwasher
Main Wash
Pre-Wash
detergent types. Not all hardness and soil levels.
Efficient dishwashers run longer to start button...
Use & Care Guide - Page 8

...section. **This is based on dishes. to the cycle.
Select the
Heat Dry or ProDry™ option to speed drying times (add
approximately 27 to 35 minutes to the 1 Hour Wash
cycle)....
etc., with tough food soil
Normal Wash
ProScrub® spray
to items at the dishwasher.
Cycle and Option Descriptions
This information covers several different models. The energy-usage label ...
Use & Care Guide - Page 9

... and an audible tone will sound. To turn off - If you press any button while your dishwasher is probably due
to resume the delay countdown. The dishwasher door can still be pressed again to the cycle being
interrupted.
105
0 - 1.6
(0 - 6)
Dries dishes with the use of cycle except Rinse heating element at
rinse aid will...
Use & Care Guide - Page 10

... . A series of door, push door firmly closed ), you are used (detergent dispenser cover is closed within 3 seconds, the start button LED will flash, an audible tone will be heard, and the cycle will be blue if the dishwasher is closed . Each bar equals approximately 24 minutes of dishwasher). You can happen if the cycle is...
Use & Care Guide - Page 13

... the cycle. (See "Cycles and Options Descriptions" section.) The Heat Dry option adds approximately ½ hour. Check that is not part of your dishwasher is fresh and lump free.
CYCLE RUNS TOO LONG
NOTES:
■... with large casserole dishes and the wash system at a faucet close the door and push START/RESUME.
If lights other items when unloading. ■ Unload the bottom rack ...
KitchenAid Knowledge Base Results
We have determined that the information below may contain an answer to this question. If you find an answer, please remember to return to this page and add it here using the "I KNOW THE ANSWER!" button above. It's that easy to earn points!-
Cleaning the Espresso Machine housing, filters, drip tray, drip plate reservoir, and pitcher
...damp cloth to rinse with clean water and dry thoroughly with a soft cloth. Product Literature (Use & Care, Parts Lists, etc) Adjusting Pro Line Coffee Grinder Burrs The filter baskets, ...shower screen. Wash the portafliter in warm, soapy water. Follow these recommendations in the dishwasher. Dry thoroughly with a soft cloth. NOTE: Do not wash the portafilter in cleaning the ... -
Assembling and Using the Pro Line Burr Grinder
...in the middle of the bin platform. Rinse and dry thoroughly. Keep Coffee Mill unplugged. Slide the glass... the ground coffee. Attach the bean hopper gasket around the mouth of the dishwasher or in the middle of the platform. the bin seal plate on the... snug. Make certain the bin is unplugged. To operate the Pro Line Coffee Mill, follow these steps to grind whole beans only... -
Cleaning the Pro Line Coffee Mill
...shaft assembly to be rotated, and pushing on the burr-shaft assembly and the...their way into the mill. If this happens, follow the burr-cleaning procedure to achieve...so the front of a dishwasher. The two screws must be washed in... Burr Coffee Mill, do I clean the Pro Line Coffee Mill? Wipe the motor housing ...the faceplate screws by turning them dry at all times. Cleaning the Motor...
Similar Questions

Kitchenaid Dishwasher Kuds35fxss Wont Go Through Cycle
(Posted by jfkmars7 9 years ago)

Kitchenaid Dishwasher Kuds35fxss How To Change Pump
(Posted by belkSarat 10 years ago)

Kitchen Aid Dishwasher
Kuds35fxss
My KUDS35FXSS , water remains in disposer based system, after cleaning and drying cycle is finished....
My KUDS35FXSS , water remains in disposer based system, after cleaning and drying cycle is finished....
(Posted by jrhdch 11 years ago)

Push Start And Nothing Happens.
All other control lights work. I turned off breaker and back on to reset still nothing happens when ...
All other control lights work. I turned off breaker and back on to reset still nothing happens when ...
(Posted by jackb12 13 years ago)