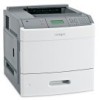
Lexmark T650 Support Question
Lexmark T650 Support Question
Find answers below for this question about Lexmark T650.Need a Lexmark T650 manual? We have 9 online manuals for this item!
Question posted by rezaMoo on October 10th, 2013
Lexmark T650 How To Remove A Jam Paper
The person who posted this question about this Lexmark product did not include a detailed explanation. Please use the "Request More Information" button to the right if more details would help you to answer this question.
Current Answers
Related Lexmark T650 Manual Pages
Clearing Jams Guide - Page 1

... remove trays while the printer is printing. • Do not load trays, the multipurpose feeder, or the envelope
feeder while the printer ...paper or envelopes. • Push all jammed paper from the paper path and then press .
Lexmark™ T65x Clearing Jams Guide
Clearing jams
Avoiding jams
The following hints can stain garments and skin. Load them . • Do not load too much paper...
Clearing Jams Guide - Page 2

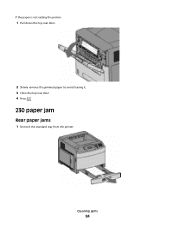
... the risk of the printer might be hot. If the paper is not exiting the printer: 1 Pull down .
4 Remove the jammed paper. 5 Close the bottom rear door. 6 Insert the standard tray. 7 Press .
2 Slowly remove the jammed paper to avoid tearing it. 3 Close the top rear door. 4 Press .
2 Note: If the paper is exiting the printer, then pull the paper out, and then...
Clearing Jams Guide - Page 3

Front paper jams
1 Remove the standard tray from the printer. 2 Remove the duplex jam access tray.
3 Remove the jammed paper. 4 Insert the standard tray. 5 Press .
2 Remove the jammed paper. 3 Close the rear duplex door. 4 Press .
3 Front paper jams
1 Remove the standard tray from the printer. 2 Push the tab down.
231-239 paper jams (optional external duplex unit)
Rear paper jams
1 Push in ...
Clearing Jams Guide - Page 4

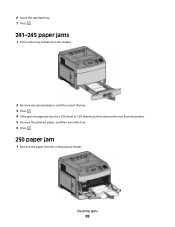
... on the display.
250 paper jam
1 Remove the paper from the multipurpose feeder.
4 Remove the jammed paper. 5 Replace the duplex jam access tray. 6 Insert the standard tray. 7 Press .
2 Remove any jammed paper, and then insert the tray. 3 Press . 4 If the jam message persists for a 250-sheet or 550-sheet tray,
then remove the tray from the printer. 5 Remove the jammed paper, and then insert the...
Clearing Jams Guide - Page 5

... stack the envelopes. 6 Load the envelopes in the envelope feeder. 7 Adjust the paper guide. 8 Lower the envelope weight. 9 Press .
2 Remove the jammed paper.
3 Close the StapleSmart II Finisher door. 4 Press .
281 paper jam
1 Clear the jam from the printer.
For more information, see "200 and 201 paper jams" on page 1. 4 Reinstall the envelope feeder. the bottom envelope will have to...
Troubleshooting Guide - Page 4

... and hold and the right
arrow button while turning the printer on the multipurpose feeder. Hard disk with the 5-bin mailbox, or go to www.lexmark.com/publications to the correct positions for the paper size loaded.
Clear jammed paper from a fresh package. • Store paper in the tray or on . 3 Release both buttons when Performing...
User's Guide - Page 66

...-related information can negatively affect paper handling.
latex inks might not. Selecting paper
Using appropriate paper prevents jams and helps ensure trouble-free ...laser printers:
• Chemically treated papers used to successfully print on these requirements;
Fiber content
Most high-quality xerographic paper is usually indicated on
the paper package.
• Do not use paper...
User's Guide - Page 72

... for laser printers. • Print samples on the letterhead being considered for use before buying large quantities. • Before loading letterhead, fan the stack to match the loaded paper, or...For information on how to load letterhead, see "Avoiding jams" on page 81 and "Storing paper" on a specific paper type, adjust the paper type setting to prevent sheets from sticking together. •...
User's Guide - Page 73

...; Use envelopes designed specifically for laser printers. When printing on the transparencies.... recommend Lexmark part number 12A5010 for A4-size transparencies and Lexmark part ...jams, do not use before buying large quantities. - "Loading the multipurpose feeder" on page 59
Tips on using envelopes
Print samples on transparencies:
• Feed transparencies from 90 g/m2 (24 lb bond) paper...
User's Guide - Page 74

...
When printing on the card stock being considered for laser printers.
Partial sheets may significantly affect the print quality and cause jams or
other paper handling problems.
• Check with adhesive, and ... is not possible, remove a 1.6-mm (0.06-in .) of the edge of the label, of the perforations, or between die-cuts of the adhesive at www.lexmark.com/publications. Print samples...
User's Guide - Page 81

..., string ties, or folding bars - Have postage stamps attached - Have bent corners - Avoiding jams
The following hints can help you avoid jams.
Paper tray recommendations
• Make sure the paper lies flat in the tray. • Do not remove trays while the printer is printing. • Do not load trays, the multipurpose feeder, or the envelope...
User's Guide - Page 82

Open doors and covers and remove trays to access jam locations.
Jam numbers 200-203, 230 231-239 241-245 250 260 271-279 280-282 283
Area Printer Optional external duplex unit Paper trays Multipurpose feeder Envelope feeder Optional output bins StapleSmart II Finisher Staple cartridge
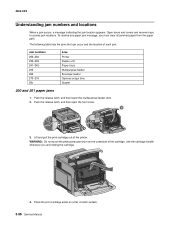
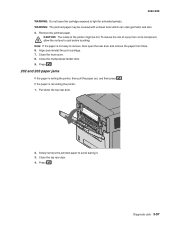
200 and 201 paper jams
1 Push the release latch, and then...
User's Guide - Page 83

... print cartridge aside on a flat, smooth surface. Note: If the paper is exiting the printer, then pull the paper out, and then press . To reduce the risk of the printer might be covered with unfused toner which can stain garments and skin.
5 Remove the jammed paper. Clearing jams
83 Warning-Potential Damage: Do not leave the cartridge exposed...
User's Guide - Page 84
If the paper is not exiting the printer:
1 Pull down the top rear door.
2 Slowly remove the jammed paper to avoid tearing it. 3 Close the top rear door. 4 Press .
230 paper jam
Rear paper jams
1 Remove the standard tray from the printer.
Clearing jams
84
User's Guide - Page 86
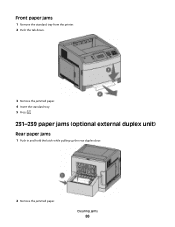
Front paper jams
1 Remove the standard tray from the printer. 2 Push the tab down.
3 Remove the jammed paper. 4 Insert the standard tray. 5 Press .
231-239 paper jams (optional external duplex unit)
Rear paper jams
1 Push in and hold the latch while pulling up the rear duplex door.
2 Remove the jammed paper. Clearing jams
86
User's Guide - Page 87

3 Close the rear duplex door. 4 Press .
Clearing jams
87
Front paper jams
1 Remove the standard tray from the printer. 2 Remove the duplex jam access tray.
3 Raise the recessed duplex bar.
4 Remove the jammed paper. 5 Replace the duplex jam access tray.
User's Guide - Page 88
... standard tray. 7 Press .
241-245 paper jams
1 Pull out the tray indicated on the display.
2 Remove any jammed paper, and then insert the tray. 3 Press . 4 If the jam message persists for a 250-sheet or 550-sheet tray, then remove the tray from the printer. 5 Remove the jammed paper, and then insert the tray. 6 Press .
250 paper jam
1 Remove the paper from the multipurpose feeder. Clearing...
Service Manual - Page 1

Edition: September 17, 2009
Lexmark™ T650, T650n, T652dn, T654dn & T656dne Printer 4062-XXX
• Table of contents • Start diagnostics • Safety and notices • Trademarks • Index
Lexmark and Lexmark with diamond design are trademarks of Lexmark International, Inc., registered in the United States and/or other countries.
Service Manual - Page 308
... 28x
Area
Printer Duplex unit Paper trays Multipurpose feeder Envelope feeder Optional output bins Stapler
200 and 201 paper jams
1. 4062-XXX
Understanding jam numbers and locations
When a jam occurs, a message indicating the jam location appears. Push the release latch, and then open the front cover.
4
2
3
1
3.
Open doors and covers and remove trays to access jam locations. WARNING...
Service Manual - Page 309
... which can stain garments and skin. 5. Pull down the top rear door.
2. Remove the jammed paper.
Slowly remove the jammed paper to light for extended periods. CAUTION: The inside of injury from there. 6. Press .
202 and 203 paper jams
If the paper is not exiting the printer: 1.
WARNING: The jammed paper may be hot. Close the top rear door. 4. Press . Note: If...
Similar Questions

How Do I Remove Jammed Paper From A Lexmark E210 Printer!
Can't Remove Paper
Can't Remove Paper
(Posted by larryshuto 7 years ago)


Why Is My Lexmark T650 Getting A Paper Jam Error Then States Defective
cartridge
cartridge
(Posted by stansloruss 10 years ago)

Where Is The Sensor Located On A Lexmark T650 For A Paper Jam
(Posted by Jabobfis 10 years ago)