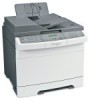
Lexmark X544 Support Question
Lexmark X544 Support Question
Find answers below for this question about Lexmark X544.Need a Lexmark X544 manual? We have 8 online manuals for this item!
Question posted by joinjure on December 24th, 2013
How To Clear A Paper Jam Message Lexmark X544
The person who posted this question about this Lexmark product did not include a detailed explanation. Please use the "Request More Information" button to the right if more details would help you to answer this question.
Current Answers
Related Lexmark X544 Manual Pages
User's Guide - Page 6

... memory device...111 Understanding scan to computer options...112
Sides (Duplex) ...112 Darkness...112
Improving scan quality...112 Using the Scan Center software...112
Understanding the Scan Center features...112
Using the ScanBack utility...113
Using the ScanBack Utility...113
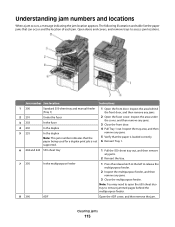
Clearing jams 114
Avoiding jams...114 Understanding jam numbers and locations...115 200 paper jam...116 201 paper jam...
User's Guide - Page 9

Paper frequently jams ...219 Paper jam message remains after jam is cleared ...219 Page that jammed does not reprint after you clear the jam 219
Solving print quality problems...220
Blank pages...220 Characters have jagged or uneven edges ...220 Clipped images...221 Dark lines ...221 Gray background ...221 ...
User's Guide - Page 45

... is ready to 16 consecutive pages of a multiple-page document onto one side of a single sheet of paper by selecting a setting from the Print dialog or the Lexmark Toolbar to see "Avoiding jams" on page 114. Off
Use factory default settings for accuracy
Before printing or making multiple copies of a document:
• Use...
User's Guide - Page 115
... list the paper jams that the paper being used for a duplex print job is loaded correctly. 6 Reinsert Tray 1.
6 242 and 243 550-sheet tray
1 Pull the 550-sheet tray out, and then remove
any jams.
2 Reinsert the tray.
7 250
In the multipurpose feeder
1 Press the release latch to the left to access jam locations. Clearing jams
115...
User's Guide - Page 116

...: The inside of injury from a hot component, allow the surface to open it.
Clearing jams
116 To reduce the risk of the printer might be hot.
Note: Make sure all paper fragments are removed.
3 Insert the tray. 4 Press .
201 paper jam
1 Grasp the front door at the side handholds, and then pull it toward you...
User's Guide - Page 117

..., allow the surface to open it. Clearing jams
117
Notes:
• Make sure all paper fragments are removed. • There may be hot. To reduce the risk of the printer might be a second sheet jammed if 200.xx Paper Jam and 202.xx Paper Jam appear. 3 Close the front door. 4 Press .
202 paper jam
1 Grasp the front door at the...
User's Guide - Page 119

Clearing jams
119
Note: The optional 550-sheet tray is too short for the duplex unit.
1 Grasp the front door at the side handholds, and then pull it toward you to open it . 2 Remove the jam. 3 Load the tray with the correct paper size (A4, letter, legal, folio). 4 Insert the tray. 5 Close the front door...
User's Guide - Page 120
Clearing jams
120
Note: Make sure all paper fragments are removed.
3 Insert the tray. 4 Press .
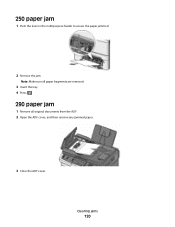
290 paper jam
1 Remove all original documents from the ADF. 2 Open the ADF cover, and then remove any jammed paper.
3 Close the ADF cover. 250 paper jam
1 Push the lever in the multipurpose feeder to access the paper jammed.
2 Remove the jam.
User's Guide - Page 172

....yy Paper jam
1 Clear the paper path. 2 Press to clear the message and continue printing.
201.yy Paper jam
1 Clear the paper path. 2 Remove the jammed paper below the fuser. 3 Press to clear the message and continue printing.
202.yy Paper jam
1 Clear the paper path. 2 Remove the jammed paper from the fuser. 3 Press to clear the message and continue printing.
230.yy Paper jam
1 Clear the paper...
User's Guide - Page 173

... then close the front door. 5 Press to clear the message and continue printing.
290-292 ADF Scanning Jams
The scanner failed to feed one or more than one jam, the message indicates the number of pages jammed.
250.yy Paper jam
1 Clear the paper path. 2 Open the front door, and then remove the jammed paper. 3 Hold the fuser cover down, and then...
User's Guide - Page 174

... make sure it is installed properly. To clear this jam:
1 Remove all pages from the ADF. 2 Turn the printer off , wait about 10 seconds, and then turn the printer back on the cyan toner cartridge to start a color job.
840.01 Scanner Disabled
This message indicates that the scanner has been disabled by...
User's Guide - Page 209

...appears, and then press . Try one or more of the following:
CHECK THE DISPLAY FOR ERROR MESSAGES
Clear any obstruction keeping the scanner unit open. 3 Close the scanner cover.
Solving copy problems
Copier does... not respond
These are no obstructions:
1 Open the scanner cover. 2 Remove any error messages. CHECK THE POWER
Make sure the printer is plugged in, the power is on, and Ready...
User's Guide - Page 213

... available: FSK (pattern 1) and DTMF (pattern 2). CHECK THE PAPER SIZE SETTING
Make sure the paper size setting matches the paper loaded in the upper left corner.
Contact your telephone line is subscribed... availability of these settings by way of the following :
CHECK THE DISPLAY FOR ERROR MESSAGES
Clear any error messages. Try one or more of the Fax menu depends on , and Ready appears....
User's Guide - Page 214

... DISPLAY FOR ERROR MESSAGES
Clear any error messages. Certain devices can be connected to the printer so that digital telephone services can be used by another device, then wait until the other device is finished before...
CHECK THE POWER
Make sure the printer is plugged in, the power is an analog device. For more information and to request an R-interface port, contact your DSL provider.
&#...
User's Guide - Page 215

.... 2 Scan the original document one or more of the following:
CHECK TO SEE IF THE PAPER TRAY IS EMPTY
Load paper in the TCP/IP section.
2 Click Settings. 3 Click Fax Settings. 4 Click Analog Fax... company's Distinctive Ring service, then keep the Ring Delay setting at a time. CHECK FOR JAMS
Clear any answering machines, computers with modems, or telephone line splitters. If you do not know the...
User's Guide - Page 218

... POWER CORD CONNECTION
Make sure:
• The power cord is installed properly. CHECK THE PAPER GUIDES
Move the guides in the multipurpose feeder. CLEAR ANY JAMS
Clear any jams in the tray to the correct position for paper jams or misfeeds. 3 Make sure paper guides are printing from, select the option. MAKE SURE THE OPTION IS SELECTED
From...
User's Guide - Page 219

...
Move the guides in the tray to the printer system board.
Paper jam message remains after you clear the jam
In the Setup menu, Jam Recovery is set to Auto or On:
1 Press . 2 Press the arrow buttons until Settings appears, and then press . 3 Press the arrow buttons until General settings ...
User's Guide - Page 252

...
150 displayed 172 200 Paper jam 172 201.yy Paper jam 172 202.yy Paper jam 172 230.yy Paper jam 172 235 Paper Jam Check Duplex 172 24x Paper Jam Check Tray 173 250.yy Paper jam 173 250-sheet tray (standard)
loading 50 290-292 ADF Scanning Jams 173 293 Paper Missing 173 293.02 Flatbed Cover Open 173 294 ADF Jam 174 30.yy...
User's Guide - Page 255

... size 49 setting type 49 storing 60 unacceptable 43, 59 Universal Paper Size 131 Universal size setting 49
paper feed troubleshooting message remains after jam is cleared 219
paper jams avoiding 114
Paper Loading menu 129 Paper Size/Type menu 124 paper sizes
supported by the printer 60 Paper Texture menu 126 paper types
supported by printer 61 where to load 61...
User's Guide - Page 257

...76 scanning to a computer 110 improving scan quality 112 scanning to a USB flash memory device 111 scanning to an FTP address creating shortcuts using the
computer 109 using shortcut numbers 109... 214 received fax has poor print quality 216
troubleshooting, paper feed message remains after jam is cleared 219
troubleshooting, print error reading USB drive 206 incorrect margins 222 incorrect or ...
Similar Questions


Em - Jam At Tray 1 Open Door A. No Paper Jam - Message Repeats Tray 2 Works Ok
Lexmark X 560n Error message Jam at Tray 1. Open Door A. When opened there is no paper jammed in sys...
Lexmark X 560n Error message Jam at Tray 1. Open Door A. When opened there is no paper jammed in sys...
(Posted by irowse 12 years ago)