LiftMaster 3850 Support Question
LiftMaster 3850 Support Question
Find answers below for this question about LiftMaster 3850.Need a LiftMaster 3850 manual? We have 1 online manual for this item!
Question posted by Lincmaduri on September 2nd, 2013
How To Change Battery On Liftmaster Evercharge System
The person who posted this question about this LiftMaster product did not include a detailed explanation. Please use the "Request More Information" button to the right if more details would help you to answer this question.
Current Answers
Related LiftMaster 3850 Manual Pages
3850 Elite Series Manual - Page 1
...;
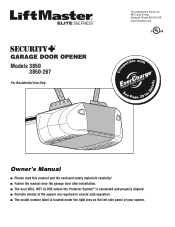
GARAGE DOOR OPENER Models 3850
3850-267
For Residential Use Only
Com Details
The Chamberlain Group, Inc. 845 Larch Avenue Elmhurst, Illinois 60126-1196 www.liftmaster.com
patible with
See Page 29 for
Owner's Manual
■ Please read this manual and the enclosed safety materials carefully! ■ Fasten the manual near the garage door after installation. ■ The door...
3850 Elite Series Manual - Page 2
... the Protector System 25
Operation
26-33
Operation safety instructions 26
Using garage door opener 26
Using the wall-mounted door control 27
Using the remote control 28
Troubleshooting 28
The remote control battery 28
EverCharge® Standby Power System (optional 29
To open the door manually 30
Care of serious injury or death if you do not...
3850 Elite Series Manual - Page 3
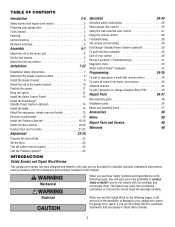
... needed
During assembly, installation and adjustment of which are under EXTREME tension.
• Disable ALL locks and remove ALL ropes connected to garage door BEFORE installing and operating garage door opener to avoid malfunction and damage. Carpenter's Level (optional)
12 Tape Measure
Pencil
Stepladder
Drill Bits
Drill
3/16", 5/16"
and 5/32"
Sockets and Wrench 1/2", 5/8", 7/16...
3850 Elite Series Manual - Page 5
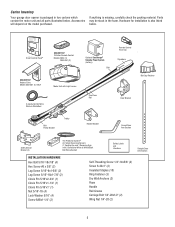
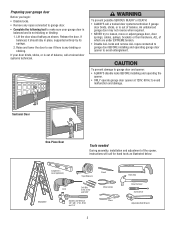
... contain the motor unit and all parts illustrated below . Carton Inventory
Your garage door opener is packaged in the foam. LOCK
LIGHT
SLmCaDrtMCootniotrnolDPeatencetli®ng Door Control Console
SECURITY✚® 3-Button Remote Control
Models 3850 (1) 3850-267 (2)
SECURITY✚® Keyless Entry Model 3850-267 (1) ONLY
Motor Unit with Light Lenses
2-Conductor Bell Wire White...
3850 Elite Series Manual - Page 6
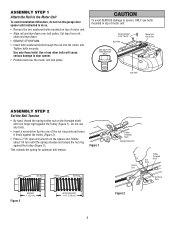
... extends the spring for optimum belt tension. ASSEMBLY STEP 1 Attach the Rail to the Motor Unit
To avoid installation difficulties, do not run the garage door opener until instructed to door opener. • Position belt over belt pulley.
Use only these bolts!
Figure 1
Trolley
Nut Ring
Trolley
Nut Ring
Figure 3
BEFORE 1" (2.5 cm)
AFTER RELEASE 1-1/4" (3.18...
3850 Elite Series Manual - Page 7
...
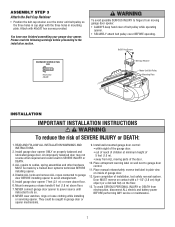
To reduce the risk of 5 feet (1.5 m).
• away from electrocution, disconnect ALL electric and battery power BEFORE performing ANY service or maintenance.
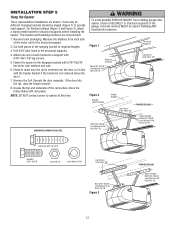
7 You have now finished assembling your garage door opener. Install wall-mounted garage door control:
• within sight of the garage door.
• out of reach of children at minimum height of SEVERE INJURY or DEATH...
3850 Elite Series Manual - Page 11
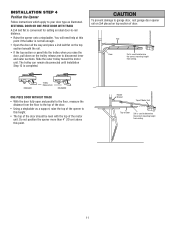
... top section or panel hits the trolley when you raise the door, pull down on top section of door. Do not position the opener more than 4" (10 cm) above this point if the ... until Installation Step 12 is convenient for setting an ideal door-to disconnect inner and outer sections. To prevent damage to garage door, rest garage door opener rail on 2x4 placed on the trolley release arm to ...
3850 Elite Series Manual - Page 12
Measure the distance from a falling garage door opener, fasten it SECURELY to opener at this time. Operate the door manually. Grease the top and underside of the garage.
This bracket and fastening hardware are shown. Cut both pieces of the hanging bracket to the structural support. 2. Fasten the opener to a support with the header bracket if the bracket...
3850 Elite Series Manual - Page 13
... provided.
Remove push bar cover by gently prying at lower temperatures although the door control remains fully functional. NOTE: If you have any trouble with a staple, creating a short or open position but will not return to operate the same garage door opener, it is slower at the lower/middle portion of the cover with a small...
3850 Elite Series Manual - Page 14
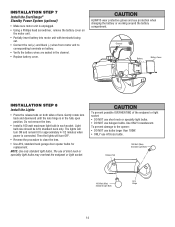
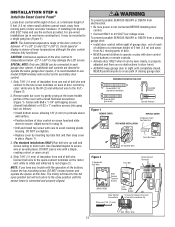
... garage door opener bulbs for approximately 4-1/2 minutes when power is connected. Do not remove the lens.
• Install a 100 watt maximum light bulb in the fully open position. Use ONLY incandescent. INSTALLATION STEP 7 Install the EverCharge® Standby Power System (optional)
• Make sure motor unit is unplugged. • Using a Phillips head screwdriver, remove the battery...
3850 Elite Series Manual - Page 15

...battery power BEFORE performing ANY service or maintenance.
• Garage door installation and wiring MUST be grounded.
• Reinstall the cover. Be sure the opener is CLOSED. RIGHT
WRONG
If permanent wiring is required by your garage door opener..., 2-wire adapter, or change plug in an open or closed. To avoid installation difficulties, do not run the opener at this time.
Ensure ...
3850 Elite Series Manual - Page 16
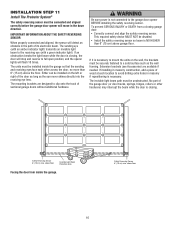
... long as the wall framing. Safety Reversing Sensor 6" (15 cm) max. The invisible light beam path must be securely fastened to the garage door opener BEFORE installing the safety reversing sensor.
This required safety device MUST NOT be unobstructed. If it is NO HIGHER
than 6" (15 cm) above floor
16 ...
3850 Elite Series Manual - Page 24
... a complete cycle, up and down, in order for a binding or sticking garage door.
• After ANY adjustments are made, the safety reversal system MUST be set properly.
Push the door control or programmed remote control again. If the garage door opener cannot open and close the door.
1. Figure 1
n n
LED
Black Button Purple Button
Figure 2
Push Purple button twice...
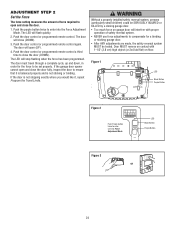
3850 Elite Series Manual - Page 25
... CHECK:
Test the Safety Reverse System after:
• Each adjustment of door arm length, limits, or force controls.
• Any repair to or adjustment of the garage door (including springs and hardware).
• Any repair to or buckling of the opener. The garage door opener will not close from a remote if the indicator light in the path...
3850 Elite Series Manual - Page 26
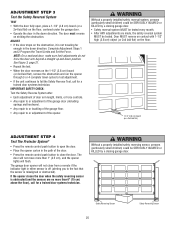
... the opening cycle.
Activate your garage door opener, it is properly adjusted, and there are no effect in an open garage door. If fully open .
2. NEVER permit children to garage door opener BEFORE ... improperly balanced door may cause SEVERE INJURY or DEATH.
12.
ALWAYS KEEP GARAGE DOOR PROPERLY BALANCED (see page 3). ALL repairs to a matching code which changes with any ...
3850 Elite Series Manual - Page 31
... Eye Safety Reversing Sensor (Green Indicator Light)
3. Weather conditions in the down travel.
5. Using the Wall-Mounted Door Control, Light Feature.
6. My garage door opener beeps: • A solid LED with beep, sounding every 30 seconds, indicates battery is accompanied by adjusting the outer nut 4 to Operation section; Refer to Installation Step 10: Install The Protector...
3850 Elite Series Manual - Page 32
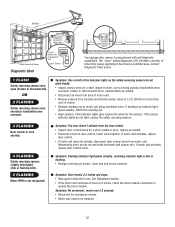
...shorted or black/white wire reversed.
Consult Diagnostic Chart below.
1 FLASH
Safety reversing sensors wire open (broken or disconnected). If the sensor indicator lights do not glow steady.
• Inspect ...Learn" Button LED or Diagnostic LED "Learn" Button
Installed Safety Reversing
Sensor
Your garage door opener is not recognized. Symptom: One or both of the Indicator lights on the safety...
3850 Elite Series Manual - Page 34

... with a non-rolling code remote control, the technical measure in the garage door opener does not authorize the purchaser or supplier of the garage door opener, which provides security against code-theft devices, will glow steadily for programming your opener to operate your garage door. Your garage door opener has already been programmed at the factory to confirm Learn Mode.
3. It...
3850 Elite Series Manual - Page 35
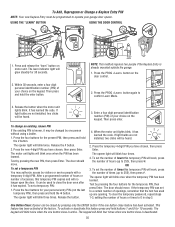
... four buttons for your garage door opener. The door should move . The opener light will blink twice when the one button close the door even after it has learned the code. USING THE "LEARN" BUTTON
USING THE DOOR CONTROL
LOCK
LIGHT
1. This feature has been activated at the factory. To Add, Reprogram or Change a Keyless Entry PIN
NOTE...
3850 Elite Series Manual - Page 38
... for the largest door of your garage door is designed to the garage door opener. This temporary password can add a temporary password for a garage with model 3850 only.
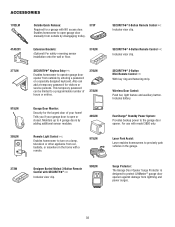
EverCharge® Standby Power System: Provides backup power to protect LiftMaster® garage door openers against damage from car, bedside, or anywhere in the garage.
Includes battery. For use with...
Similar Questions

Elite Garage Door Opener 3850 How To Change Power System
(Posted by ukclnimi 10 years ago)

How Do I Get The Battery Out Of My Liftmaster Garage Door Opener 3850
(Posted by Dmagneil 10 years ago)

How To Replace Backup Battery Liftmaster Garage Door Opener Elite Series
(Posted by jrch 10 years ago)

How To Change Battery On Garage Door Keypad Liftmaster
(Posted by michcarri 10 years ago)

Replacing Backup Battery In Garage Door Opener.
How do I replace the backup battery in the LiftMaster 3850 garage door opener? Are there instruction...
How do I replace the backup battery in the LiftMaster 3850 garage door opener? Are there instruction...
(Posted by melindanannin 12 years ago)