Get support for LiftMaster MT

LiftMaster MT Support Question

LiftMaster MT Support Question

Find answers below for this question about LiftMaster MT.
Need a LiftMaster MT manual? We have 2 online manuals for this item!
Question posted by grindle1302 on December 28th, 2013

My Liftmaster Mt-1211 Will Not Close.

My Mt 1211 will not close. When I pres the close button the system will move approximately one foot, stop and return to the full open position. Please assist.

Current Answers

Answer #1: Posted by TommyKervz on December 28th, 2013 11:14 PM
This answer was accepted by the poster of the original question.
TommyKervz

Member since:
January 10th, 2013

Points: 17,776,803
1,100
points
Greetings.

Why do the lights on my garage door opener flash and my door will not close?

The garage door opener is equipped with two safety features that may prevent the door from closing and cause the lights to flash.

The Lock Button on the Wall Control

The lock button on the wall control may be activated. Press the button to turn this feature off. The light bulb will blink two times. This feature is designed to prompt you that the lock button is activated. When the lock button is ON the garage door opener will work from the wall control but the remote controls are locked out.

The Safety Reversing Sensors

The most common reason for the lights to flash on the garage door opener and the door not closing is that the safety reversing sensors are misaligned or obstructed; this is a safety feature of the garage door opener.

When properly connected and aligned, the sensor will detect an obstacle in the path of its electronic beam. If an obstruction breaks the light beam while the door is closing, the door will stop and reverse to full open position, and the opener lights will flash 10 times.

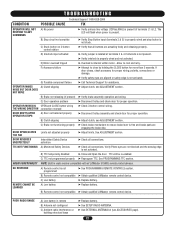
Your garage door opener has a Self-Diagnostic feature. The LED next to the learn button will flash a number of times, and then pause signifying the potential issue.

One (1) flash indicates the sensor wire is shorted. See How do I test or troubleshoot the safety sensor wires?

Two (2) flashes indicate an open, broken, disconnected sensor wire, or the safety sensors are NOT installed. Consult your manual for sensor installation instructions or see How do I test or troubleshoot the safety sensor wires?

Four (4) flashes indicate the sensors are slightly misaligned. See How do I align my safety reversing sensors?

NOTE: The garage door can be closed by pressing and holding the Door Control push bar until down travel is completed.


Hope that is helpful.
Kervz at www.satechhelp.co.za

Related LiftMaster MT Manual Pages

MT5011E Installation Manual - Page 1

INSTALLATION MANUAL MODEL MT5011E/BMT5011E MEDIUM DUTY DOOR OPERATOR RaNdoBiwuoiRlwteiitcnheiver INTENDED FOR PROFESSIONAL INSTALLATION ONLY Visit www.LiftMaster.com to locate a professional installing dealer in your area. 2 YEAR WARRANTY Serial # (located on electrical box) Installation Date Radio Receiver Built on Board 315MHz NOT FOR RESIDENTIAL USE A SAFETY DEVICE IS HIGHLY RECOMMENDED.
MT5011E Installation Manual - Page 3

... includes a number of features that will provide years of the operator is shipped from the factory in the door's path and automatically reverse a closing door. Refer to automatically close after a preset time (only available with B2 wiring and a monitored safety device). • Wiring Types: The functionality of reliable and safe operation. Features: • Supports...
MT5011E Installation Manual - Page 4

...C2 Standard B2 configurable (see Basic Programming section) CONTROL WIRING 16-22 AWG MECHANICAL DOOR SPEED 12" (30.48 cm) / second OUTPUT FORCE 125 ft. BRAKE (... ENTRAPMENT PROTECTION: . . . . Supports both monitored and non-monitored safety devices including LiftMaster CPS photo-eyes and industry standard sensing edges. ENVIRONMENTAL LOCATION Indoor, dry location OPERATING TEMPERATURE 4˚ ...
MT5011E Installation Manual - Page 5

..., be 14'. CARTON INVENTORY Before beginning your installation check that all components were provided. 15 1 14 ^ ^OPEN CLOSE O STOP 8 4 10 9 7 2 12 3 13 11 6 5 ITEM DESCRIPTION QTY 1 Operator 1 2 Track (left & right) Door height plus 2' 2 3 Track Spacers 2 4 Front Idler 1 5 Trolley 1 6 Take-up Bolt 1 7 Chain 1 8 Master Links 2 9 Header Bracket 1 10...
MT5011E Installation Manual - Page 11

... using appropriate fasteners and locking hardware that will support the weight of the garage. Concrete anchors MUST be used if installing ANY brackets into masonry. Lock Nut Washer Bolt (Not Provided) Bolt (Not Provided) 7 Attach door arm to trolley and door AVERTISSEMENT Bolt Nut (Not Provided) ATTENTION Lock Washer Nut Lock Washer Flange...
MT5011E Installation Manual - Page 13

... station. Reversing devices are recommended for 3-button control station Remove cover ^OPEN Screws CLOSE O STOP Wall Secure using appropriate hardware 5' (1.5 m) 3-Button Control Station CAUTION To prevent possible SEVERE INJURY or DEATH, install reversing sensors when: • The radio is used. • The 3-button control station is out of sight of the door. • Or ANY other control...
MT5011E Installation Manual - Page 14

... on the outside of the electrical box. Depress retaining plate Adjust OPEN limit Retaining Plate OPEN Limit Nut OPEN Limit Switch CLOSE Limit Nut AVERTISSEMENCLTOSE Limit Switch ATTENTION Increase Door Travel Adjust CLOSE limit Increase Door Travel Decrease Door Travel AVERTISSEMENT AVERTISSEMENT Decrease Door Travel SAFETY Limit Switch NOTE: When retaining plate is released, verify...
MT5011E Installation Manual - Page 15

... door it is closing , the door will stop and typically reverse to permit smooth operation. • Secure clutch nut with an obstruction while the door is recommended that a safety device (sensing edge or photo eyes) be installed. See Optional Safety Device Configurations for wiring information. 15 Remove Tape Holding Cotter Pin to the full open position. The...
MT5011E Installation Manual - Page 16

...-Eyes with 4-wire sensing edge (White/Black) 4-wire electric sensing edge (White) TTC ^^^^ 1 LEARN STOP CLOSE OPEN LEDD14 2 3 4 LMEP1 LMEP2 COM INTRLK STOP CLOSE OPEN 5 6 7 AUX ANT AUX ANT TTC ^^^^ 1 LEARN STOP CLOSE OPEN LEDD14 2 3 4 LMEP1 LMEP2 COM INTRLK STOP CLOSE OPEN 2-Wire electric or pneumatic sensing edge 2-wire electric or pneumatic sensing edge (White/Black...
MT5011E Installation Manual - Page 17

...AANUT X ANT ^^^^ 7 TTC LEARN STOP CLOSE OPEN LEDD14 1 2 3 4 5 6 7 LMEP1 LMEP2 COM INTRLK STOP CLOSE OPEN 8 9 10 ITEM 1 2 3 4 5 6 7 8 9 10 DESCRIPTION Open Button Close Button Stop Button Learn Button Timer to Close Button Purple Wire Antenna Auxiliary Antenna Connection LED Field Wiring Terminal Factory Wiring Connector FUNCTION Open Door Close Door Stop Door Programs the remote...
MT5011E Installation Manual - Page 18

... Board Photo Eye TO PROGRAM Press and hold the LEARN and STOP buttons until the LED goes out (approximately 3 seconds). The operator will continue to close to close . • Open override that reverses when closing by any monitored safety devices. The operator will go into a Restricted Close mode**. MONITORED SAFETY DEVICE ADVERTENCIA PRECAUCIÓN Sensing Edge RESET TO...
MT5011E Installation Manual - Page 19

... mode. D B2 WIRING TYPE WITH MONITORED SAFETY DEVICE • Momentary contact to open , close and stop . • Open override that reverses when closing by any opening device. • Wiring for safety device to reverse. Press and hold the LEARN and CLOSE buttons until the LED goes out (approximately 3 seconds). BASIC PROGRAMMING B2 WIRING TYPE WITHOUT MONITORED SAFETY DEVICE C Requires...
MT5011E Installation Manual - Page 20

... J2 L5 ^^^^ R27 TTC 1 C18 D14 LEARN STOP CLOSE OPEN LED 2 3 4 5 6 7 K2 LT C29 R24 P1 D9 LMEP1 LMEP2 COM INTRLK STOP CLOSE OPEN LEARN STOP CLOSE OPEN LEDD14 1 2 3 45 67 MEP1 LMEP2 COM INTRLK STOP CLOSE OPEN NOTICE: To comply with door in the operator. The LED will be erased. Press and release the TTC button a second time. 4. Press and release the LEARN...
MT5011E Installation Manual - Page 21

... to allow arm to fully close. 5. Press STOP button. (The door should close to fully close. Press OPEN button. (The door should stop .) 3. Open the door. 2. Remove the obstruction. 5. TEST REMOTE CONTROL * Requires B2 wiring type and compatible LiftMaster remote control. Weak or broken springs or unbalanced door could result in the close direction.) 4. Release handle. Allow...
MT5011E Installation Manual - Page 22

... qualified LiftMaster remote control...OPEN and CLOSE button wiring THE WRONG DIRECTION connection reversed DOOR DRIFTS AFTER OPERATOR STOPS A) Door not balanced properly ➤ Verify brake assembly operation and wiring. ➤ Disconnect trolley and check door for proper operation. ➤ Check 3-button control wiring. ➤ Disconnect trolley assembly and check door for assistance...
MT5011E Installation Manual - Page 23

...assistance. Check clutch adjustment. Call Technical Support for the logic board LED to flash 7 times when power is applied or cycled to install external door interlock. Brown** Brown** Orange Purple Yellow Grey Safety Limit Switch Open Limit Switch Grey Close Limit Switch 23 AANTUX ANT J2 TTC LEARN STOP CLOSE OPEN LED 1 2 3 4 5 6 7 LMEP1 LMEP2 COM INTRLK STOP CLOSE OPEN OPEN...
MT5011E Installation Manual - Page 27

... 65-8202 Commercial Protector SystePmRE®SS: TO OPEN Provides protection on doors up to 30' wide. Key Control Station:...CLOSE CLOSE O STOP 02-109 OPEN CLOSE 3-Button Control Station: Steel enclosure. CPS-LN4 Commercial Protector System®: R ING OPEN Provides protection on doorsRuINpG to 45' wide. OPEN 373LM 333LM OPEN WPB1LM WPB3LM WKP5LM 123 456 789 * 0# 3-Button...
MT5011E Installation Manual - Page 28

... and operation with the Commercial Door Operator. 3 BUTTON STATION OR 3 POSITION KEYSWITCH WITH SPRING RETURN TO CENTER AND STOP BUTTON STANDARD 7635 2 OR MORE 7635 KEY LOCKOUT 7635 Open Close Stop Open Close Stop Open Close Stop Open Close Stop Keyswitch 2 BUTTON STATION OR 3 POSITION KEYSWITCH WITH SPRING RETURN TO CENTER STANDARD 763 763 2 OR MORE Open Close C2 MODE ONLY See note...
MT5011E QuickStart Guide Manual - Page 1

... ALL local electrical codes OPEN CLOSE STOP INTRLK COM LMEP2 LMEP1 Timer to Close Programming Timer to Close feature enables the operator to close the door after a preset time, adjustable from 5 to close from the TTC open cycle. Timer to Close (TTC) Timer To Close Button Timer to Close feature enables the operator to 60 seconds. Requires LiftMaster monitored safety device. Press...
MT5011E QuickStart Guide Manual - Page 2

...MT/BMT door operator IMPORTANT: This QuickStart is intended to the operator terminal block. Connect the arm assembly to open side of the Door Door... slip if the door is obstructed. These instructions are positioned between the limit ...-point. Visit www.LiftMaster.com to stop the door by hand during travel. OPEN CLOSE STOP Arm Assembly Pivot Bolt 1 Approximately 4 Feet Half the...

Similar Questions

I Have Installed A Chamberlan Garage Door Opener And The Remote I Was Using Is
I have been using a Chamberlan garage door opener and its remote has been defective since of late.Pl...
(Posted by donweera42 8 months ago)
Garage Door Opens After Shutting.
My Lift master 8550 inside keypad is Inside wall pad is model #880LM. outside keypad Model # is 877M...
(Posted by BONNIECA92 2 years ago)
How Big Of A Garage Door Will A Model Mt 1211 Lift Weight And Width ?
I have a 13' wide 8' high door. Its a older heavy door. I have a new model MT 1211 I had for a 9' wi...
(Posted by crusin31again 10 years ago)
I Am Having A Hard Time Adjusting The Clutch On The Door Opener Striking A Balan
between having it close properly without retracting automatically and having it retrack when it come...
(Posted by mikerkwd 11 years ago)
Remote Door Opener
How do you reprogram a remote on a liftmaster model MT 5011
(Posted by khanlon 12 years ago)
Ask a New Question
Use the box below to post a new question about this LiftMaster product .
Points & Prizes
  • You can earn points for nearly everything you do on HelpOwl.com
  • You can trade in those points for gift cards at leading retailers such as Amazon.com and Walmart
  • It's that simple!
See How it Works
Create a Free Account

LiftMaster Manuals

Find free LiftMaster MT manuals and user guides available at ManualOwl.com. Try out our unique manual viewer allowing you to interact with manuals from directly within your browser!

LiftMaster Reviews

View thousands of LiftMaster user reviews and customer ratings available at ReviewOwl.com.

Contact Information

Complete LiftMaster customer service contact information including steps to reach representatives, hours of operation, customer support links and more from ContactHelp.com.

Scoreboard Ratings

See detailed LiftMaster customer service rankings, employee comments and much more from our sister site.