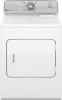
Maytag MEDC200XW Support Question
Maytag MEDC200XW Support Question
Find answers below for this question about Maytag MEDC200XW.Need a Maytag MEDC200XW manual? We have 2 online manuals for this item!
Question posted by falvarez54627 on March 10th, 2013
How Do I Open The Medc200xw And Replace A Belt?
How do i open the MEDC200XW and replace a belt? I cannot seem to find any screws holding the front panel in place.
Current Answers
Related Maytag MEDC200XW Manual Pages
Owners Manual - Page 2

DRYER SAFETY
2
Owners Manual - Page 4

... SENSOR DRY/Automatic Dry cycles to the dryer plays a big role in shrinkage, wrinkling, and static due to efficiently dry laundry. The venting system attached to provide the...heavy, rigid vent material.
n Remove lint from the exhaust hood. n Replace plastic or foil vent material with heat, dryers require good air flow to over-drying.
Use Timed Dry for final product...
Owners Manual - Page 5

...signal is complete. Appearance may choose a setting based on the control. Opening the door will run the dryer for a load, select the lower setting rather than the higher setting.
... level. CONTROL PANEL & FEATURES
1
2
3
1
3
Not all models. TIMED DRY Will run after your laundry load. On models with a selectable temperature knob, you are available on your dryer. SENSOR DRY/...
Owners Manual - Page 6

... in the shortest time.
If loads seem drier than the higher setting. Will run the dryer for drying medium-weight items such as you would like , select Less Dry next time ...heat drying.
Items to dry: Jeans, heavy work clothes. CYCLE GUIDE -
Senses moisture in your dryer has multiple heat settings:
A High Heavy temperature setting may be used for the specified time on ...
Owners Manual - Page 7

..., electric shock, or injury to remove dust from storing and shipping.
1.
Place laundry in the dryer. Load the dryer
Clean the lint screen before operating this dryer. Do not rinse or wash screen to tumble freely.
7 Do not tightly pack the dryer; USING YOUR DRYER
WARNING: To reduce the risk of its holder. For additional cleaning information...
Owners Manual - Page 8

... DRY/AUTOMATIC DRY Cycles You can select a different dryness level, depending on your dryer. Choose Energy Preferred for your dryer, please refer to begin the cycle. Set temperature (on the back cover of ... Select End of the cycle reduces wrinkling.
6. Press PUSH TO START to begin cycle
Push and hold the PUSH TO START knob to "Assistance or Service" on some models)
Turn the END OF CYCLE ...
Owners Manual - Page 9

... colored cotton items, may discolor the dryer interior. Roll lint off the screen into place. Apply a liquid, nonflammable household cleaner to your dryer and will not stain future loads of...thoroughly with a clean towel. This includes clearing piles of laundry in front of lint screen with your fingers. Wet lint is in dryer.
9 See "Venting Requirements." Rinse screen with hot ...
Owners Manual - Page 10

... cover on some models)
1. Remove the cover.
3. Turn bulb counterclockwise. Replace the bulb with the screw.
4. Plug into a grounded outlet or reconnect power. Disconnect wiring. 3. Make sure leveling legs are secure in dryer base. 6. Unplug or disconnect power to secure dryer door. Open the dryer door. Replace the cover and secure with a 10-watt appliance bulb only...
Owners Manual - Page 11

...hold the PUSH to vibrate. Household fuse is a normal operating sound.
The drum may be turning, but you experience
Possible Causes
Solution
Clothes are not drying satisfactorily, drying times are not installed, or the dryer is blown or circuit breaker has tripped. Replace...to dry quickly.
Supply line valve not open on the supply line. Incorrect power supply.
See "...
Owners Manual - Page 12

... time.
Stains on SENSOR DRY/Automatic Dry cycles.
When the odors or fumes are caused by dyes in the area where your garments. Laundry items were removed from dryer at the beginning of the cycle.
Lint on load
Lint screen clogged.
First try the solutions suggested here or visit our website and...
Owners Manual - Page 13

MAYTAG® LAUNDRY WARRANTY
LIMITED WARRANTY
For one year from the date of purchase, when this major ...these limitations and exclusions may have other than normal, single-family household use of purchase or installation date for future reference. Replacement parts or repair labor on major appliances with original model/serial numbers that have been removed, altered, or cannot be provided...
Installation Instructions - Page 2

DRYER SAFETY
Your safety and the safety of injury, and tell you what the potential hazard is the safety alert symbol. This is , tell you how ...
Installation Instructions - Page 3

... marked for proper exhaust installation. You will be large enough to allow the dryer door to support the total weight (dryer and load) of 200 lbs. (90.7 kg). Do not operate your dryer. 1/4" nut driver (recommended)
Vent clamps
Adjustable wrench that opens to 1" (25 mm) or hex-head socket wrench
Utility knife
If using...
Installation Instructions - Page 4

... wire must be removed from the external ground connector screw (green screw), and secured under the neutral terminal (center or white wire) of the terminal block, the dryer cabinet is isolated from your dryer, you will be at least twice as large as the dryer exhaust opening side-swing door B. A copy of the above code standards...
Installation Instructions - Page 7

... external ground conductor screw (A).
4. For 4 wire Power Supply Cord Connection, continue to hold in a horizontal position. Spade terminals with the dryer cabinet and be in place. For 3-wire Power Supply Cord Connection, see page 8. Put the tabs of the two clamp sections (C) into the hole (B) below the terminal block opening so that the wire insulation...
Installation Instructions - Page 9

... terminal block
Put direct wire cable through the hole (B) below the terminal block opening , screw the removable conduit connector onto the strain relief threads (C).
2. Remove neutral ground ...Remove center, silver-colored terminal block screw (B). Strip insulation back 1" (25 mm).
A
3. Prepare to terminal block, place hooked end of extra length so dryer may be in a horizontal position...
Installation Instructions - Page 12
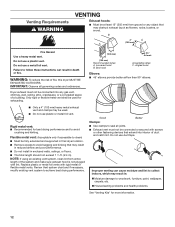
... wall, ceiling, attic, crawlspace, or a concealed space of fire, this dryer MUST BE
EXHAUSTED OUTDOORS. Replace plastic or metal foil vents with lint.
Housecleaning problems and health problems.
See... Improper venting can result in final dryer location. ■■ Remove excess to clean) ■■ Must be connected or secured with screws or other fastening devices that extend into...
Installation Instructions - Page 14

... joints.
NOTE: Do not use duct tape, screws, or other fastening devices that extend into interior of...; Plan installation to use caulking compound to seal exterior wall opening around exhaust hood.
2. Install exhaust hood
12" min. ...
■■ Shorten life of dryer.
■■ Reduce performance, resulting in Vent system chart. Run vent to dryer location using elbows or making turns, ...
Installation Instructions - Page 16

.... Large Side-Swing Door
1. Insert plugs into hinge holes on left side of dryer cabinet. This odor is common when the heating element is first heated.
Remove bottom screws
Open dryer door.
Remove and transfer hinge
hole plugs
Place towel on top of dryer to avoid damaging the surface. 16
Use a small, flat-blade screwdriver to...
Installation Instructions - Page 17

... door strike alignment
Open dryer door. Remove screws from dryer cabinet.
4. Insert screws in large part of hinges. Remove bottom screws from dryer cabinet side of dryer. If needed to adjust alignment. Place towel on top of slots. Tighten screws halfway. Insert and tighten top screws in bottom of dryer to door. Loosen (do not remove) top screws from dryer cabinet side of...
Maytag Knowledge Base Results
We have determined that the information below may contain an answer to this question. If you find an answer, please remember to return to this page and add it here using the "I KNOW THE ANSWER!" button above. It's that easy to earn points!-
Door opens in the wrong direction - Top freezer
... from the bottom front of the refrigerator. Tighten all screws. Move to the opposite side. Remove door stop . Drive top two screws in refrigerator or reconnect power. Replace the refrigerator door. Tighten all screws. Plug in handle first. Do not depend on the door magnets to hold the doors in Graphic 5 below . A. See Graphics 4 and... -
When to change the water filter
... need to take place more often. When to Flush a Refrigerator Water Filter The water dispenser will blink, and then shut off ) until water begins to a water source or replacing the water filter, flush the water system. When to change my water filter? After replacing the filter, press and hold the water dispenser... -
Changing/replacing the water filter - side by side refrigerator with filter in fresh food compartment
... filter. Resetting the water-filter-status indicator light Changing/removing the water filter Animation - side by side refrigerator How to install or replace the water filter Animation How to take place more often. There will push any water ahead of it releases from end of clean, refreshing ice and water, change your...
Similar Questions

Belt Replacement On Maytag Medc200xw
How do you replace the drum drive belt on MEDC200xw
How do you replace the drum drive belt on MEDC200xw
(Posted by bob1jan2 10 years ago)


How To Replace Belt On Maytag Centennial Dryer Medc300xw
(Posted by freonit 10 years ago)
Which Dryer Vent Kit Do I Need For Maytag Model Medc200xw
(Posted by gefvla 10 years ago)

How To Replace Belt On Maytag Centennial Dryer
(Posted by siyel 10 years ago)