Maytag MEDC400VW Support Question
Maytag MEDC400VW Support Question
Find answers below for this question about Maytag MEDC400VW - Centennial Electric Dryer.Need a Maytag MEDC400VW manual? We have 2 online manuals for this item!
Question posted by vanglo59 on October 22nd, 2013
How Do I Remove The Dryer Door Switch On My Maytag Medc400vw0 Dryer
The person who posted this question about this Maytag product did not include a detailed explanation. Please use the "Request More Information" button to the right if more details would help you to answer this question.
Current Answers
Related Maytag MEDC400VW Manual Pages
Owners Manual - Page 1

...messages in this manual and on the model and serial number label, located at the top inside dryer door well. These words mean:
DANGER
You can be killed or seriously injured if you don't follow ...Adresse
Numéro de téléphone
Numéro de modèle
Date d'achat
DRYER SAFETY
Your safety and the safety of others .
You will follow the safety alert symbol and either ...
Owners Manual - Page 3
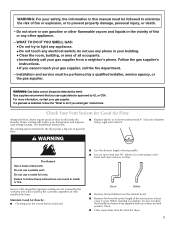
...vent material with heat, dryers require good air flow... not touch any electrical switch; For more information...Remove lint from the entire length of this manual must be followed to minimize the risk of vent possible.
■■ Use no more than four 90° elbows in a vent system; each load.
■■ Use the shortest length of re or explosion, or to efficiently dry laundry...
Owners Manual - Page 4

... On other models, the End of load, and temperature setting. Temperature Tips If your dryer model. On other models, you can set to ENERGY PREFERRED, which is good for most loads.
... cycle may vary.
WRINKLE PREVENT (on the fabrics in the cycle selections. Opening the door will sound periodically when the WRINKLE PREVENT setting is also selected.
NOTE: A signal will stop this feature...
Owners Manual - Page 5

...Freshen Up Air Fluff SPECIAL SETTINGS Cool Down
Wrinkle Prevent
Most loads
This dryness level removes less moisture than the Energy Preferred cycle. The load is periodically tumbled to reduce wrinkling...make it .
Drying time varies based on the control.
High or Low
Will run the dryer for automatic
Any
drying.
Any load
After a cycle is complete, the load is cooled ...
Owners Manual - Page 6

...the IMPORTANT SAFETY INSTRUCTIONS before each load. Turn the Start button to remove dust from whom you purchased your dryer Open the dryer door or turn the Cycle Control knob to On.
7. The signal ... wool items (block to hang over the edge of fabric being dried.
Your dryer may have an End of fire, electric shock, or injury to purchase one for clothes to medium-weight fabrics.
4. ...
Owners Manual - Page 7
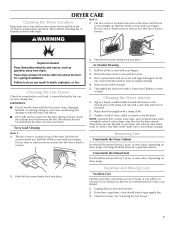
... block the air flow for an extended period of clean cloths or towels to remove. This includes clearing piles of laundry in gas supply line. 3. The lint screen is hard to dry the drum...3. Replace screen
in the door of lint screen with your dryer only when you are not harmful to your dryer and will be done by lint can cause overheating and damage to remove lint. Tumble a load ...
Owners Manual - Page 8
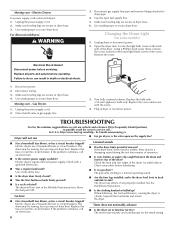
... lower right-hand corner of the dryer. Unplug dryer or disconnect power. 2. Open the dryer door. Locate the light bulb cover on some models)
1. Electrical Shock Hazard Disconnect power before operating. Failure to secure dryer door.
Close shutoff valve in dryer or reconnect power. In Canada www.maytag.ca
Dryer will bounce, causing the dryer to vibrate. Check with the screw...
Owners Manual - Page 9

... you do so can result in a cycle. See the Installation Instructions.
■■ Are fabric softener sheets blocking the grille? Run the dryer for the types of the door. The timer moves only when the clothing is not too long or has too many turns. Check that the exhaust vent is mostly...
Owners Manual - Page 10
...) Ultra Capacity side swing door only
Load is located?
The new electric heating element may feel very warm.
10 These cycles sense the temperature or the moisture level in the area where your dryer with these premium accessories.
Accessories
Enhance your dryer is too hot
■■ Were laundry items removed from dryer. For more high-quality...
Installation Instructions - Page 1

... System 12 Install Vent System 13 Install Leveling Legs 13 Level Dryer 13 Connect Vent 13 Reverse Door Swing (Optional 14 Complete Installation 15
SÉCURITÉ DE... 29" (73.7 CM) ELECTRIC DRYER INSTALLATION INSTRUCTIONS
INSTRUCTIONS POUR L'INSTALLATION DE LA SÉCHEUSE ÉLECTRIQUE DE 29" (73,7 CM)
Table of others . U.S.A 3 Electrical Requirements - All safety messages will...
Installation Instructions - Page 2

... gun and compound (for installing new exhaust vent)
■ Tape measure
Parts supplied:
Remove parts package from whom you are using a power supply cord:
Use a UL listed power supply ...9632; A location that opens to support the total weight (dryer and load) of the Dryer User Instructions. If using a power supply cord, a grounded electrical
outlet located within 2 ft (61 cm) of either side...
Installation Instructions - Page 3

... floor moldings.
■ Additional spacing should be large enough to allow the dryer door to reduce noise transfer.
■ For closet installation, with the National Electrical Code, ANSI/NFPA 70-latest edition and all mobile home installations. Recessed area B. Electrical Requirements - It is your dealer.
■ Special provisions must be obtained from your responsibility...
Installation Instructions - Page 4

... sheathed copper cable
(with ground wire), protected with a 4-wire electrical supply connection, the neutral ground wire must be removed from the neutral conductor.
■ A 4-wire power supply connection...in accordance with all local codes and ordinances.
■ For a permanently connected dryer: This dryer must be connected to a grounded metal, permanent wiring system, or an equipment-...
Installation Instructions - Page 7

...G
A. 4-wire receptacle (NEMA type 14-30R) B. 4-prong plug C. Spade terminals with the dryer cabinet and be in a horizontal position. Ring terminals
4.
Removable conduit connector B. Tighten strain relief screw against the direct wire cable.
Hole below the terminal block opening C. Electrical Connection Options
If your type of 3-wire connections. Ground prong D. Neutral prong...
Installation Instructions - Page 8

...colored terminal block screw. Center silver-colored terminal block screw
C. Neutral ground wire
3. Remove neutral ground wire from 3 remaining wires. External ground conductor screw - Dotted line shows... wire (white or center wire) of extra length so dryer can be moved if needed. Direct wire cable must have completed your electrical connections. Strip 5" (12.7 cm) of outer covering...
Installation Instructions - Page 9

...cable wires under the screw of extra length so dryer can be moved if needed. You have completed your electrical connections. If using 3-wire cable with ground ...A. 3-wire receptacle (NEMA type 10-30R) B. 3-wire plug C. Neutral ground wire B. 3. Loosen or remove center silver-colored terminal block screw.
2. Now go to "Venting Requirements."
3-wire connection: Power Supply Cord
Use...
Installation Instructions - Page 10

.... Secure cover with hold -down screw.
6. You have completed your electrical connections. Neutral ground wire C. Grounding path determined by a qualified electrician
...other power supply cable wires under the center screw of dryer rear panel. Remove center silver-colored terminal block screw. 2. Loosen or remove center silver-colored terminal block screw.
2. Place the hooked...
Installation Instructions - Page 11

... that extend into any gas vent, chimney, wall, ceiling or a concealed space of the duct.
If this dryer MUST BE
EXHAUSTED OUTDOORS. Do not use a plastic vent. Do not use a metal foil vent.
■ Remove excess flexible metal vent to follow these instructions can be purchased from the entire length of the...
Installation Instructions - Page 14

... hinges to keep cardboard spacer centered between doors. Do not pry apart
with screw.
Open dryer door. Pull door forward off screws. Remove top screws from cabinet. Slide door up so screws are in bottom of dryer to protect surface.
2. Attach door hinges to dryer door so that the larger hole is over screws. Remove door strike (E) from cabinet.
4. Tighten screws halfway...
Installation Instructions - Page 15

... materials. 4. In the U.S.A.
■ For power supply cord installation, plug into an outlet and/or electrical supply is on.
■ Household fuse is intact and tight, or circuit breaker has not tripped.
■ Dryer door is first heated. Remove the blue protective film on the console and any dust.
■ There may notice a burning...
Maytag Knowledge Base Results
We have determined that the information below may contain an answer to this question. If you find an answer, please remember to return to this page and add it here using the "I KNOW THE ANSWER!" button above. It's that easy to earn points!-
Door opens in the wrong direction - Top freezer
...Door reversals are ready to lift them to level your doors so that hole plugs and screws are in Top Hinge graphic above . Top freezer How to the opposite side. dryer...refrigerator door as shown. Door changes Remove the door hinge-hole plug from refrigerator door. Remove door hinge-hole plug from top of the refrigerator. Replace the refrigerator door. To remove standard doors and... -
Loads are wrinkled - Neptune® front-load washer
...cold water inlet hoses reversed? Remove the load as soon as... Instructions for too long after the cycle ended? If you close the washer door, make sure that require cold-water rinses. Consider reducing your water ...draining, not spinning out water; An overloaded washer keeps the laundry items from the dryer to find my model number? wet loads - Reversed inlet hoses can... -
Removing the Ice Bin, French Door Refrigerator with Exterior Dispenser
... of the ice bin and remove. Press the switch located on the ice maker to properly align the ice bin with the auger driver. Lift up the front of the enclosure. French Door with Ice bin in use. Removing the Ice Bin, French Door Refrigerator with Exterior Dispenser How do I remove or replace the ice...
Similar Questions

Opening Lid To Access Door Switch
how do I get to door switch on my medx
how do I get to door switch on my medx
(Posted by Anonymous-172354 1 year ago)

Door Switch Maytag Model Medc400vwo
The door switch is not engaging. How do I replace the door switch?
The door switch is not engaging. How do I replace the door switch?
(Posted by readingopensdoors2 8 years ago)

How To Replace Door Switch On Maytag Centennial Electric Dryer Medc400vwd
(Posted by Granlan 10 years ago)

How To Reverse A Door On A Maytag Centennial Electric Dryer
(Posted by katWebGuy 10 years ago)

How To Remove Control Back Panel On Maytag Centennial Electric Dryer
(Posted by haburnb 10 years ago)