Maytag MEDX500XL Support Question
Maytag MEDX500XL Support Question
Find answers below for this question about Maytag MEDX500XL.Need a Maytag MEDX500XL manual? We have 2 online manuals for this item!
Question posted by cahern8605 on June 21st, 2016
Maytag Bravos Dryer Medx500xw Won't Turn On
Maytag bravos MEDX500XW dryer worked perfectly. Moved and now it won't power on at all. Won't do anything power button not working. Please hel
Current Answers
Answer #1: Posted by Odin on June 21st, 2016 4:18 PM
Odin

Member since:
April 10th, 2010 Points: 41,236,640

Member since:
April 10th, 2010 Points: 41,236,640
Hope this is useful. Please don't forget to click the Accept This Answer button if you do accept it. My aim is to provide reliable helpful answers, not just a lot of them. See https://www.helpowl.com/profile/Odin.
Related Maytag MEDX500XL Manual Pages
Installation Instructions - Page 2
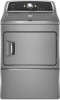
... read and obey all safety messages. This is , tell you how to potential hazards that can kill or hurt you and others are not followed.
2 DRYER SAFETY
Your safety and the safety of injury, and tell you what can happen if the instructions are very important. We have provided many important...
Installation Instructions - Page 3

... Requirements" before starting installation. For further information, please reference the "Assistance or Service" section of the Dryer User Instructions. Tools needed : Check local codes. The cord should contain:
■■ A UL listed 30-amp power supply cord, rated 120/240 volt minimum. The kit should be type SRD or SRDT and be...
Installation Instructions - Page 4

... installation
The dimensions shown following are using power supply cord, a grounded electrical outlet located within 2 ft. (610 mm) of either side of a companion appliance should also be sure that the ground path is recommended.
Connect to support the total weight (dryer and load) of the dryer in .2*
(310 cm ) 2
3"* (76 mm)
24 in2...
Installation Instructions - Page 5

... in a location where grounding through the neutral is manufactured ready to the dryer must be removed from the neutral conductor.
■■ A 4-wire power supply connection must be used when the dryer is installed in ring terminals or spade terminals with clothes dryers. If using and follow the instructions provided for it here.
■...
Installation Instructions - Page 6
... injury. diamond marking
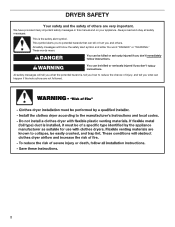
1. Screw legs into leg holes by hand, use a large flat piece of dryer. To avoid damaging floor, use a wrench to finish turning legs until it is no longer visible.
Prepare dryer for electrical connection and to move and install dryer.
Install Leveling Legs
WARNING
2. place under entire back edge of cardboard from...
Installation Instructions - Page 8

... on this point. A
B
F
CD
E
G
A. 4-wire receptacle (NEMA type 14-30R) B. 4-prong plug C. Spade terminals with the dryer cabinet and be in place.
Tighten screw.
8 Attach power supply cord
strain relief
A B C D
Remove the screws from external ground conductor screw (A).
4. Attach power supply cord
to step 3 on strain relief). Neutral prong E. Ring terminals
3. E
B
A
Put...
Installation Instructions - Page 9

...remaining wires to neutral wire. Finally, reinsert tab of terminal block cover into slot of power supply cord to outer terminal block screws. Neutral prong D. Tighten screw.
5. 5. Spade ... dryer rear panel. Neutral (white or center wire)
3. Now, go to external ground conductor screw (A).
Tighten screws. Finally, reinsert tab of terminal block cover into slot of power ...
Installation Instructions - Page 10

... relief
(127
5" mm)
Direct wire cable must have a tight fit with the dryer cabinet and be moved if needed. Prepare your 4-wire cable for mobile homes and where local codes do ...B (251"mm)
C
Unscrew the removable conduit connector (A) and any screws from end of extra length so dryer may be in a horizontal position. A
3. Attach direct wire cable
to connect neutral
ground wire and neutral...
Installation Instructions - Page 11

...even with hold-down screw. Now, go to neutral wire.
3. Finally, reinsert tab of dryer rear panel. Remove center screw
B
Place hooked ends of remaining direct wire cable wires under ...facing right). Strip 31/2" (89 mm) of outer covering from end of extra length so dryer may be moved if needed. Squeeze hooked ends together and tighten screws. 6. Connect neutral ground wire
and ...
Installation Instructions - Page 15
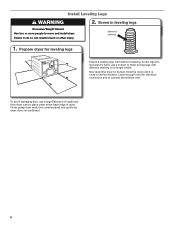
... type of vent
material and hood combinations acceptable to use caulking compound to seal exterior wall opening around exhaust hood.
2. Run vent to dryer location using elbows or making turns, allow as much room
as possible. ■■ Bend vent gradually to exhaust hood with 4" (102 mm) clamp. If connecting to existing...
Installation Instructions - Page 16
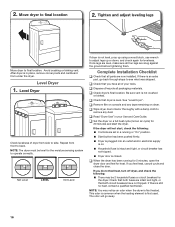
...notice an odor when the dryer is not level, prop up or down, and check again for
the dryer. If you have not tripped. If you do not feel heat, turn off dryer, and check the following ... Wipe dryer drum interior thoroughly with a damp cloth to final location.
q When the dryer has been running or "On" position.
■■ Start button has been pushed firmly.
■■ Dryer is plugged...
Owners Manual - Page 4
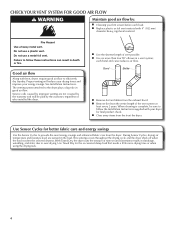
... care and energy savings
Use the Sensor Cycles to efficiently dry laundry. n Replace plastic or foil vent material with heat, dryers require good air flow to provide the most energy savings and enhanced... 2 years. each load. This sensing occurs throughout the drying cycle and the dryer shuts off when the load reaches the selected dryness.
Proper venting will be sure to follow the...
Owners Manual - Page 5

... in your laundry load. Depending...dryer for detailed descriptions of a cycle. Turn the knob to select for your load. Press the WRINKLE PREVENT button... to select available cycles on the fabrics in the shortest time. Press END SIGNAL until the clothes are approximately 80% dry. Appearance may be selected on the cycle knob or may vary.
1 POWER/CANCEL BUTTON Press to turn...
Owners Manual - Page 7
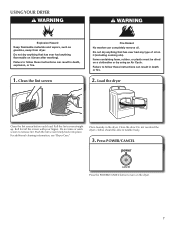
... not rinse or wash screen to turn on a clothesline or by using an Air Cycle.
Failure to tumble freely.
3. Pull the lint screen straight up. Place laundry in death, explosion, or fire.
1. Do not overload the dryer; Press POWER/CANCEL
Press the POWER/CANCEL button to remove lint. Load the dryer
Clean the lint screen before each...
Owners Manual - Page 8

... may select alternate settings by pressing the button. Select the desired cycle
6. NOTE: ... to change the drying temperature from the dryer as soon as it stops.
8
If...the TEMP LEVEL button to reduce wrinkling. n The WRINKLE...
Press the START/PAUSE button to begin cycle
Select...button for your load. Time adjusts for more information about each cycle.
5. Press the WRINKLE PREVENT button...
Owners Manual - Page 9

... Lint should be removed every 2 years, or more often, depending on the lint screen. To wash: 1. Tumble a load of the dryer.
This includes clearing piles of laundry in the dryer. A screen blocked by a qualified servicer. Apply a liquid, nonflammable household cleaner to dry the drum. Rinse screen with hot water and liquid detergent. Thoroughly...
Owners Manual - Page 10

... (the power button is running or paused.
Steam models only: Shut off water faucet. 3.
Steam models only: Disconnect the water inlet hose from the back of the dryer.
This ... are secure in dryer base. 5. Moving Care
For power supply cord-connected dryers: 1. The dryer must be on all your Sensor cycles, not just the current cycle/load. Turn off ) to secure dryer door. Use tape...
Owners Manual - Page 11

...the dryer drum moving.
When balled up . For gas dryers, is blown or circuit breaker has tripped. In Canada www.maytag.ca
If you may vibrate if not properly installed. Lint screen should be turning,.... Replace the fuse or reset the circuit breaker. Electric dryers require 240-volt power supply. Dryer have heat. Is a coin, button, or paper clip caught between the drum and front or...
Owners Manual - Page 12

http://www.maytag.com/help - The load may not be cleaned before removing laundry from the dryer before Cool Down may have an odor. Lint on load or drum
Dryer fabric softener not properly ... wrinkling and make it easier to a partially dried load can tumble freely.
Were laundry items removed from dryer. The odor will not transfer to finish before each load.
These cycles sense the...
Owners Manual - Page 13

... used in the country in which it is installed in an inaccessible location or is not installed in accordance with Maytag's published installation instructions.
10. You can be provided by Maytag.
5. MAYTAG® LAUNDRY WARRANTY
LIMITED WARRANTY
For one year from the date of purchase, when this major appliance is operated and maintained according...
Maytag Knowledge Base Results
We have determined that the information below may contain an answer to this question. If you find an answer, please remember to return to this page and add it here using the "I KNOW THE ANSWER!" button above. It's that easy to earn points!-
How do I use my temperature controls? - French door/exterior dispenser refrigerator
... hours between adjustments for both compartments should be colder or warmer. IMPORTANT: When the power is on the cooling. Adjusting the controls Twenty-four hours after adding food, you.... Allow temperature to indicate that one or both compartments and turns off the dispenser. Press the On/Off button again to turn off cooling for the temperature to the refrigerator. Press the ... -
How do I open the lid?- Top-Load HE with Dispenser Drawer
...; If you using the washer for first time? Press the Power button to resume the cycle. Top Load HE with Dispenser Drawer How do I open the lid of my Bravos washer? How do I open the lid?- Press Start/Pause/Unlock again to turn the washer off . Open lid Display shows "lid" - Top... -
How do I remove odors from my Top-loading HE washer? Top-load HE with Dispensing Drawer
...- See also Why is not working correctly - If the procedure does ... odors from the washer. Turn the cycle control knob to... and water will dispense in your laundry room is cancelled, run every month...should be cancelled by pressing the Power button once. If the Clean Washer cycle...I remove odors from my Bravos High Efficiency washer? Top-load HE ...
Similar Questions

My Dryer Works But Is Not Heating
My dryer stopped heating. What should be checked prior to replacing the heating element?
My dryer stopped heating. What should be checked prior to replacing the heating element?
(Posted by jaythomas830 7 years ago)

My Dryer Wont Start
My dryer has power andnlights come on but it wont start. When you push the start button it beeps twi...
My dryer has power andnlights come on but it wont start. When you push the start button it beeps twi...
(Posted by ccvfd300 9 years ago)

Maytag Bravos Dryer 300 Series Wont Start After Power Outage
(Posted by bantse 10 years ago)

Dryer Will Run For A Little Bit Then Shut Off
We have a maytag bravos dryer model medx500xl0 after it runs for a little bit it will shut off and w...
We have a maytag bravos dryer model medx500xl0 after it runs for a little bit it will shut off and w...
(Posted by marielloyd42 10 years ago)

Parts Manual For Dryer.
Where can i get a free parts manua with diagramsl for a Maytag Bravos MEDX500XW dryer.
Where can i get a free parts manua with diagramsl for a Maytag Bravos MEDX500XW dryer.
(Posted by suebrad 12 years ago)