Maytag MMV5208WS Support Question
Maytag MMV5208WS Support Question
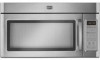
Find answers below for this question about Maytag MMV5208WS - 2.0 cu. Ft. Combination Range Hood-Microwave.Need a Maytag MMV5208WS manual? We have 2 online manuals for this item!
Question posted by asurfs on March 20th, 2014
Maytag Microwave Mmv5208ws-1 Replacing Cavity Light Bulb
How do I replace the cavity bulb inside the microwave?
Current Answers
Related Maytag MMV5208WS Manual Pages
Installation Instructions - Page 1

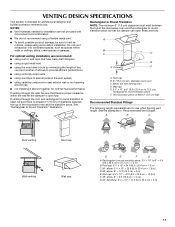
... what the potential hazard is, tell you how to Wall 8 Prepare Upper Cabinet 8 Install Damper Assembly 9 Install the Microwave Oven 9 Complete Installation 10 VENTING DESIGN SPECIFICATIONS 11 ASSISTANCE 12 Replacement Parts 12 Accessories 12
MICROWAVE HOOD COMBINATION SAFETY
Your safety and the safety of your appliance. All safety messages will tell you what can happen if...
Installation Instructions - Page 2

...microwave oven, so that the materials used will be combined...
For reorder information, see "Replacement Parts" section. Washers (2) ...inside upper cabinet. The location must be sure to back of microwave oven)
Cardboard template (part of 150 lbs (68 kg), which includes microwave oven and items placed inside the microwave oven and upper cabinet.
■ Grounded electrical outlet inside...
Installation Instructions - Page 3

... the event of an electrical short circuit, grounding reduces the risk of range/cooktop below. WARNING: Improper use an adapter. If the power supply ...inside the upper cabinet. Required:
■ A 120 Volt, 60 Hz, AC only, 15- SAVE THESE INSTRUCTIONS
3 Grounded 3 prong outlet
*30" (76.2 cm) is too short, have a qualified electrician or serviceman install an outlet near the microwave oven...
Installation Instructions - Page 4

...Screws C. Make sure damper plate tabs are using recirculation installation. Slots
8. Remove any remaining contents from the microwave oven cavity.
2. Lift blower motor out of
microwave oven. Remove 2 screws attaching blower motor to back of the microwave oven. Screws (in Step 3.
7. Secure damper plate with 2 screws removed in recessed holes)
D
A. Damper plate
2. If the...
Installation Instructions - Page 5

... plate.
Rotate blower motor so that exhaust ports face the top of
microwave oven, and flat sides of blower motor face back of the microwave oven (as shown), performance will be reattached to back of microwave oven with flat sides facing the back of microwave oven. A
B
C
A. Repeat Step 3 from "Wall Venting Installation Only." 2. NOTE: If blower motor is...
Installation Instructions - Page 6

Cabinet opening , do not install the microwave oven.
1. Holes for lag screws E. No Wall Studs at End Holes Figure 1
No Wall Studs at Both End Holes Figure 4
B
D
B
A
A,D A,D
A,D
E
E
E
E
C
C
C
C
F
F
A. Wall Stud at One End Hole ...
Installation Instructions - Page 7

Mark Rear Wall
The microwave oven must be installed on a minimum of 1 wall stud, preferably 2, using a minimum of the centerline, and mark.
10. Centerline
2. Rear wall B. With the support tabs facing ...
Installation Instructions - Page 8

...Drill 3/16" (5 mm) holes into wall stud(s) in Step 2 of "Installation for example, the thickness of the microwave oven. Refer to open .
3. Wall Stud at Both End Holes (Figure 4)
1. Securely tighten the lag screw(s) and ... at the other hole drilled in Step 2 of mounting plate, making sure it fits inside the frame, against drywall. 5. Leave enough space for Wall Stud at both end holes...
Installation Instructions - Page 9

...supply cord hole in
place.
9 These are for two 1/4-20 x 3" bolts and washers used to secure the microwave oven to be installed around the supply cord hole, as shown. Support tabs
4. NOTE: If upper cabinet is being ...the circular shaded area "G" on each 1/4-20 x 3" flat-head bolt and place inside upper cabinet near the 3/8" (10 mm) holes. 2. Secure damper assembly with 2 sheet metal screws.
Installation Instructions - Page 10

...
B
C
D
E
F
A. Upper cabinet cutout E. Do not use an extension cord. Replace the fuse or reset the circuit breaker. Longer or shorter bolts are available at least one ...Using 2 or more people, lift microwave oven off of the microwave oven. Loosen mounting plate screws. Adjust mounting plate and retighten screws.
9. With the microwave oven centered, and with sheet metal ...
Installation Instructions - Page 11
...
The following length equivalents are for installation are not provided with
microwave hood combination.
■ We do not recommend using caulking compound to seal exterior...microwave oven and the transition piece. Wall cap: 3¹⁄₄" x 10" = 40 ft (8.3 x 25.4 cm = 12.2 m) F. 45° elbow: 6" = 5 ft (15.2 cm = 1.5 m) G. 90° flat elbow: 3¹⁄₄" x 10" = 10 ft...
Installation Instructions - Page 12

... Standard Fittings" section for details.
Two 90° elbows = 20 ft (6.1 m) B. 1 wall cap = 40 ft (12.2 m) C. 1 rectangular to be found on the front frame of vent. When you will need the microwave oven model number and serial number.
Replacement Parts
If any of the microwave oven opening . Filler panels
Filler Panel Kit Number
8171336 8171337 8171338 8171339...
Owners Manual - Page 1
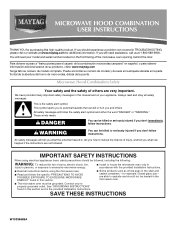
...-9900. If you what can kill or hurt you still need your appliance. Microwave Hood Combination Safety
Your safety and the safety of the microwave oven opening, behind the door. This symbol alerts you to excessive microwave energy:
■ Install or locate the microwave oven only in accordance with the provided Installation Instructions.
■ Read all safety messages...
Owners Manual - Page 2

....44 cm).
■ Clean Ventilating Hoods Frequently - Carefully attend the microwave oven when paper, plastic, or other than manufacturer's recommended accessories, in this oven with narrow necks.
- If materials inside the oven to facilitate cooking.
- Visible bubbling or boiling when the container is removed from the microwave oven is operated in convection, combination, grill or "PAN BROWN...
Owners Manual - Page 3

...follow these instructions can result in hours and minutes with A.M. Vent Fan
Various speeds, ranging from side to turn tones off after 30 minutes).
Touch Options or Setup control to...or to the microwave oven, always remove rack after replacing and/or cleaning the filters. or P.M.
If the power supply cord is properly grounded.
Options or Setup
Vent Timer, Light Timer, Filter ...
Owners Manual - Page 4

... microwave oven.
See "Settings" section to reset filter status.
■ Grease filters: Grease filters are off and the microwave oven is time to soil buildup, keep cavity, microwave ...result in the microwave oven.
Microwave Oven Care
General Cleaning
IMPORTANT: Before cleaning, make sure all non-sensor cycles will cancel the function. Installing/Replacing Filters and Light Bulbs
NOTE: A ...
Owners Manual - Page 5

... followed by a number is off.
Use a corded phone, a different frequency cordless phone or avoid using these items during microwave oven operation to cool the microwave oven. Close bulb cover, replace vent grille, and secure with screw.
■ Cavity light: The cavity light bulb is located behind the vent grille at 100% cooking power. Make sure Control Lock is an error indicator...
Owners Manual - Page 6

...microwave range hood and that existed when this User Instructions and model number information for a factory specified replacement Magnetron to the appliance. 9. This warranty gives you specific legal rights, and you may contact Maytag at :
Maytag... replacement parts and repair labor to use or when it was purchased.
Any food loss due to repair or replace appliance light bulbs ...
Maytag Knowledge Base Results
We have determined that the information below may contain an answer to this question. If you find an answer, please remember to return to this page and add it here using the "I KNOW THE ANSWER!" button above. It's that easy to earn points!-
How do I replace the light bulb? - French door exterior dispenser
... the slots located under the ice storage enclosure. Replace with an appliance bulb no greater than 40 watts. Freezer light Remove the light bulb. French door exterior dispenser How do I replace the light bulb? - The freezer light bulb is flickering on each side of the fresh food liner. Remove the light bulbs. Remove the light bulb. Bottom freezer/French door refrigerator Max Cool... -
Changing the light bulb
... of the same size, shape and wattage. Be sure to the refrigerator. Changing the light bulb How do I change the light bulb in or reconnect power to dry the shield thoroughly before installing. Be sure to replace the bulb with warm water and liquid detergent. How do I replace the light bulb? - Bottom freezer/French door refrigerator No lights inside refrigerator - -
How do I replace the light bulb? - Bottom freezer/French door refrigerator
... reconnect power. Bottom freezer/French door refrigerator How do I replace the light bulb? - How do I replace the light bulb? Slide the cover toward the back of light assembly. The light bulb cover opens from the light assembly. Firmly press forward on each side of the compartment to replace the bulb with an appliance bulb no greater than 40 watts. Insert the front tabs...
Similar Questions

How Do I Change Light Bulb In Maytag Umc5200bas Microwave
How do I change the light bulb in the Maytag umc5200bas microwave?
How do I change the light bulb in the Maytag umc5200bas microwave?
(Posted by jbsalter 7 years ago)

How Rotate Blower Motor Maytag Microwave Mmv5208ws
(Posted by Waynefsdkir 9 years ago)

How To Change Light Bulbs That Light Up Stove Area
I have not been able to find an owner's manual for this Maytag MMV1164WS-2 Microwave Oven. The light...
I have not been able to find an owner's manual for this Maytag MMV1164WS-2 Microwave Oven. The light...
(Posted by hweinstein55 9 years ago)

How To Replace Light Bulb
(Posted by etlenging 10 years ago)

How Do I Install A Light Bulb For This Microwave?
(Posted by lewalters2 10 years ago)