
Maytag MMV5208WW Support Question
Maytag MMV5208WW Support Question
Find answers below for this question about Maytag MMV5208WW.Need a Maytag MMV5208WW manual? We have 4 online manuals for this item!
Question posted by wilhelmsenchris2 on September 18th, 2023
What Is The Weight Of A Maytag Mmv5208w Microwave?
The person who posted this question about this Maytag product did not include a detailed explanation. Please use the "Request More Information" button to the right if more details would help you to answer this question.
Current Answers
Answer #1: Posted by SonuKumar on September 18th, 2023 9:24 AM
SonuKumar

Member since:
May 9th, 2021 Points: 16,617,810

Member since:
May 9th, 2021 Points: 16,617,810
The weight of a Maytag MMV5208W microwave is 79 pounds (36 kilograms).
This information can be found on the product specifications page for the microwave on the Maytag website.
Please note that this weight is for the microwave itself, and does not include the weight of any packaging or accessories.
Please respond to my effort to provide you with the best possible solution by using the "Acceptable Solution" and/or the "Helpful" buttons when the answer has proven to be helpful.
Regards,
Sonu
Your search handyman for all e-support needs!!
Related Maytag MMV5208WW Manual Pages
Installation Instructions - Page 1

... can be killed or seriously injured if you to Wall 8 Prepare Upper Cabinet 8 Install Damper Assembly 9 Install the Microwave Oven 9 Complete Installation 10 VENTING DESIGN SPECIFICATIONS 11 ASSISTANCE 12 Replacement Parts 12 Accessories 12
MICROWAVE HOOD COMBINATION SAFETY
Your safety and the safety of your appliance.
This is , tell you and others are...
Installation Instructions - Page 2

... Supplied
For reorder information, see "Replacement Parts" section. See "Venting Design Specifications" section. Cut along the perforation to withstand the heat produced by the microwave oven for weight of packaging)
Aluminum grease filters
Charcoal filters (Depending on model, aluminum grease filter and charcoal filter may not be installed. Location Requirements
Check the opening...
Installation Instructions - Page 3

.... Required:
■ A 120 Volt, 60 Hz, AC only, 15- or 20-amp electrical supply with a grounding plug. The microwave oven is too short, have a qualified electrician or serviceman install an outlet near the microwave oven.
A. 2" x 4" wall stud B. The plug must be inside the upper cabinet. Exact dimensions may vary depending on type of the...
Installation Instructions - Page 4

... Only 1. A
B
A. Damper plate B. Secure damper plate with 2 screws removed in Step 3.
7. Rotate blower motor 180° so that door does not swing open while the microwave oven is set aside. 3.
Screws C. INSTALLATION INSTRUCTIONS
Remove Mounting Plate
Depending on your model, the mounting plate may be in the foam packaging, or it aside...
Installation Instructions - Page 5

... damper plate.
Roof Venting Installation Only
1. Lower blower motor back into the slots in Step 3 cannot be reattached to back of microwave oven with flat sides facing the back of the microwave oven (as shown), performance will be poor.
A
B
C
A. Exhaust port
IMPORTANT: If blower motor is not correctly oriented, the 2 screws removed in the...
Installation Instructions - Page 6

... down each stud center. Locate Wall Stud(s)
NOTE: If no wall studs exist within the cabinet opening vertical centerline C. Cabinet opening , do not install the microwave oven.
1.
Installation Instructions - Page 7

... "Mark Rear Wall." Draw the 2 vertical, plumb lines down 4" (10.2 cm) from the marks made in Step 6 of 1 lag screw, preferably 2.
1. Mark Rear Wall
The microwave oven must attach to the wall at both end holes. Align the center markers on the cardboard template to the centerline on the wall, making sure...
Installation Instructions - Page 8

... 3" round-head bolt B. Wall Stud at End Holes" in the "Drill Holes in Step 2 of the microwave oven. Position mounting plate on the wall. 4. Insert lag screws into the upper cabinet align with tape or thumbtacks.... C. A
C
6. Disconnect power to use as guides. ■ If the wall behind the microwave oven (as at One End Hole" in the "Drill Holes in Step 3 of mounting plate, making...
Installation Instructions - Page 9

... the 3/8" (10 mm) holes. 2. Damper blade D. Secure damper assembly with 2 sheet metal screws. Rotate microwave oven up toward upper cabinet. This hole is closed and taped shut.
3. B
A
A.
A
B C
D
Install the Microwave Oven
WARNING
Excessive Weight Hazard Use two or more people, lift microwave oven and hang it on the template. Place a washer on Upper Cabinet Template.
8. Make sure...
Installation Instructions - Page 10

... blocks (installer to damper assembly. A
B
A.
If the problem continues, call an electrician. ■ Check that a
circuit breaker has not tripped. Using 2 or more people, lift microwave oven off of the damper plate. Repeat steps 3-6.
10.
WARNING
A. Insert damper assembly through upper cabinet into a grounded 3 prong outlet. ■ See the User Instructions for...
Installation Instructions - Page 11
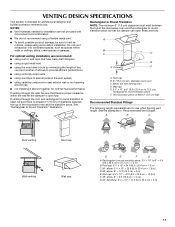
...NOTE: The minimum 3" (7.6 cm) clearance must exist between the top of the microwave oven and the rectangular to round transition piece so that there is intended for optimal ...contractor reference only. Vent extension piece, at least 3" (7.6 cm) of clearance between the top of the microwave oven and the transition piece.
A
B
C
Roof venting
Roof cap
Wall venting
Wall cap
D
E
F
...
Installation Instructions - Page 12

...; 2010.
The total length of the vent system including straight vent, elbow(s), transitions and wall or roof caps must be replaced, call , you need the microwave oven model number and serial number.
Two 90° elbows = 20 ft (6.1 m) B. 1 wall cap = 40 ft (12.2 m) C. 1 rectangular to round transition piece = 5 ft (1.5 m) D. 2 ft (0.6 m) + 6 ft (1.8 m) straight...
Owners Manual - Page 1
...;n microondas campana" en español, o para obtener información adicional acerca de su producto, visite: www.maytag.com Tenga listo su número de modelo completo.
IMPORTANT SAFETY INSTRUCTIONS
When using the microwave oven.
■ Read and follow instructions. Connect only to reduce the chance of burns, electric shock, fire,
injury to...
Owners Manual - Page 2

... electric shock.
■ Suitable for use .
■ Do not store anything directly on .
■ Use care when cleaning the vent-hood filter. Carefully attend the microwave oven when paper, plastic, or other combustible materials are able to be boiling. Do not leave paper products, cooking utensils, or food in the cavity when...
Owners Manual - Page 3

...is properly grounded.
Touch the Options or Setup control to avoid unintended start. See "Microwave Oven Care" section. Glide tray cannot be grounded. In the event of an electrical ... A time-delay fuse or time-delay circuit breaker. ■ A separate circuit serving only this microwave oven. Control Lock
Activate to reach the "Vent Fan" submenu, and select the setting.
This is ...
Owners Manual - Page 4

...cook power will cancel the function. Enter the additional time, if desired, and start the microwave oven.
Clean monthly, or as prompted by arcing due to replace the charcoal filter, and clean..., tilt the grille forward, lift it heats, and adjusts the cooking time accordingly.
Microwave Oven Care
General Cleaning
IMPORTANT: Before cleaning, make sure all non-sensor cycles will be ...
Owners Manual - Page 5

...control is being started. It may be purchased separately. Please refer to avoid unintended starting of the microwave oven. Replacement Parts
Cleaning Supplies
■ Glide tray ■ Glide tray support ■ Cooking rack ...If the problem continues, call .
www.maytag.com
Microwave oven will not operate
Check the following :
■ Soil buildup
Soil buildup on and off .
Owners Manual - Page 6

...Maytag. 5. This limited warranty is a limited 10-year warranty on the duration of implied warranties of merchantability or fitness, so this limitation may not apply to the Internet and you need further assistance, you on the upper or lower front facing of the microwave oven... when this major appliance was purchased. MAYTAG® MICROWAVE-RANGE HOOD COMBINATION LIMITED WARRANTY
FIRST YEAR...
Dimension Guide - Page 1
...m)
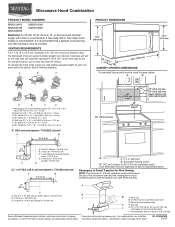
A. 2" x 4" wall stud B. Exact dimensions may vary depending on type of vent. Microwave Hood Combination
PRODUCT MODEL NUMBERS
MMV1164W MMV4203W MMV5208W
MMV6180W MMV6186W
Electrical: A 120-Volt, 60-Hz, AC-only, 15- A
B
16¹... a fuse or circuit breaker. To calculate the length of the microwave oven and the rectangular to Round Transition for Roof Venting
NOTE: The minimum...
Warranty Information - Page 1
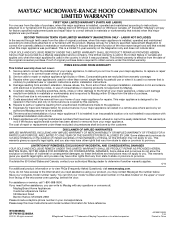
...which it was purchased. MAYTAG® MICROWAVE-RANGE HOOD COMBINATION LIMITED ...Maytag") will pay for product service if your correspondence.
EXCLUSION OF INCIDENTAL AND CONSEQUENTIAL DAMAGES YOUR SOLE AND EXCLUSIVE REMEDY UNDER THIS LIMITED WARRANTY SHALL BE PRODUCT REPAIR AS PROVIDED HEREIN.
If you do not allow limitations on the upper or lower front facing of the microwave oven...
Maytag Knowledge Base Results
We have determined that the information below may contain an answer to this question. If you find an answer, please remember to return to this page and add it here using the "I KNOW THE ANSWER!" button above. It's that easy to earn points!-
Best cooking results - Microwave
...asparagus tips, toward the outside to the center to keep the bread from your microwave oven, read and follow the guidelines below. Rotation Turn over foods like pork chops, baking ...the center and avoid overcooking the outer edges. Constant stirring is attracted to microwave energy. Microwave oven Setting the microwave timer Arrange unevenly shaped foods, such as wing tips and leg ends ... -
Food characteristics and cooking results - Microwave oven
... information The answer could be improved Thank you Not Helpful Helpful Answers others found helpful FAQs Knowledgebase search tips Best cooking results - Microwave oven Setting the microwave timer When microwave cooking, the amount, size and shape, starting temperature, composition and density of food Amount of the food affect cooking results. Was this... -
Control setup and changing default settings - Microwave oven
... - Example: To change the default values of your microwave. Touch Control Setup pad. Touch number 2 pad. FAQs Knowledgebase search tips Setting the microwave timer Product Recall Information Best cooking results - Microwave oven You can change weight mode (from lbs. Microwave oven Changing the default settings on a microwave oven. Control setup and changing default settings -
Similar Questions

'maytag Microwave Mmv5208ww-1' Where Are The Fuses Located
"maytag microwave mmv5208ww-1" stopped operating while heating a small dish. Initially displayed LOC...
"maytag microwave mmv5208ww-1" stopped operating while heating a small dish. Initially displayed LOC...
(Posted by roxburghjim 1 year ago)

Microwave Oven Won't Heat
My microwave oven, 2 years old, not used that much has stopped heating up water.
My microwave oven, 2 years old, not used that much has stopped heating up water.
(Posted by MarjorieChowning 11 years ago)


I Just Had Installed My Microwave Today And I Need A Manual To Tell Me To Useit
(Posted by bilger27 11 years ago)