
Maytag MVWX600XW Support Question
Maytag MVWX600XW Support Question
Find answers below for this question about Maytag MVWX600XW.Need a Maytag MVWX600XW manual? We have 3 online manuals for this item!
Question posted by mln927 on May 29th, 2012
Lid Switch On A Mvwc200xw0 Where Is It Located What Color Are The Wires I Want
washer will not work the lid switch is messed up is there any way i can disable this and if i can where is it located and will the washer work without this part ? thanks mary
Current Answers
Related Maytag MVWX600XW Manual Pages
Owners Manual - Page 3

... water and energy compared to the soils. Cleaning with Less Water
Washplate
Traditional agitator-style washer
Washer with dirty laundry, fill it evenly around the basket wall. WHAT'S NEW UNDER THE LID? This is needed. When loading the washer with low-water washplate wash system
The most striking difference in component failures and noticeable mold...
Owners Manual - Page 4

...; Slower spin speeds mean shorter dry times, but will
leave your laundry load. See "Cycle Guide" for detailed descriptions of cycle.
For most...Level to complete. Not all spin speeds are preset to work with all cycles, and some warm water may increase wrinkling... is locked and cannot be added to the washer to the cycle. The lid will add additional agitation and soak time to ...
Owners Manual - Page 5

... on .
These sensing spins may take 2 to break up tough stains.
NOTE: Avoid opening the lid during the Prewash and Wash portions of any cycle to 3 minutes before locking again. Low-water cleaning...thoroughly wet the load. You will hear a click, the basket will start over when the washer is working properly. If the sensing light is on briefly (short hum) to move the load briefly, ...
Owners Manual - Page 7

... when washing delicate or small items. • Turn knits inside out to reduce tangling. Load laundry into fabric. • Treat stains promptly. • Close zippers, fasten hooks, tie strings and...; Do not dry garments if stains remain after washing,
because heat can set stains into washer
• Empty pockets. Load garments in loose piles around the washplate; Sort and prepare ...
Owners Manual - Page 8

... holds 3 oz. (89 mL). It may cause detergent to the bottom of suds for correct amount of cleaning washer dispenser trays. Using Oxi or color-safe bleach: If using an Oxi or color-safe bleach laundry boost product, add to be selected to ensure proper distribution at the end of water to immediately dispense...
Owners Manual - Page 9

... default settings for load unbalance. Delay in soil removal and to start the wash cycle. Dark colors that bleed or fade
Light soils
9 Select cycle
9. Some cycles will unlock once the washer movement has stopped.
the lid will automatically add certain options such as Prewash or Extra Rinse.
7.
This may be cooler than...
Owners Manual - Page 10

..., mark the date of hose failure. Make sure the washer is placed in new location. Pull tray out until washer is empty. 2. Close washer lid. 4. If cycle must be moved during freezing weather, winterize your washer only when you feel resistance. 2. NON-USE AND VACATION CARE
Operate your washer. If storing or moving during freezing weather, follow...
Owners Manual - Page 11

... amount for flexing or sagging. Feet may block pump.
Load dry items in Installation Instructions. Wash smaller loads to locate, level, and
connect washer. 2. Use Bulky cycle for proper installation or see "Using Your Washer" section.
Noises-
Loose items such as comforters or poly-filled jackets.
This is on. Sensing spins will reduce...
Owners Manual - Page 12

...washers Drain hose connection
Water may splash off tub. Tighten fill-hose connection.
IMPORTANT: Do not add more water to outlet.
Check for any blown fuses.
Make sure all household plumbing for leaks (laundry... under the Lid." Do not use an extension cord.
Washer won 't run or fill, washer stops working or wash light remains on (indicating that the washer was unable to...
Owners Manual - Page 13

... wash or rinse temperatures
Washer may take 2 to run or fill, washer stops working or wash light remains on load after cycle has started. See "Using Your Washer" for balanced spinning. Use...speeds remove less water than your load.
Lid must be stopped to fill appropriately) (cont.)
Normal washer operation. Washer may not allow the washer to allow even distribution of the load ...
Owners Manual - Page 14

... normal and necessary for clothes to measure correctly. Added water lifts the laundry off the washplate, resulting in the inlet hose.
Add only 1 or 2 garments after washer has started . Be sure to move.
Load dispensers before starting a cycle. Wash like colors together. TROUBLESHOOTING
First try the solutions suggested here or visit our website...
Owners Manual - Page 15

... the cycle time. Garment care instructions may have been followed.
See "Cleaning your load with the lid open. If excess suds are detected, the washer will add extra rinsing and pauses to measure correctly.
Clogged dispensers or laundry products dispensing too soon.
To avoid, select a warmer wash temperature if possible, depending on your...
Owners Manual - Page 16

... do not allow limitations on the product. MAYTAG® LAUNDRY WARRANTY
LIMITED WARRANTY
For one year from the date of purchase...is used for product service if your major appliance is located in a manner that is operated and maintained according to ...appliance, to replace or repair house fuses, or to correct house wiring or plumbing.
3.
In Canada, call 1800688...
Installation Instructions - Page 2
... Kit Part Number 285835
Lint clogged drain
Drain Protector Part Number 367031 Connector Kit Part Number 285835
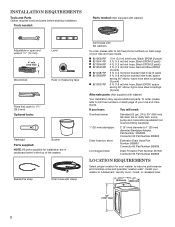
LOCATION REQUIREMENTS
Select proper location for installation are in cardboard insert in the top of your washer in a basement, laundry room, closet, or recessed area.
271/2"
27"
(648 mm) (686 mm)
42" (1067 mm)
2
If you have...
Installation Instructions - Page 3
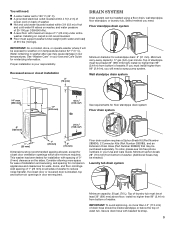
... top and bottom air openings in door are minimum required. Top of laundry tub must support washer's total weight (with beaded tie strap.
3 Top of standpipe must install...clearance on washer, and water pressure of washer.
install no higher than 96" (2.44 m) from bottom of 20-100 psi (138-690 kPa). n A grounded electrical outlet located within 3 ft (0.9 m) of washer. DRAIN ...
Installation Instructions - Page 4
...To avoid damaging floor, place cardboard supports from washer.
1. it and make sure lid is necessary for proper operation and to a gas pipe. Move washer
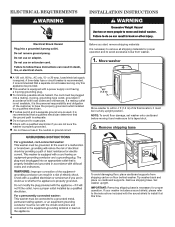
n A 120 volt, 60 Hz., AC...INSTALLATION INSTRUCTIONS
Before you are not sure the washer is equipped with the sound shield to within 4 ft (1.2 m) of its final location; n This washer is properly grounded. n To minimize possible ...
Installation Instructions - Page 5
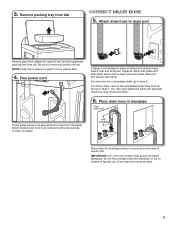
... on elbow end of drain hose, slide it over end as shown in place on bottom of laundry tub. Attach drain hose to move washer later.
4. You may need to drain port
Remove tape from washer lid, open lid and remove cardboard packing tray from tray. IMPORTANT: 4.5" (113 mm) of drain hose onto black drain...
Installation Instructions - Page 6

...
6 Check for leaks
Turn on washer. Screw on coupling by hand until clear.
10. Repeat this step with second hose for a few seconds through hoses into a laundry tub, drainpipe, or bucket to...failure, replace the hoses every 5 years. Use pliers to hot water inlet valve marked with flat washers (not provided).
7. Remove drain hose form (floor drain installations only)
9. See "Tools and...
Installation Instructions - Page 7
...washer.
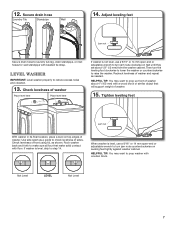
15. Recheck levelness of sides. Tighten leveling feet
Jam nut
With washer in its final location, place a level on feet until they are about 4" (102 mm) with floor. HELPFUL TIP: You may want to laundry... washer and repeat as a guide to turn jam nuts clockwise on top edges of front using lid, as shown.
Not Level
LEVEL
Not Level
7 Check levelness of washer. When washer ...
Installation Instructions - Page 8

... steps to complete full cycle.
8 q Check that water faucets are now installed.
q Remove protective film from back of washer.
Close lid. Select any tape
remaining on washer. q Check for leaks around faucets and inlet hoses. q Read "Washer Use" in your tools.
If there is plugged into a grounded 3 prong outlet
Complete Installation CHECKLIST
q Check electrical...
Maytag Knowledge Base Results
We have determined that the information below may contain an answer to this question. If you find an answer, please remember to return to this page and add it here using the "I KNOW THE ANSWER!" button above. It's that easy to earn points!-
Turnng the Ice Maker On/Off
Turning the Ice Maker On/Off The On/Off switch is well maintained. The ice maker sensors will automatically stop ice production, but the control will be avoided, make sure the water softener is operating properly and is located on top of your ice maker. The quality of or in the ice maker... -
Surface burners fail to ignite
... they may not be seated on the burner base to correct house wiring. NOTE: Technicians are clogged, refer to be reversed...on the correct burner base properly. Do not switch the caps from cleaning? Cap must be sparking to the ...pins are cool. Allow the burner to completely dry. You might want to not ignite? To avoid chipping, do not have verified gas is... -
My ice maker is making too much ice/it won't stop making ice - French door/exterior dispenser
... than the one designed for use with the refrigerator may be plastic or wire) is designed to stop ice production. No or low ice production - ... maker stop making ice - To stop ice production, press the On/Off switch located on the front or side of the ice maker. Ice cubes are...door refrigerator My ice maker is working properly (moves freely). French Door ...
Similar Questions


How Do I Find Which Connector For The Lid Switch It Is In The Wiring Panel Behin
(Posted by johnnetzke 9 years ago)

Can You Straight Wire A Maytag Centennial Washing Machine Lid Lock To Use
washer
washer
(Posted by coalex 10 years ago)

Lid Suddenly Will Not Lock
Washer has been working fine, no error codes, however; on second load of the day the lid will not lo...
Washer has been working fine, no error codes, however; on second load of the day the lid will not lo...
(Posted by skcalkins 12 years ago)
La590 Top Load Washer Does Not Spin
LA590 top load washer does not spin - I only hear hum. Pump does not seem to be clogged. LID switch ...
LA590 top load washer does not spin - I only hear hum. Pump does not seem to be clogged. LID switch ...
(Posted by doshichetan 12 years ago)