Get support for NordicTrack T 6.5 S Treadmill

NordicTrack T 6.5 S Treadmill Support Question

NordicTrack T 6.5 S Treadmill Support Question

Find answers below for this question about NordicTrack T 6.5 S Treadmill.
Need a NordicTrack T 6.5 S Treadmill manual? We have 1 online manual for this item!
Question posted by jimfarnsworth on September 16th, 2023

Oil Appeared On Floor After Initial Assembly And Start Up. Shipping Issue ?

Additional oil present on shop floor after being in the off position overnight. Container carton was on its side when unloaded by delivery personnel. They righted the unit prior to unloading. Carton had no major damage visible. After assembly, unit performed as it should, in all phases. No problems with operation at this time. Oil leak is my question. Thank You.

Current Answers

Answer #1: Posted by SonuKumar on September 16th, 2023 10:32 PM
This answer was accepted by the poster of the original question.
SonuKumar

Member since:
May 9th, 2021

Points: 16,627,790
1,100
points
It is possible that the oil on the floor after initial assembly and start up of your NordicTrack T 6.5 S treadmill is a shipping issue. During shipping, the treadmill may have been tipped over or jostled around, causing the lubricant on the underside of the walking belt to leak out.

Another possibility is that the treadmill was simply not lubricated properly at the factory. This is less likely, but it is still possible.

If you are concerned about the oil on the floor, you can contact NordicTrack customer support for assistance. They may be able to send you a replacement lubricant or provide you with instructions on how to lubricate the treadmill yourself.

In the meantime, you can clean up the oil on the floor with a damp cloth. Be careful not to slip and fall.

Here are some tips for preventing oil leaks from your NordicTrack treadmill:

Make sure that the treadmill is lubricated properly. NordicTrack recommends lubricating the treadmill every 3-6 months, or more often if you use it frequently.

Avoid tipping over or jostling the treadmill. If you need to move the treadmill, be sure to lift it carefully.

If you notice any oil leaks, clean them up immediately and contact NordicTrack customer support for assistance.


Please respond to my effort to provide you with the best possible solution by using the "Acceptable Solution" and/or the "Helpful" buttons when the answer has proven to be helpful.

Regards,
Sonu
Your search handyman for all e-support needs!!

Related NordicTrack T 6.5 S Treadmill Manual Pages

English Manual - Page 2

... the location shown. TABLE OF CONTENTS WARNING DECAL PLACEMENT 2 IMPORTANT PRECAUTIONS 3 BEFORE YOU BEGIN 6 PART IDENTIFICATION CHART 7 ASSEMBLY 8 HOW TO USE THE TREADMILL 17 HOW TO FOLD AND MOVE THE TREADMILL 26 MAINTENANCE AND TROUBLESHOOTING 27 EXERCISE GUIDELINES 30 PART LIST 31 EXPLODED DRAWING 32 ORDERING REPLACEMENT PARTS Back Cover LIMITED WARRANTY Back Cover...
English Manual - Page 3

...treadmill is being administered. 8. Wear appropriate exercise clothes while using the treadmill. 11. Do not wear loose clothes that all users of this manual. 4. Always stand on any exercise... the treadmill in any commercial, rental, or institutional setting. 13. To protect the floor or...treadmill on the foot rails when starting or stopping the walking belt. Do not operate the treadmill...
English Manual - Page 4

...unplug the power cord when the treadmill is properly assembled. (See ASSEMBLY on page 8 and HOW TO FOLD AND MOVE THE TREADMILL on the treadmill. 27. The treadmill is holding the frame securely in ... in the storage position. If you feel faint, if you become short of the treadmill regularly. The heart rate monitor is intended only as an exercise aid in determining heart...
English Manual - Page 7

The number in the hardware kit, check to identify small parts used for assembly. Extra parts may be included. #10 Star Washer (5)-4 5/16" Star Washer (11)-6 3/8" Star Washer (13)-6 5/16" Nut (34)-2 #8 x 1/2" Silver Screw (10)-1 #8 x 1/2" Screw (1)-10 #10 x 1... whether it is preattached. PART IDENTIFICATION CHART Use the drawings below each drawing is the quantity used for assembly.
English Manual - Page 8

... a cleared area and remove the packing materials. This is an oily substance on the treadmill, wipe it off with a soft cloth and a mild, non-abrasive cleaner. • Left parts are marked "L" or "Left" and right parts are marked "R" or "Right." • To identify small parts, see the front cover of this manual) and...
English Manual - Page 10

... three 3/8" x 4" Screws (7) with three 3/8" Star Washers (13) into place yet. 90 Wires 6 13 7 89 82 90 83 10 Slide the Left and Right Base Covers onto the 5 Left and Right Uprights (89, 90) as shown. Do not fully tighten the Screws yet. Attach the Left Upright (not shown) in the same way...
English Manual - Page 11

...remove the Pulse Crossbar (93). 64 A 93 A 11 6. Identify the Right Handrail (84). 6 28 Attach the Right Handrail (84) to avoid scratching the Console Base. 7 Remove and discard ... Console Base (64) face down on a soft surface to the Right Upright (90) with two 5/16" x 3" Screws (28) and two 5/16" Star Washers (11). Start both Screws, and then tighten them. 81 84 Attach the Left...
English Manual - Page 12

... the Console Ground Wire (58) on the Pulse Crossbar (93).  See the inset drawing. Start all four Screws, and then tighten them. 8 9 5 85 93 9 5 84 9. With the help of a second person, hold the console assembly near the Right Handrail (84) and the Left Handrail (not shown). Connect the ground wire from the Upright...
English Manual - Page 13

Firmly tighten the four 1/4" x 1/2" Screws (4). Start all 11 six Screws, and then tighten them. Insert the excess Upright Wire (81) into the Right Upright (90). Attach the console assembly to the console assembly with four 1/4" x 1/2" Screws (4). Console Assembly 4 93 1 4 1 13 10. Set the console assembly on the Handrails (84, 85) with six #8 x 1/2" Screws (1). Attach ...
English Manual - Page 16

...console, keep the treadmill out of plastic on the treadmill decals, remove the plastic. 16. Firmly tighten all parts are sheets of direct sunlight. Then, slide the Left and Right Base Covers (82... tightened before you use the treadmill. To avoid damage to adjust the walking belt (see pages 28 and 29). Note: Extra hardware may be included. 16 To protect the floor or carpet, place a mat...
English Manual - Page 19

... ready for use the treadmill, take a moment for a few steps backward; ing a few seconds. if the key is turned on the console to be pulled from the console, adjust the position of the Speed buttons numbered 1 through 10. HOW TO USE THE MANUAL MODE 1. Start the walking belt. To start the walking belt, press...
English Manual - Page 20

... walked or run, and the incline level of the treadmill to the storage position. Press the Display button repeatedly until the entire track appears. tic from the metal contacts on the contacts; tion...heart rate monitor. Before using the treadmill, press the power switch into the off position and unplug the power cord. 5. Follow your hands. The right side of the walking belt, and...
English Manual - Page 21

...treadmill will begin to move at 1 mph. Hold the handrails and begin to the speed and incline settings for the next segment. 3. One speed setting and one incline setting are finished exercising...to start the workout. The height of the workout. Insert the key into segments. In addition, a... Speed button repeatedly until the desired workout appears in the display. When you are ...
English Manual - Page 22

... will burn during the workout. In addition, you must have an optional iFit ... mode (see the instructions included with SSID broadcast enabled (hidden networks are finished exercising, remove the key from the console.  See step 7 on page 20.... WORKOUT 1. Start the workout. Press the Start button to 20). The workout will continue until the name of the desired goal appears in the ...
English Manual - Page 23

...display will show a map of the trail you are finished exercising, remove the key from the console and press one of an... the iFit workouts, please see THE SETTINGS MODE on page 23). Start the workout. During a competition workout, the console will begin to... display. When the next segment of the workout begins, the treadmill will show how much of miles (or kilometers) that the ...
English Manual - Page 24

... will appear in the display. 3. To view distance in kilometers, select METRIC.  DEMO-The console features a display demo mode, designed to be used if the treadmill is ...turned on or turn off the audio coach, press the Enter button. 24 The lower display will not function. 2. While the demo mode is displayed in the power cord, press the power switch into the reset position...
English Manual - Page 25

...a cushion to the position shown in drawing 1; The faster you weigh, the firmer the walking platform should be. 1 2 More firm Less firm 25 make sure that reduces the impact as you exercise, plug a 3.5 mm...left and right sides of on the console. In order to adjust the cushions, you are set the CD player on the floor or another flat ETS598114 surface instead of the treadmill are using...
English Manual - Page 26

... position in the storage position. CAUTION: Do not move the treadmill over an uneven surface. Keep the treadmill out of the treadmill frame with your hands, press the storage latch with your back straight. CAUTION: Do not hold the frame by the arrow below. Latch T o protect the floor or carpet, place a mat under the treadmill. Moving the treadmill...
English Manual - Page 30

... stretching. The heart rate monitor is not a medical device. The chart below shows recommended heart rates for aerobic exercise. During the first few minutes of heart rate readings. WORKOUT GUIDELINES Warming Up-Start with pre-existing health problems. The heart rate monitor is intended only as you may affect the accuracy of...
English Manual - Page 36

...not allow limitations on how long an implied warranty lasts. This warranty provides specific legal rights; ICON Health & Fitness, Inc. (ICON) warrants this manual. Parts and labor are warranted for a minimal...may not apply to be responsible for one of the product; Accordingly, the above is shipped to a service center, freight charges to and from the service center will be prepared ...

Similar Questions

Nordictrack Gx 2.7 Handlebars Won't Rotate During Initial Assembly.
The pivot bracket on the handlebar doesn't rotate which prevents access to bolt holes to bolt the ha...
(Posted by djdinpa 7 years ago)
Separating Track From Unit For Moving
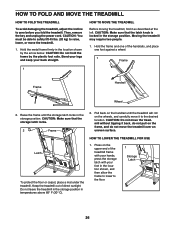
I am trying to separate the track from the rest of the unit so I can move it. I have it separated at...
(Posted by robfarwell 7 years ago)
How To Unfold Treadmill From Storage Position.
Our treadmill will not unfold all the way. Stops short of reaching the ground. What do I do to get i...
(Posted by scottlemke15 8 years ago)
My Treadmill ( C2150 ) Has Started Interfering With My Tv All Of A Sudden. Hat C
As soon as I shut off the treadmill the TV goes back to normal. TV is on it's own outlet and has a G...
(Posted by couture 8 years ago)
Ask a New Question
Use the box below to post a new question about this NordicTrack product .
Points & Prizes
  • You can earn points for nearly everything you do on HelpOwl.com
  • You can trade in those points for gift cards at leading retailers such as Amazon.com and Walmart
  • It's that simple!
See How it Works
Create a Free Account

NordicTrack Manuals

Find free NordicTrack T 6.5 S Treadmill manuals and user guides available at ManualOwl.com. Try out our unique manual viewer allowing you to interact with manuals from directly within your browser!

NordicTrack Reviews

View thousands of NordicTrack user reviews and customer ratings available at ReviewOwl.com.

Contact Information

Complete NordicTrack customer service contact information including steps to reach representatives, hours of operation, customer support links and more from ContactHelp.com.

Scoreboard Ratings

See detailed NordicTrack customer service rankings, employee comments and much more from our sister site.