Get support for Pfaff Tipmatic 1027

Pfaff Tipmatic 1027 Support Question

Pfaff Tipmatic 1027 Support Question

Find answers below for this question about Pfaff Tipmatic 1027.
Need a Pfaff Tipmatic 1027 manual? We have 1 online manual for this item!
Question posted by jllowance on September 4th, 2020

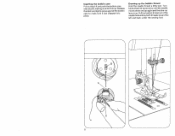
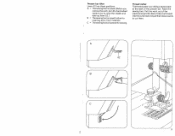
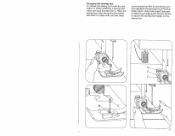
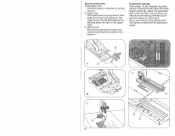
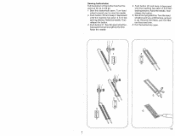
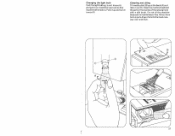
New Or Replacement For A Clutch Assembly (part No. 930402254450)?

The person who posted this question about this Pfaff product did not include a detailed explanation. Please use the "Request More Information" button to the right if more details would help you to answer this question.

Current Answers

Answer #1: Posted by Troubleshooter101 on September 4th, 2020 8:17 PM
Troubleshooter101

Member since:
September 30th, 2015

Points: 2,927,030
100
points
You have to check this link below to know about the available parts:- https://m.bonanza.com/items/like/240748134/pfaff-1027-tipmatic-tension-assembly-w-thread-guide Thanks


Please respond to my effort to provide you with the best possible solution by using the "Acceptable Solution" and/or the "Helpful" buttons when the answer has proven to be helpful. Please feel free to submit further info for your question, if a solution was not provided. I appreciate the opportunity to serve you!
Troublshooter101
Answer #2: Posted by aprosanaguimaraesrodrigues on September 4th, 2020 4:19 PM
aprosanaguimaraesrodrigues

Member since:
September 4th, 2020

Points: 90
90
points
Atenção: o barato pode sair mais caro

Ao se depararem com problemas desse tipo, muitas pessoas optam por economizar ao máximo nos processos de reparação, seja adquirindo peça de segunda linha ou substituindo apenas parcialmente os componentes defeituosos. Mas atenção: essa atitude pode gerar problemas maiores no futuro, resultando em gastos excessivos com manutenções corretivas.

Portanto, é importante valorizar a qualidade das peças de reposição e a substituição completa dos componentes defeituosos. Isso influenciará bastante na conservação do conjunto, bem como de outros mecanismos do motor e da caixa de câmbio. Além disso, é importante ressaltar o perigo que um problema na embreagem representa no trânsito, especialmente em velocidades mais altas. Não tem jeito: o ideal é não economizar.

Faça as inspeções necessárias e planeje a manutenção completa do sistema, executando todos os serviços necessários e optando sempre por peças de marcas consolidadas no mercado. Desta forma, você garante a qualidade e resistência do conjunto.

Como deu para perceber, a manutenção de embreagem, com a troca do disco e do rolamento, é essencial para o conforto e a segurança do veículo, além da conservação do motor e da caixa de câmbio.

Fora isso, é importante que sejam tomados cuidados com alguns hábitos que aceleram seu desgaste. No mais, basta recorrer a profissionais de confiança ao notar sinais de problemas no sistema para fazer a correção completa, sem economizar em peças de reposição para evitar futuras dores de cabeça.


Rosana Guimaraes

Related Pfaff Tipmatic 1027 Manual Pages

Owner's Manual - Page 2

...-tip controls 1025 Selecting utility stitches Selecting stretch stitches Utility- and stretch-stitch combinations 1027 Selecting the needle position for straight stitching Droppingthemachinefeed Changing the needle Changingthesewingfoot Special sewing feet Buttonhole settings Sewing buttonholes Sewing feet Changing the light bulb Cleaningandoiling Trouble shooting Page 4 4 5 10 11 11 12 13...
Owner's Manual - Page 4

...the sewing lamp. c) Be sure to interrupt sewing and leave the machine for entering phone number of customer service a) Be careful to avoid finger injuries by the needle when sewing. Parts of your sewing machine ...-feed control 45 Stitch chart (Model 1027) 46 Accessory box with accessory compartment underneath 47 Bobbin winder 48 Free arm cover (enclosing sewing hook and drop-feed control) 49...
Owner's Manual - Page 5

On Model 1027 a stitch chart is found on the inside of this cover (A). Opening the hinged top cover Also fold the handle toward the left hand (B), swing it ...
Owner's Manual - Page 6

I;- C 2 . C a 0 0 C shows how the second spool holder snap-on sewing feet, the and the seam ripper fit into the box. Accessory box and accessory compartment sTliofiltrtyitucpooutmht ep(Aaf)rr.tomTnhet enortfe(aBics)caeunsnsdaoedrrdynietbiaootnxha.4l 6acacneds Ill.
Owner's Manual - Page 7

... foot control is now readyfor sewing. Press down the pedal, and the machine starts sewing. Electrical connection Take the foot control out of the machine. Your machine is placed in the machine again as shown in the illustration (A). Foot control Place the foot control under the table. Push plug B into the machine socket and plug C into the...
Owner's Manual - Page 8

...the accessory box and is then pulled into slot Band take-up lever 52. Upper threading Raise the sewing foot. C Second spool holder: This is contained in front of the spool of thread. Placing spool ... right thread guide Don the needle holder. Insert the spool holder in the drawing. For two-needle sewing, draw one thread into slot Ato the left of guide C, and draw the other into the left...
Owner's Manual - Page 9

Threading the needle Thread the needle from you. 5 After bobbin winding, tighten the knob again by turning it away from front to back. Hold the hand wheel steady and turn the stop motion knob toward you start winding the bobbin, disen gage the sewing mechanism. V Disengaging the sewing mechanism Before you .
Owner's Manual - Page 10

...turns of thread on spindle 47 so that pin Centers slot D. Draw the needle thread under the sewing foot, up and into slot 54, and from the spool, lead it around bobbin tension stud 55... spool of thread on spindle 47 so that pin Centers slot D. Then re-engage the sewing mechanism. Disengage the sewing mechanism. Push the full bobbin toward the right to start the bobbin winder. When the ...
Owner's Manual - Page 12

... lightly press against the bobbin case to make sure it has snapped into place. Turn hand wheel 32 toward the left and back under the sewing foot. 8 Inserting the bobbin case Pull out latch K and push the bobbin case onto stud B, making sure slot A is up.
Owner's Manual - Page 13

... the back of the machine toward you to cut them. 9 Thread cutter The thread cutter is lowered for inserting extra-thick materials. Draw the threads into the cutter slot and pulithem downwards to raise the needle and take-up lever 52.) B = The sewing foot is raised further for sewing. Pull the work , turn...
Owner's Manual - Page 15

... for sewing stretch stitches (red stitch symbols on push buttons). Regulating the stitch length Turn the control so that the number indi cating the stitch length chosen is opposite mark A. Stitch length range: Model 1025: 0-4 Model 1027: 0-6 Ill. Reverse sewing Push button 44. As long as you keep this button depressed, the machine sews back...
Owner's Manual - Page 16

Elastic blindstitch Push buttons 15 and 16. Finger-tip controls of model 1027 10 Elastic triple straight stitch Straight stitch 11 Pullover stitch Blindstitch 1 2 Closed overlock stitch Joining stitch 1 3 Overlock stitch Shell-edge stitch 14 Feather stitch Elastic ...
Owner's Manual - Page 19

... button 1 0 Right needle position (model 1 027): push buttons 11 and 1 2. L ri J 6 L This stitch can also be sewn with model 1025. and stretch-stitch combinations, model 1027 The various stitch combinations are shown in the chart on the inside of the hinged top cover. For example, if you want to...
Owner's Manual - Page 20

... For sewing, push the drop-feed control toward B. Changing the needle Raise the needle bar. Push the drop-feed control toward A. The feed dog is dropped (for zigzag and utility stitch sewing. 16... Then hold the needle, loosen screw A and pull the needle out downwards. Insert a new System 1 30/705 H needle (with a needle ...
Owner's Manual - Page 21

... and hold it in slot C. Screw F serves to secure the sewing foot holder on the presser bar. 17 Hole E and screw Dare used for attaching an edge guide. Lower presser bar lifter 42 and at the same time reposition the sewing foot so that stud B fits in place with your left hand...
Owner's Manual - Page 22

...buttonhole foot. Insert the filler cord as follows (C): Place it in front lug D. Special sewing feet A Blindstitch foot Blindstich guide E is adjusted by turning screw D. Regulate the stitch ... with screw H. The zipper foot can be adjusted sideways for stitching along scale F. As you sew, arrow E moves along the right or left zipper chain. This serves to determine the buttonhole length...
Owner's Manual - Page 23

.... Raise the needle. Remove the fabric, pull the filler cord taut and trim. 6 Cut the buttonhole open. 4 19 Sew the second button hole seam the same length as it depressed until the machine has sewn 4 to 6 bartacking stitches. Raise the needle. Turn the hand wheel toward you to raise the needle. 2 Push...
Owner's Manual - Page 25

...machine feed and the parts in slots C. Changing the light bulb Push the light bulb up, turn it toward A and pull it out. All you have to do is maintenance-free. Push it up at the back (A) and take it is put a drop of the sewing... hook with a sàft brush. Insert the new bulb so that its pins slide in the vicinity of oil ...
Owner's Manual - Page 26

... as far as it will go , its flat shank side facing toward the back. See Needle and Thread Chart. Let machine feed the work is pushed or pulled. Needle bent. Insert new needle. Thread tension too strong. Wrong needle used . 2. Regulate thread tensions. Trouble shooting rCa use: 1. Remedy: Push needle up as...
Owner's Manual - Page 27

... uniform Tension out of material. Bobbin thread wound unevenly. Use first-class thread only. Thread machine properly and check both tensions. 5. 4 Cause: Remedy: 4. Check upper and lower tensions....bobbin winding, do not hold thread in hook raceway. Thread too thick, knotty or hard. Machine feeds irregularly or not at left.) Flick reverse-feed control to the right. 6. Seam is...

Similar Questions

Stitch Selection - Zigzag Etc.
good day, please tell me how the stitch selection works on the tipmatic 1027 sewing machine
(Posted by myrnamjs 3 years ago)
I Am In Need Of New Brushes For A Pfaff 230 Sewing Machine, [email protected]
I can repair motors, engines etc. I can't find new brushes for my pfaff230 sewing machine. Do you ha...
(Posted by lizogle1 8 years ago)
Tipmatic 1027 Has Power, The Light Is On , But It Won't Run.
Plugged in. Light on. no movement when foot pedal depressed. fly wheel turns. needle rises and falls
(Posted by joannekulesza 8 years ago)
Pfaff C1100 Pro Sewing Machine Instruction
Can you please direct me to "easy" to understand instruction on how to "thread" my Pfaff C1100 Pro s...
(Posted by magicfeathers55 10 years ago)
Ask a New Question
Use the box below to post a new question about this Pfaff product .
Points & Prizes
  • You can earn points for nearly everything you do on HelpOwl.com
  • You can trade in those points for gift cards at leading retailers such as Amazon.com and Walmart
  • It's that simple!
See How it Works
Create a Free Account

Pfaff Manuals

Find free Pfaff Tipmatic 1027 manuals and user guides available at ManualOwl.com. Try out our unique manual viewer allowing you to interact with manuals from directly within your browser!

Pfaff Reviews

View thousands of Pfaff user reviews and customer ratings available at ReviewOwl.com.

Contact Information

Complete Pfaff customer service contact information including steps to reach representatives, hours of operation, customer support links and more from ContactHelp.com.

Scoreboard Ratings

See detailed Pfaff customer service rankings, employee comments and much more from our sister site.