Pfaff creative 2134 Support Question
Pfaff creative 2134 Support Question
Find answers below for this question about Pfaff creative 2134.Need a Pfaff creative 2134 manual? We have 1 online manual for this item!
Question posted by Kelley33846 on December 2nd, 2021
Embroidery Question
How do I get the double arrows to appear so that I can begin my embroidery design?
Current Answers
Answer #1: Posted by SonuKumar on December 3rd, 2021 8:09 AM
SonuKumar

Member since:
May 9th, 2021 Points: 16,627,790

Member since:
May 9th, 2021 Points: 16,627,790
Please respond to my effort to provide you with the best possible solution by using the "Acceptable Solution" and/or the "Helpful" buttons when the answer has proven to be helpful.
Regards,
Sonu
Your search handyman for all e-support needs!!
Related Pfaff creative 2134 Manual Pages
Owner's Manual - Page 2

... 60335-2-28 and UL1594
IMPORTANT SAFETY INSTRUCTIONS
When using this household sewing machine. To unplug, grasp the plug, not the cord. This household sewing machine is designed to comply with same type rated 5 Watt. Close attention is necessary when this sewing machine is required around the sewing machine needle. • Always use bent needles. • Do not pull or...
Owner's Manual - Page 3
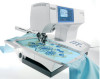
... some time reading these operating instructions. Before you will soon discover how easy it is the perfect embroidery and sewing machine combination. Your Pfaff creative 2134 is to your imagination and make your machine. You will find inspiration in creative sewing projects and learn more about the special accessories available for your ideas become reality! Give a free...
Owner's Manual - Page 4

...the sewing machine Parts of the embroidery unit Parts of the embroidery ...creative 2134
2:12
Bringing up the bobbin thread
2:14
Thread cutter
2:14
Threading the twin needle
2:15
Control Panel overview
2:16
Window indications
2:17
Correct thread tension
2:18
Getting started
2:19
3 Embroidery
Attaching the embroidery foot
3:2
Attach the embroidery unit
3:2
Remove the embroidery...
Owner's Manual - Page 13

...lead cord" 6. Thread cutter 20. Take up lever 22. Creative smart card slot 29. Connection socket for bobbin winding 26. ...2. Removable accessory tray 11. Threading slots
16. Thread cutter for the embroidery unit
Introduction 1:13 Front panel with control buttons 5. Parts of the sewing machine
1. Carrying handle 3. Connection socket, "foot control" 7. Slide for ...
Owner's Manual - Page 15

The stitches of the sewing machine are illustrated on the inside of the carrying case. Introduction
Carrying case
Place the enclosed lead cord, the foot control and Owner's manual into the storage compartment of the lid.
1:15 Lid
Open the lid upwards.
Owner's Manual - Page 16

... respective compartments of the hole.
Accessories
Embroidery unit With the embroidery unit comes four clips, the embroidery foot, the hoop (225x140), the embroidery booklet and the embroidery smart card 300s. Accessory tray / Free arm In order to sew using the free arm, swing the accessory tray to the left of the sewing machine. Arranging the accessories Open the...
Owner's Manual - Page 20

...), you are unsure of the correct voltage for this plug is controlled by pressing the foot control. To reduce the risk of electric shock, this sewing machine.
2:2 If the plug does not fit fully in any way! Connecting the foot control
Connect the plug of the foot control to the connection socket...
Owner's Manual - Page 21

The sewing machine is raised or lowered with the presser foot lift (29). To put the presser foot lift in free-motion/darning/embroidery position you should lower the presser foot lifter and push it backwards until it engages in the creative 2134 window. Preparations
Main switch
When the main switch (7) is switched on (switch function...
Owner's Manual - Page 40

... holder as far as it out to the front into the cross hole of the sewing machine. Tighten the screw (A). Tighten the screw (A).
Attach the embroidery unit
Switch off the main switch The connecting socket (32) for the embroidery unit is accessible.
2. Carefully loosen the screw (A) until the cross-hole (B) is found on the...
Owner's Manual - Page 43

... only designs or both designs and fonts, the small hoop icon will be shown on the window. The letter P will be shown on the window. For each font will move forward to slide off the hoop.
Embroidery
Function buttons for embroidery
This section contains the function buttons active when the machine is in the embroidery case...
Owner's Manual - Page 54

....
Start embroidering. To finish, slide the hoop back onto the embroidery unit and continue embroidering.
3:16 Start your machine again, and the machine will sew a straight stitch outline around only the appliqué fabric outside the straight stitch line. Cutwork embroidery
To embroider cutwork designs, place a stabilizer underneath the fabric and hoop all the layers...
Owner's Manual - Page 72

... stitch. Hoop your work.
4:18
Put the presser foot in a round embroidery hoop. Darning in the darning position. Lower the feed dog. To put the presser... produce a stronger repair. Select the straight or zigzag stitch. Tip: Remember, when sewing with the feed dogs lowered, the stitch length is at its highest position. Free-...appear on the reverse side of the presser foot holder.
Owner's Manual - Page 83
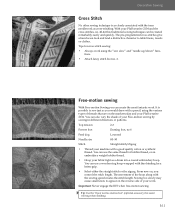
..., or an embroidery weight bobbin thread.
• Hoop your work .
Important: Never engage the IDT when free-motion sewing.
You can also vary the shade of the hoop along with the sewing speed creates the stitch length. The movement of your machine with a good quality cotton or synthetic thread. With your Pfaff creative 2134. You can...
Owner's Manual - Page 88

... it snap in place. Cleaning the window Wipe the window with the brush. • Clean the sewing machine after every 10 - 15 hours of the cut-out then press down at the front until you start sewing, check that the needle plate is lying flat. Clean the feed
dogs and hook area with...
Owner's Manual - Page 89

... safely. Insert the bulb in a clock-wise direction. Remove the light bulb changer from the
machine. • Remove the accessory tray. Guide the bulb into the holder as far as indicated ...remove it will go and turn it until the pins of the machine, 12 V max 5 W.
The light bulb is located inside the
sewing machine near the needle threader. Insertion of the bulb Important: Use a...
Owner's Manual - Page 91
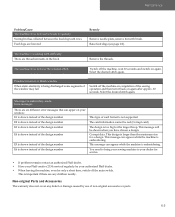
... dealer. • When leaving the machine, even for service.
• If problems remain contact an authorized Pfaff dealer. • Have your Pfaff creative 2134 serviced regularly by use of non-original accessories or parts.
6:5 Select the desired stitch again. This message will be red (Corrupt card)
The design is embroidering. Select the desired stitch...
Owner's Manual - Page 92

... Panel overview
2:16
Creative smart card slot
1:13
Cross-hem knit stitch
1:8, 5:13
Cross stitches
1:10, 5:11
Cutwork embroidery
3:16
Cut position
3:5
Cut the thread
3:12
D Darning
Automatic
4:17
Free-motion
4:18
with the three-step zigzag stitch
4:17
Darning position
2:3
Decorative stitches
1:10
Design length
3:10
Design width
3:10
EEdit/Sew sequences
4:5
Elastic...
Owner's Manual - Page 93

...(set) screw
1:13
Needle plate
1:13
Nostalgia/Heirloom
5:10
O Orbiting button
3:5
Overlock stitches
1:9, 4:10
P Park position
3:5
Parts of the embroidery hoop
1:14
Parts of the embroidery unit
1:14
Parts of the sewing machine
1:13
Patchwork
5:6
Piecing the quilt top
5:6
Positioning buttons
3:7, 4:7
Presser feet
1:17
Presser foot holder with presser foot
1:13
Presser foot...
Owner's Manual - Page 95

... V / 120 V
75 W 12 V/max. 5 W Max 950 rpm
0...9 mm 0...6 mm 8 mm 10.5 103/705
Package contents Sewing machine Carrying case Foot control Lead cord Accessories package Owner's manual Embroidery unit Embroidery hoop Embroidery clips Quick start embroidery kit
Intellectual property PFAFF, creative and IDT (image) are registered trademarks or trademarks of VSM Group AB.
6:9 Technical data
Dimensions...
Owner's Manual - Page 96

If you suspect that your sewing machine. This discoloring may be very difficult or impossible to avoid the discoloring.
6:10 Some fabrics have a lot of excess dye which can cause discoloration on ... garment contains a lot of excess dye. Fleece and denim fabric, especially red and blue, often contain a lot of excess dye, always pre-wash it before sewing to remove.
Similar Questions

Will This Work With A Pfaff Creative 2134? Thanks
(Posted by Charflem 2 years ago)

My Pfaff Embroidery Machine Will Not Start Pattern When 120x115 Hoop Is Connecte
(Posted by thefaerieway 3 years ago)

I Have A Pfaff Creative 2134 ,i Need Instruction Book,not Manual. Thanks
(Posted by rossivittoria 4 years ago)

The Sewing Machine Will Say Calibrate Embroidery Unit. I Click The Check Mark T
when I click on calibrate the sewing machine goes into thinking mode & it just does it for a long ti...
when I click on calibrate the sewing machine goes into thinking mode & it just does it for a long ti...
(Posted by Anonymous-156748 8 years ago)

Pfaff 259 Sewing Machine Won't Run With Foot Petal
I have a pfaff 259. When I push on the foot petal the motor runs but the machine itself doesn't run....
I have a pfaff 259. When I push on the foot petal the motor runs but the machine itself doesn't run....
(Posted by Aemazing 8 years ago)