
Pfaff hobbylock 796 Support Question
Pfaff hobbylock 796 Support Question
Find answers below for this question about Pfaff hobbylock 796.Need a Pfaff hobbylock 796 manual? We have 1 online manual for this item!
Question posted by vreid4 on April 10th, 2013
While Serging With My Hobbylock 796 Cut Fabric Entering Into My Serged Seam - Do
Do I need a new upper or lower knife or is it another problem
Current Answers
Related Pfaff hobbylock 796 Manual Pages
Owner's Manual - Page 2

Notes on safety
A) Due to avoid injury and observe the sewing area continuously while sewing.
C) The maximum approved wattage of the needle, the user must be adjusted by anyone but an authorized Pfaff agent. B) When leaving the machine, changing parts or accessories, the machine must take sufficient care to the up and down movement of...
Owner's Manual - Page 3
... 794 Adjusting the stitch length on 796 Adjusting the differential feed on 796 Regulating the sewing foot pressure Adjusting the seam width Changing the sewing feet Sewing rolled hems Changing needles Changing lower knife Changing upper knife Changing light bulb Cleaning the thread tensions Oiling the machine Sewing problems and solutions Accessories Specifications
2, 3 4
4, 5 5
6, 7 7-11
8 9 10...
Owner's Manual - Page 5

Controls of the sewing machine
1 Foot pressure regulating dial 2 Thread guide 3 Carrying handle 4 Left needle thread tension dial 5 Right needle thread ...796 17 Needle plate 18 Presser foot 19 Needle bar 20 Thread reel stand 21 Thread reel pins 22 Adjusting knob 23 Machine plug socket
24
Master
switch
25 Lint box
26 Foot control
27 Foot control plug
28 Mains plug
29 Lower knife
30 Knife...
Owner's Manual - Page 6

... are illustrated on the foot control. Caution: When the machine is not in use, disconnect plug from power source.
To replace the accessory box, slide it into the machine plug socket. Electrical connection Use this machine only on a flat surface or on a special sewing table. Then connect the mains plug to the left and...
Owner's Manual - Page 9
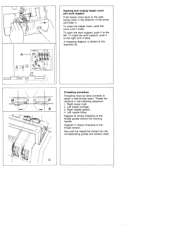
...3. Now pull the respective thread into the corresponding guides and tension discs.
7
Thread the machine in the direction of the arrow and lower it locks. Right looper (red) 2. A threading diagram is affixed to the right, swing... support Push looper cover lever to the machine (A). To close the looper cover, push the cover until it to obtain a well-formed seam. Right needle (green) 4.
Owner's Manual - Page 14

Sewing a test sample After threading, a test sample should be guided to the rear, under the presser foot. Raise presser foot lever, as shown in illustration. In ... so, the threads must be sewn.
Hold thread ends with your left hand while turning hand wheel counter clockwise with your right hand. Insert test fabric and lower presser foot. Make sure that threads have interlocked correctly.
Owner's Manual - Page 15
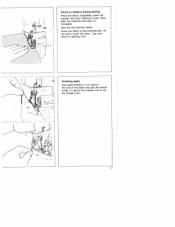
... the seam and use the thread cutter (1) behind the presser foot to sew. (Also after the machine has been re threaded). Use your hand for guiding only. Since the fabric is fed automatically, do not pull or push the fabric. Points to observe during sewing Place the fabric completely under the presser foot when starting to cut the...
Owner's Manual - Page 16

... heavy fabrics and different thicknesses of seams, sew approximately 3 cm (1") beyond the seam. For knit fabrics, a crochet needle can be used to very heavy fabrics.
Securing the seam:
Knot the thread chain. Lower presser foot and sew over . Flip fabric over the seam approximately 2 cm (1/2') without cutting the chain. When sewing very heavy fabrics, tighten the upper knife screw...
Owner's Manual - Page 17

... has been obtained. Reverse side
Right
Left
needle thread
needle thread
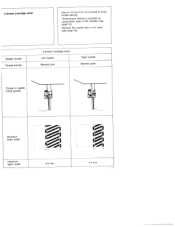
Adjusting thread tension:
Set all thread tension dials to fabric type and thread size.
Examine the seam and make the necessary tension adjustments. Left looper thread
- See illustration below.
See illustration above.
1
Sew a test sample to be adjusted according to "N" (standard setting).
Owner's Manual - Page 19
...
How to convert from four-thread to threethread sewing: Three-thread sewing is riot used (see page 10). Remove the needle that is possible by using either right or left needles (see page 26). Needle thread Thread tension
3-thread overedge seam Left needle Marked blue
Rht needle Marked green
Thread in needle
clamp...
Owner's Manual - Page 20

... in mm which normally is normally reset only for very thin or heavy fabrics. Heavy fabrics: Increase the sewing foot pressure by setting to a lower number. Stitch Ienght setting on 794
The stitch length is the standard sewing foot pressure. Thin fabrics: Reduce the sewing foot pressure by turning feed regulator 16. A = setting mark. Material
Light materials...
Owner's Manual - Page 21

... arrow).
/
The numbers indicate the stitch length
in the direction indicated by the arrow until it there. If
I
IIIi
II
I
I ! Setting the stitch length on 796
Open lateral swivel table 15.
di if
I
5:
Set the required stitch length at mark A by continuing to turn handwheel 12 forwards or backwards, as you...
Owner's Manual - Page 23

... wish to obtain fashionable effects on garments
differential feed setting 2).
21 d
nicki fabrics, light knittings
Heavy knitwear,
2
very elastic fabrics
Ill. 1
III 2
0'
g
III. 3
Ill. 4
Gathering can also be set during sewing. In order to make a sewing test has to be employed to process
differential feed. sure
about
the
setting
r1e differential feed can be...
Owner's Manual - Page 24

according to the lower (cutting) position and close the looper cover. Reset the upper knife to fabric type and seam requirements. Adjusting seam width: Standard setting is "N". Turn knurled knob (2) clockwise until it may be changed from 2.5 to the far right.
Note: Before adjusting the stitch width, always disengage the upper knife. The seam width can be necessary to reset the...
Owner's Manual - Page 27

the If
fabric is to roll the fabric between Hobbylock will quickly produce a professional
quick test to thumb and rolled hem. Or use regular sewing thread, woolly nylon or
rayon thread for a rolled hem with finish. Set red threading path (upper looper tension) at + 4 or Set orange threading path (lower looper tension) at + 2 or more, depending on...
Owner's Manual - Page 28
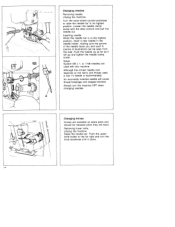
...and skipped stitches. Push the upper knife holder to its highest position.... needles Removing needle: Unplug the machine. Although the correct needle size depends on the fabric and thread used with the allen...machine OFF when changing needles. Removing lower knife: Unplug the machine. Notes: System D8 x 1, or 1738 needles are used , a size 14 needle is at the highest position, insert a new...
Owner's Manual - Page 29

... knife clamp screw (1) and pull the lower knife down.
Set the knife so that the cutting edge aligns with the cutting edge facing right. Push upper knife to the right and turn to the front until it snaps into the groove of the lower knife holder with the surface of the needle
-
-
1
Tighten the lower knife clamp screw.
_________ - I
27 Inserting lower knife: Insert a new knife...
Owner's Manual - Page 30

.... It has to the far right and turn the knob clockwise until the upper knife arm is carbide tipped and will not need to 1.0 mm lower in this position than the surface of the upper knife should be 0.5 to be replaced only when the cutting edge has been damaged. The front edge of the needle plate. Turn...
Owner's Manual - Page 33
...
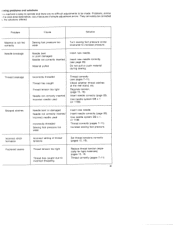
31 ewing problems and solutions hs machine is not fed correctly Needle breakage
Thread breakage
Skipped stitches
Incorrect stitch formation Puckered seams
Sewing foot pressure too weak
Turn sewing foot pressure ...needle used
Incorrectly threaded Sewing foot pressure too weak
Insert new needle. Regulate tension, (page 15, 16). Insert needle correctly (page 26).
Problems, similar the ones ...
Owner's Manual - Page 34

3
4 5 /__•
60
Specifications Highest sewing speed Overedge seam width Stitch length Sewing foot Lubrication Needle system Dimensions . Weight
Accessories
1 Screwdriver 2 AlIen wrench 3 Lint brush 4 Tweezers 5 Lower knife 6 Thread unreeling disc 7 Needles 8 Oil 9 Rolled hem presser foot
Optional accessories (not illustrated):
Blindhem foot Elastic foot
stitches/mm,
30-6.5 mm
1-5mm
Snap...
Similar Questions

Thread Jumbled Under Fabric When Starting To Sew.
I have carefully threaded my machine, Pfaff Tiptronic 2020 properly and bobbin and its thread is pro...
I have carefully threaded my machine, Pfaff Tiptronic 2020 properly and bobbin and its thread is pro...
(Posted by cebpdb1217 11 months ago)

What Fuse Size Do I Need For A Hobbylock 796 Foot Control
(Posted by colincoupland 1 year ago)

Where Can I Obtain Accessory Kit For Hobbylock 796
how can I obtain an accessory kit or Hobbylock 796
how can I obtain an accessory kit or Hobbylock 796
(Posted by selbyag 3 years ago)

I'm Trying To Make A Button Hole, The Sewing Machine Is Not Advancing The Fabric
(Posted by paulinegp22 4 years ago)

Where Can I Get An Instruction And Service Manual For A Pfaff Hobbylock 796?
(Posted by henk21355 4 years ago)