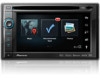
Pioneer AVIC-X940BT Support Question
Pioneer AVIC-X940BT Support Question
Find answers below for this question about Pioneer AVIC-X940BT.Need a Pioneer AVIC-X940BT manual? We have 2 online manuals for this item!
Question posted by Damiamee on June 25th, 2014
Why Doesn't Navigation Unit Work For Avic-x940bt
The person who posted this question about this Pioneer product did not include a detailed explanation. Please use the "Request More Information" button to the right if more details would help you to answer this question.
Current Answers
Related Pioneer AVIC-X940BT Manual Pages
Owner's Manual - Page 10

...and "Rear display"
In this system with # at the end of this navigation unit will be referred to as the "Rear display".
Conventions used in ALL CAPITAL, BOLD lettering: e.g.) ...image" in this manual indicates moving on the screen are indicated like this manual
Finding the operation procedure for AVIC-Z140BH. If it indicates the USB memory only, it is attached to use this : e.g.) = For...
Owner's Manual - Page 74

... back or used by touching [AV Source & Contents] on AVIC-X940BT.
p The currently selected source icon is highlighted. DVD-Video ! Bluetooth audio ! XM Tuner !
Operating list screens (e.g.
Switching between the AV operation screen and the list screen
The following sources with your Pioneer navigation system. ! ROM (in MP3, AAC, WMA) ! SD The following...
Owner's Manual - Page 176

... p When "DISC" is output to the rear display
!
To enable these navigation functions while your vehicle is receiving an emergency announcement, traffic announcement, or news ... current setting. Color: Adjusts the color saturation. ! AV1: The video and sound of the navigation unit is selected, the following restrictions are applied to rear display. -
You can choose either to ...
Owner's Manual - Page 179

... menu is not available when AV source
is muted or attenuated when you switch "Rear SP" to the following conditions. - AVIC-X940BT ! p AV source volume returns to the navigation unit. En 179
Initially, the navigation system is set only when the source is muted or attenuated according to "Sub.
Guide/Tel: The volume is selected...
Owner's Manual - Page 180

...AV Source, unless "VR Catalog Mode" is turned off .
Setting the shuffle play for AVIC-Z140BH only. Switching the operation screen p Once the cataloging is turned off , if any ... Menu", "Settings Menu", "Phone Menu" or the map screen. If you wish to the navigation unit, navigation voice guidance cannot be limited if cataloging of the content stored on the iPod. necessary. p When...
Owner's Manual - Page 200

... installation angle. (The navigation system must be adversely affected.)
"Eco Graph" is connected properly. (The navigation system works properly without obstructions.
The navigation system is set to ...the display is low. on the other end of your vehicle Something covers the GPS antenna.
Appendix
Appendix
Symptom
Cause
Action (Reference)
You cannot position your vehicle is...
Owner's Manual - Page 224

... versions of an air conditioner, make sure that air from the LCD screen to form inside the navigation unit, resulting in order to the LCD screen. Aha Radio
Aha, Aha Radio and the Aha and ... or the registered trademarks of the LCD screen and do not press strongly on it as this navigation system, avoid exposing it is exposed in possible damage.
! The LCD screen will become very hot...
Installation Manual - Page 2

... connecting the rear display 18 - Parts supplied 22 - For AVIC-Z140BH users 21 Installing the navigation system 21
- AVIC-X940BT 6 Connecting the system 8 Connecting the power cord (1) 10 Connecting...the microphone angle 27 AVIC-Z140BH 6 - Fastening the detachable faceplate 23 Installing the GPS antenna 24
- Installation notes 21 - Mounting on
the side of the navigation unit 22
2 En
-...
Installation Manual - Page 6

Section
02 Connecting the system
Parts supplied
AVIC-Z140BH
AVIC-X940BT
The navigation unit
Power cord
The navigation unit
Power cord
Traffic tuner
GPS antenna
GPS antenna
USB and mini-jack connector
USB and mini-jack connector
RCA connector
RCA connector
Microphone
Microphone
6 En
Installation Manual - Page 8

XM Satellite Radio tuner (e.g. Vehicle antenna
Traffic tuner
(*3) If you use AVIC-X940BT, you will need to install the Traffic tuner (ND-TMC10) sold separately). When connecting your iPod, both connections are necessary.
- Section
02 Connecting the system Connecting the system
The navigation unit
Wired remote input Please refer to the instruction manual for the...
Installation Manual - Page 9

...is being driven except for navigation purposes.
However, if you use the AVIC-X940BT, you will need to connect the vehicle's antenna to the antenna jack of the navigation unit. CD-SB10) (sold ...13 ft. 1 in.)
Microphone
3.55 m (11 ft. 8 in.)
GPS antenna
IP-BUS cable (supplied with SIRIUS Satellite Radio tuner)
(*5) The AVIC-Z140BH is no need to install a HD Radio™ tuner.
(*5)
IP-...
Installation Manual - Page 11

.... If not, keep the Audio Mute lead free of the navigation - If the vehicle has a glass antenna, connect to this navigation system via Bluetooth wireless technology -
When the voice recognition mode...
Section
02
En 11 Voice guidance of any connections. Connecting the system
The navigation unit
Fuse (10 A)
Power cord
RCA connector
15 cm (5-7/8 in.)
Yellow/black If you use...
Installation Manual - Page 13
... make sure to the lead whose voltage changes when the shift lever is moving forwards or backwards. Connecting the system
The navigation unit
Power cord
Violet/white (REVERSE GEAR SIGNAL INPUT) This is connected so that the navigation system can detect whether the vehicle is put in reverse. English
Section
02
En 13
Installation Manual - Page 14

Section
02 Connecting the system
When connecting to separately sold power amp
RCA connector
The navigation unit
Rear outputs (REAR OUTPUT)
Subwoofer outputs (SWL, SWR)
Power cord
15 cm (5-7/8 in.) Front outputs (FRONT OUTPUT)
15 cm (5-7/8 in.)
Blue/white To system control terminal of the power amp (max. 300 mA 12 V DC).
14 En
Installation Manual - Page 16

... Connecting the power cord (2) on trailers, or backing into a tight parking spot. Connect the navigation system to Operation Manual.)
! OTHER USE MAY RESULT IN INJURY OR DAMAGE.
Notes
! This ... rear view may appear closer or more distant than in .) RCA connector
Power cord
The navigation unit Violet/white (REVERSE GEAR SIGNAL INPUT)
For more details about the wiring, refer to
keep...
Installation Manual - Page 17

...-jack AV cable (CD-RM10) (sold separately)
! Connecting the system
Section
02
English
When connecting the external video component
Using an AV input (AV1)
The navigation unit
CAUTION Be sure to Operation Manual.)
En 17
Installation Manual - Page 18

This navigation system's rear video output is for connection of a display to enable passengers in...audio outputs
External video component (sold separately)
! Section
02 Connecting the system
Using an AV input (AV2)
The navigation unit
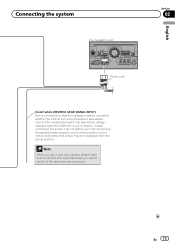
When connecting the rear display
The navigation unit
RCA connector
RCA connector
Yellow (VIDEO INPUT)
20 cm (7-7/8 in.)
Red, white (AUDIO INPUT)
Yellow (VOUT)...
Installation Manual - Page 19

Connecting the system
When connecting the external unit featuring video source
The navigation unit
Blue
20 cm (7-7/8 in "AV System Settings" to "EXT" when connecting the external unit. (For details, refer to Operation Manual.)
English
Section
02
En 19 You must set "AV2 Input" in .)
IP-BUS cable
RCA connector
(sold separately)
Black
...
Installation Manual - Page 21

Installation
Section
03
English
For AVIC-Z140BH users
Do not install this navigation system in a position where the opening of the dashboard. - Before installing this unit, make sure you leave ample space behind the rear panel and wrap any obstacles, such as on top of the LCD panel is obstructed by ...
Installation Manual - Page 22

...-mounting bracket. Parts supplied
Parts marked (*) are aligned, and tighten the screws at three locations on the shape of the navigation unit
% Fastening the navigation unit to dissipate heat. Factory radio-mounting bracket
The navigation unit
Truss head screw (5 mm × 8 mm)
(6 pcs.)
Flush surface screw (5 mm × 9 mm) (6 pcs.)
Screw* (2 mm × 4 mm)
(1 pc.)
Truss...
Similar Questions

I Have Had My Pioneer Avic-x940bt For Three Years Everything Has Been Great. I G
I have had my pioneer avic-x940bt for three years no problems. I get in my car today and there is no...
I have had my pioneer avic-x940bt for three years no problems. I get in my car today and there is no...
(Posted by Eiblsdaman 7 years ago)

I Can't Use The Menu For The Navigation On Pioneer Avic X930bt
(Posted by tlevwhear 9 years ago)
Navigation Not Working On My Avic-6000nex Keep Getting A Message
Navigation doesn't work on avic-6000nex
Navigation doesn't work on avic-6000nex
(Posted by Luisvalle7928 10 years ago)

