Pioneer DEH-P6200 Support Question
Pioneer DEH-P6200 Support Question
Find answers below for this question about Pioneer DEH-P6200.Need a Pioneer DEH-P6200 manual? We have 2 online manuals for this item!
Question posted by petegibbs on January 22nd, 2021
I Just Need A Wiring Diagram
The person who posted this question about this Pioneer product did not include a detailed explanation. Please use the "Request More Information" button to the right if more details would help you to answer this question.
Current Answers
Related Pioneer DEH-P6200 Manual Pages
Owner's Manual - Page 2

... Menu Functions 17
Tuner Operation 18
- Random Play (RANDOM) - Selecting Discs by Disc Title List
(TITLE LIST) - Title Scroll
Audio Adjustment 29
Selecting the Equalizer Curve 29 Entering the Audio Menu 29 Audio Menu Functions 30
- Disc Number Search
(for Pioneer Products .......... 6 When using the 50-Disc Type
Multi-CD Player 6
Remote Controller...
Owner's Manual - Page 4

..." adapts to higher volumes of fun and enjoyment. Taking a minute to do this now will provide a lifetime of sound. Selecting fine audio equipment such as the unit you've just purchased is too late, this manufacturer and the Electronic Industries Association's Consumer Electronics Group recommend you avoid prolonged exposure to excessive noise...
Owner's Manual - Page 5

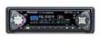
... Finder
Head Unit
DISPLAY button VOLUME
BAND button
OPEN button
FUNCTION button 5/∞/2/3 buttons
EQ selector
LOUD button
Buttons 1-6
AUDIO button PGM button
SOURCE/OFF button
CLOCK button
Remote Controller (for DEH-P6200)
A remote controller that enables remote operation of the head unit is the same as when using buttons on the head...
Owner's Manual - Page 6
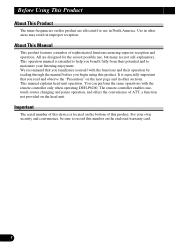
... begin using this product. Important
The serial number of this device is especially important that you familiarize yourself with the remote controller only when operating DEH-P6200. About This Manual
This product features a number of sophisticated functions ensuring superior reception and operation. You can perform the same operations with the functions and...
Owner's Manual - Page 8
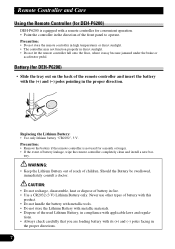
.... • Do not store the Lithium Battery with metallic materials. • Dispose of the used for DEH-P6200)
• Slide the tray out on the back of the remote controller and insert the battery with a...Remote Controller and Care
Using the Remote Controller (for DEH-P6200)
DEH-P6200 is not used Lithium Battery, in compliance with its (+) and (-) poles facing in
the proper directions.
7...
Owner's Manual - Page 9
.../OFF button selects the desired source in the following order: Built-in CD player = TV = Tuner = Multi-CD player = External Unit = AUX
7 Remote Controller (for DEH-P6200) Each press of the button selects the desired source in the following cases, the sound source will not change: * When a product corresponding to each source...
Owner's Manual - Page 14
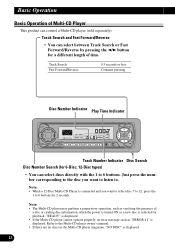
Just press the number corresponding to the disc you want to listen to the Multi-CD player owner's manual. • If there are no discs in ...
Owner's Manual - Page 15

... Menu Functions".)
Each press changes the Mode ... You can switch between different modes in the Audio Menu.
When you're in the Function Menu (refer to next section), Detailed Setting Menu... (refer to page 16), Initial Setting Menu (refer to page 37) or Audio Menu (refer to page 29), they also make it easy to indicate which 5/∞/2/3 buttons you are...
Owner's Manual - Page 31
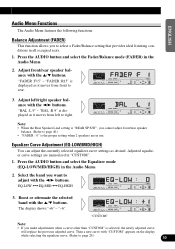
.../Balance setting that provides ideal listening conditions in "CUSTOM".
1. ENGLISH
ESPAÑOL
DEUTSCH
Audio Menu Functions
The Audio Menu features the following functions. Then a new curve with the 2/3 buttons. Adjust front... with the 5/∞ buttons. "FADER :R15" is displayed as desired.
Press the AUDIO button and select the Equalizer mode (EQ-LOW/MID/HIGH) in use. Note: •...
Owner's Manual - Page 33
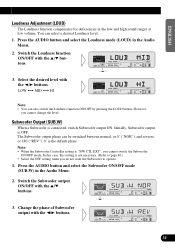
... and select the Loudness mode (LOUD) in the Audio Menu.
2. Initially, Subwoofer output is "S/W CTL:EXT", you cannot switch the Subwoofer
ON...button.
In this case, this setting is not necessary. (Refer to operate.
1. Press the AUDIO button and select the Subwoofer ON/OFF mode (SUB.W) in the Audio Menu.
2. Change the phase of Subwoofer output with the 5/∞ buttons. FRANÇAIS...
Owner's Manual - Page 34

... Note:
• You can select the Subwoofer setting mode only when Subwoofer output is switched ON in the Audio Menu. 2. Select the frequency to page 40.)
1. "- 6". Note: • When the Subwoofer Controller...Subwoofer. 1. Non Fading Output (NON FAD)
When the Non Fading Output setting is ON, the audio signal does not pass through this unit's low pass filter (for the Subwoofer), but is output ...
Owner's Manual - Page 35
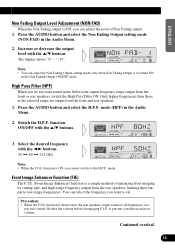
...1. to the H.P.F. Increase or decrease the output level with the 5/∞ buttons.
3. Press the AUDIO button and select the H.P.F. Switch the H.P.F. function ON/OFF with the 5/∞ buttons. mode. ...cut. Note: • You can adjust the level of all frequencies, not
just bass sounds. Continued overleaf.
34
FRANÇAIS
ITALIANO NEDERLANDS Front Image Enhancer ...
Owner's Manual - Page 36
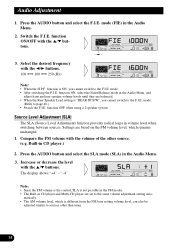
...3. The display shows "+4" - matically. • The AM volume level, which remains unchanged.
1. Audio Adjustment
1. mode. • After switching the F.I .E. Settings are set to sources other source. (e.g.... 2/3 buttons. 100 += 160 += 250 (Hz)
""
Note: • When the H.P.F. Press the AUDIO button and select the SLA mode (SLA) in volume level when switching between sources. mode (FIE) in...
Owner's Manual - Page 41
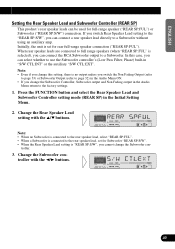
...button and select the Rear Speaker Lead and Subwoofer Controller setting mode (REAR SP) in the Audio
Menu return to the factory settings.
1.
Change the Subwoofer controller with the 5/∞ buttons...:S/W", you can select whether to use the Subwoofer controller's (Low Pass Filter, Phase) built-in the Audio Menu ON. • If you can be used for full-range speaker ("REAR SP:FUL") or ...
Owner's Manual - Page 42
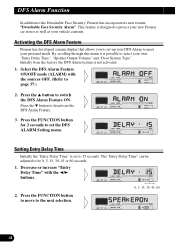
... the 5 button to be 0, 5, 15, 30, 45 or 60 seconds.
1. Setting Entry Delay Time
Initially the "Entry Delay Time" is possible to select your personal needs. Decrease or increase "Entry Delay Time" with the sources OFF. (Refer to meet your own "Entry Delay Time", "Speaker Output Volume" and "Door System Type...
Owner's Manual - Page 44

... First, close all the vehicle's doors. As the vehicle's door is disconnected, it may be necessary to reprogram the DFS Alarm Menu,
otherwise this setting needs to select "DOOR-H :CLS" FORD, JAGUAR, MERCEDES*, etc.
* Some Models Only.
• Select "DOOR-L :CLS" or "DOOR-H :CLS" with the grounding type (Negative switching). Lastly...
Owner's Manual - Page 49

Operation returns to DEH-P6200. • The sound is turned off, "MUTE" is displayed and no audio adjustment is ended.
48
FRANÇAIS
ITALIANO NEDERLANDS ENGLISH
ESPAÑOL
DEUTSCH
Cellular Telephone Muting (for DEH-P6200)
Sound is muted automatically when a call is made or received using a cellular telephone connected to normal when the phone connection is possible.
Other Manual - Page 1

... output and/or impedance values other than those for vehicles with insulating tape. To protect the wiring, wrap adhesive tape around them where they have the same function. Especially, insulate the unused ... cords that get hot, such as near the heater outlet. INSTALLATION MANUAL OF OF
DEH-P6200
This product conforms to an external power amp's system remote control or the car's Auto-...
Other Manual - Page 3
... New Pin Switches
Separately sold separately) required to operate siren, horn or lights. • Connect Brown wire to one side of relay coil. • Connect ground to "DOOR SWITCH".)
30 A Fuse (Sold...or negative door pin switches. Note: • Set DFS Alarm to
"DOOR-H :CLS". Recommended Wiring:
30 amp relay (sold pin switches are available that can be installed ONLY by a professional ...
Other Manual - Page 4
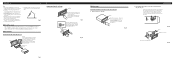
... supplied extraction keys into the unit, as possible using the screw holes on each side. Installation
Note: • Before finally installing the unit, connect the
wiring temporarily, making sure it is a sudden stop, like an emergency stop. • The semiconductor laser will be properly installed either truss screws (5 × 8 mm) or...
Similar Questions

I Need Wiring Diagram For Installing In 1998 Ford Ranger
(Posted by jameshedawan 1 year ago)


No Wiring Harness Need Wiring Diagram For Deck Deh-p8mp
Need wiring diagram for deck.
Need wiring diagram for deck.
(Posted by Fmlitsbs 7 years ago)
Need Wiring Diagram For Pioneer Deh-p310up To Install In Dodge Neon 1995
(Posted by bkc123 8 years ago)

Pioneer Deh-p6200
I have the original Pioneer DEH-6200 with detachable face made back in 2000 with the remote --does i...
I have the original Pioneer DEH-6200 with detachable face made back in 2000 with the remote --does i...
(Posted by Divlyn90 11 years ago)