
2003 Pontiac Aztek Support Question
2003 Pontiac Aztek Support Question
Find answers below for this question about 2003 Pontiac Aztek.Need a 2003 Pontiac Aztek manual? We have 1 online manual for this item!
Question posted by charbogast on October 14th, 2012
Gas Cap Assembly For 2003 Pontiac Aztek
Does a 2003 Pontiac Aztek have a door for access to the gas cap and does the gas cap have a cord attached so the cap is not easily lost?
Current Answers
Related Manual Pages
Owner's Manual - Page 2

...04 Nnrrnal Maintenance R e p l s p m ~ n P3t-t~ ..." The 2003 PontiacAztekOwnerManual
SeatsandRestraintSystems ...1-1 Front Seats ...1-2 Rear Seats ...1-7 Safety Belts ...1-13 Child Restraints ...Air Bag Systems ...1-59 Restraint System Check ...1-68 Features and Controls ...2-1 Keys ...2-3 Doors and Locks ...2-9 Windows ...2-15 Theft-Deterrent Systems ...2-18 Starting and Operating Your ...
Owner's Manual - Page 3

... may result in U.S.A. If you do this manual, you learn about the features and controls for Pontiac Division whenever it so the new owner can obtain a French copy of Canada Limited" for your ...Box 07130 Detroit, MI 48207
GENERAL MOTORS, GM, the GM Emblem, PONTIAC, the PONTIAC Emblem and the name AZTEK are registered trademarks of control or an accident. In this , it was printed. Part No....
Owner's Manual - Page 72

...related hardware are designed to inflate in moderate to the driver's and/or right front passenger's door. i v h q n c ; If your vehicle strikes something that will move or ...particular crash, no one can contact the steering wheel or the instrument panel.
distrih~~te force of gas from the inflator, which inflates the air bag. The driver's and right front passenger's frontal air...
Owner's Manual - Page 81

.... You can have PK3 stamped on page 2-37 for the ignition as well as all door locks, the liftgatehailgate lock and the storage compartments. Notice: Your vehicle has a number of...made. If your vehicle is needed, you need a new key, contact your vehicle, call the Pontiac Roadside Assistance center. See Onstat@System on it will have a lot of features
that came with an...
Owner's Manual - Page 90

..., take your key, open the= a!! Turn the fan on or under the instrsmext pane!, open your door and set the locks from the inside. See "Comfort Controls." If you have air outlets on your heating... or cooling system to its highest speed with the liftgate/tailgate open because carbon monoxide (CO) gas can be dangerous to drive with the liftgate/tailgate open or if CAUTION: (Continued)
2-13 If...
Owner's Manual - Page 111
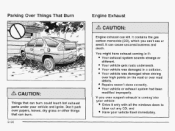
... debris. You might have exhaust coming into your vehicle: Drive it only with all the windows down to blow out any CO; It contains the gas carbon monoxide (CO), which you ever suspect exhaust is coming in a collision. Parking Over Things That Burn
Engine Exhaust
E -ine exhaust can cause unconsciousness and...
Owner's Manual - Page 121

... support.
2. To prevent damage or loss of cargo as you're driving, check now and then to remove the screw located in the side rail assembly in the glove box.
2-44 Use the tool (6) located in a bag in the glovebox labeled "tool kit-acsry". Your luggage carrier has release levers within...
Owner's Manual - Page 122

... of the crossrail. This could cause damage to help secure large loads. If your vehicle. Toadjustthe crossrails, lift the release levers on each side rail assembly.
One is on the fioor by the tailgate. This will be equipped with speakers.
2-45 Notice: Do not open the sunroof if the crossrails are...
Owner's Manual - Page 125

...) on the covers to close the covers once you are done loading or unloading them . Your vehicle may have been removed from the floor track assembly.
2.
Owner's Manual - Page 126

...15.24 cm).
5. Removing the Floor TrackAssembly
After the tray is removed, the floor track assembly also needs to carry it towards you . 2-49 Use your other hand to lift up on... the tethered ring from the bottom. Unlock the slide locks from the two rear floor retainers by lifting and pulling the assembly toward you .
Items should not be removed. TI-"--r +hrrC r - , , I I IG lcal V I
...
Owner's Manual - Page 127
...sure that nothing
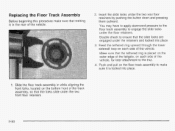
is in while aligning the front forks, located on the floor track assembly to engage the slide locks under the two rear floor retainers by pushing the button ... each side of the vehicle, for later attachment to ensure that the forks slide under the retainers and locked into place.
1. Replacing the Floor Track Assembly
Before beginning this procedure make sure it is...
Owner's Manual - Page 128

... the tray back into position.
2-51 Replacing the Sliding Rear Convenience Tray
The floor track assembly must be installed first for more information. 1. Roll the tray forward into place. Make sure...the tray are four (4) axles on the bottom of the floor track assembly. See "Replacing the Floor Track Assembly" listed previously for the sliding rear convenience tray to the tethered ring ...
Owner's Manual - Page 157

... the following has occurred: Something is adjusted to the proper height. Wipe the HUD lens gently, then dry it , cover the outlet with the protective cap. When not using it . Certain electrical accessories may need to adjust the HUD brightness again using an accessory power outlet,
maximum electrical load must not...
Owner's Manual - Page 339
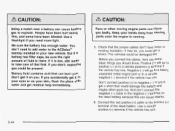
...to a remote negative (-) terminal if the vehicle has one. But if a battery has filler caps, be damaged too. Check that the jumper cables don't have been hurt doing this can cause...and some basic things you . If it is there. r
Using a match near a battery can cause battery gas to take care of that first. People have loose or missing insulation.
Connect the red positive (+) cable to ...
Owner's Manual - Page 344
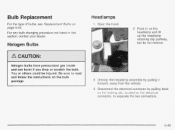
...up the headlamp retaining clip partway, but do not remove. Halogen Bulbs
Hal-Jen bulbs have pressu-.-ed gas i..-ide and can burst if you drop or scratch the bulb. Open the hood.
2. Headlamps
1. ...
For the type of bulbs, see Replacement Bulbs on the bulb package.
3. Unsnap the headlamp assembly by pulling back u,., ii-le iU&i,jY i&j, !uti&& tilt: t:ieci,ic;ai
u,-,
connector, to read ...
Owner's Manual - Page 367

...out from the floor track assembly.
2.
Extension Tube
E....Cap Hole C. B
1. Turn the folding wrench counterclockwise to lower the spare tire to remove the spare tire.
4. You will hear a click when the sliding rear tray is locked into the extended position. I . Hoist Shaft Assembly I . Open the driver's side storage compartment door of the extension tube to the hoist shaft and attach...
Owner's Manual - Page 374

...using the hoist assembly until it has been repaired or replaced. Loosen the wheel nuts - as soon. can. You will not be sharp. If there is a wheel cover, loosen the plastic nut caps with a ...p L ! The key is hanging, turn .)
10.
If the cable is supplied in the front passenger door pocket.
5-79 Don't try to the starting position. They won't come off the lua nut for each ...
Owner's Manual - Page 381

...ring. Flip up with the center hole of the vehicle with the folding wrench.
3.
Assemble the wing nut and the J-hook.
4.
E
A. Put the jack base on ...bracket. Lay the tire in the rear cargo area. 2.
J-hook
D. Attach the wrench back to make sure the tire is secure and does not ...the center cap by tapping the back of the jack access door. Put back all tools as they were stored in ...
Owner's Manual - Page 382

... as they were stored in the groove. Attach the wrench back to tighten the jack. ... Open the driver's side storage compartment door of the jack access door. Install the wing nut and the J-...
3.
This secures the cover in place.
2. A. Assemble the wing nut and the J-hook.
6. Sliding Rear ...5-87 Full-size Tire F. Storage Compartment Cap Hole forward to the floor. Tighten the ...
Owner's Manual - Page 431

... on and RSE OFF when it is off ,
* a DVD or auxiliary device is playing, and
the front audio system is on page 3-102 for the 2003 Pontiac Aztek andpage 3-103 for the "Entertainment System" on and either the CDlAUX or the TAPE/CD button is on the RSA system.
?PhiC!P'C SpPSkPr. The front...
Similar Questions

Video How To Change Neutral Safety Switch On 2003 Aztek
(Posted by jimbja 10 years ago)

Where Is Fuse For Heater On A 2003 Aztek Pontiac
(Posted by hagedgeefi8 10 years ago)

Where Are The Crank Sensors Located On 2003 Aztek
(Posted by Anonymous-113815 11 years ago)
I Have A 2003 Aztek It Is Overheating I Have Put On Wzter Pump Thermastate What
(Posted by Anonymous-113815 11 years ago)