2004 Pontiac Aztek Support Question
2004 Pontiac Aztek Support Question
Find answers below for this question about 2004 Pontiac Aztek.Need a 2004 Pontiac Aztek manual? We have 1 online manual for this item!
Question posted by Man0bi on August 30th, 2014
Where Is The Release For The Spare On Aztek
The person who posted this question about this Pontiac automobile did not include a detailed explanation. Please use the "Request More Information" button to the right if more details would help you to answer this question.
Current Answers
Related Manual Pages
Owner's Manual - Page 1

2004 Pontiac Aztek Owner Manual
Seats and Restraint Systems ...1-1 Front Seats ...1-2 Rear Seats ...1-6 Safety Belts ...1-12 Child Restraints ...1-39 Air Bag Systems ...1-61 Restraint System Check ...1-71 Features ...
Owner's Manual - Page 2

... information at the time it was printed. Box 07130 Detroit, MI 48207 GENERAL MOTORS, GM, the GM Emblem, PONTIAC, the PONTIAC Emblem and the name AZTEK are registered trademarks of control or an accident.
Owner's Manual - Page 8
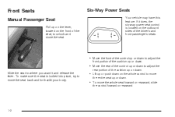
... whole control to move
the entire seat up on the lever, located on the front of the seat, to move the seat. If it and release the lever.
Owner's Manual - Page 10
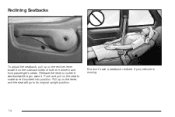
Release the lever to lock the seatback where you want it 's locked into position. Push and pull on the outboard sides of both the driver's and ...
Owner's Manual - Page 14

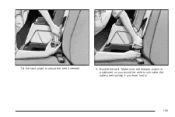
... can stay in this position or it slightly toward the straight crossbar. 6. To release the front latches, squeeze the angled latch release bar toward the rear of the split bench seat.
1-8 Remove the seat by ...5. Pull the lever, located at the base on the outboard side of the seat, to release the rear latches from the vehicle by rocking it can be removed from the floor pins and...
Owner's Manual - Page 16

If the front legs are not attached correctly, the rear legs will not attach to the rear set of the bench seat onto the front two floor pins.
1-10 Make sure the bench seat is angled so that the front hooks clear the floor pins. Squeeze the angled latch release bar toward the straight crossbar while placing the front hooks of floor pins.
1. 2.
Owner's Manual - Page 25

... if there is positioned so you would be less likely to make the lap part tight, pull down on the shoulder belt. Make sure the release button on the hips, just touching the thighs. In a crash, this applies force to take belt restraining forces. The shoulder belt should be worn low...
Owner's Manual - Page 35

... down on the buckle end of the belt as you pull up on the latch plate to make sure it is secure. Make sure the release button on the buckle is not long enough, see Safety Belt Extender on the shoulder part.
1-29 If the belt stops before it reaches the...
Owner's Manual - Page 40

...To make the belt shorter, pull its free end as the other lap-shoulder belts. Make sure the release button on the buckle is one guide available for smaller adults, the comfort guides may be able to...to.
1-34 There is positioned so you would be installed on the shoulder belts. Buckle, position and release the lap-shoulder belt the same way as shown until the belt is snug 4. To provide added ...
Owner's Manual - Page 42

Buckle, position and release the safety belt as described in Rear Seat Passengers on top of the belt.
4. To remove and store the comfort guides, squeeze the belt edges ...
Owner's Manual - Page 44

..., and just for the seat in your dealer will be on page 1-32. To wear it, just attach it to order it . Buckle, position and release the safety belt as described in Center Rear Passenger Position on top of the belt. 4. Safety Belt Extender
If the vehicle's safety belt will go...
Owner's Manual - Page 61
Buckle the belt. Make sure the release button is positioned so you would be able to unbuckle the safety belt quickly if you ever had to adjust the belt if needed.
3. Tilt the latch plate to .
1-55
Owner's Manual - Page 64

Make sure the release button is secure. To tighten the belt, pull its free end while you remove the child restraint, be sure to reconnect the lap and shoulder ...
Owner's Manual - Page 362
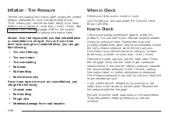
... Don't let anyone tell you that underinflation or overinflation is low, add air until you overfill the tire, release air by looking at 60 psi (420 kPa).
If you reach the recommended amount. Be sure to check tire pressure. If the in ...the tire valve stem. If your tires don't have too much air (overinflation), you can 't tell if your compact spare tire.
Owner's Manual - Page 379

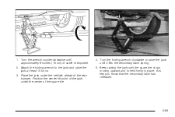
...the folding wrench to release the pin from under the vehicle. Turn the folding wrench counterclockwise to lower the spare tire to expose the hoist shaft. 6. Compact Spare Tire B. Folding Wrench...Storage G. Insert one end of the storage compartment. 7. Continue turning the wrench until the spare tire can be able to be pulled out from the floor track assembly. 2. ...
Owner's Manual - Page 382

... side of the rear bumper. Attach the folding wrench to the jack and raise the jack at Step 2. 1. Front-Wheel Drive
To release the spare tire from the spare. If the spare tire does not slide off the jack completely, make sure no one is behind you pull the jack out from the secondary...
Owner's Manual - Page 383

... slides off the jack.
5-87 Keep lowering the jack until it lifts the secondary latch spring. 5. Keep raising the jack until the spare tire stops moving upward and is held firmly in place, this lets you know that the secondary latch has released and the spare tire is balancing on the jack.
6. 4.
Owner's Manual - Page 384

... completely lowered, tilt the retainer and slip it has been repaired or replaced. You will not be injured by the jack. All-Wheel Drive
To release the spare tire from the jack and carefully remove the jack. Disconnect the wrench from the secondary latch, do the following:
{CAUTION:
Someone standing too close...
Owner's Manual - Page 385
... firmly in place, this lets you know that the secondary latch has released.
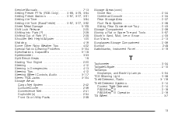
5-89 Place the jack under the center of the rear bumper. Position the center lift point of the jack under the vehicle, ahead of the spare tire.
4. Turn the folding wrench clockwise to the jack and raise the...
Owner's Manual - Page 459
...the Tone (Bass/Treble) ...3-67, 3-77, 3-92 Sheet Metal Damage ...5-108 Shift Lock Release ...2-25 Shifting Into Park (P) ...2-26 Shifting Out of Park (P) ...2-28 Shoulder Belt Height ...Storage Area ...Roof Rack System ...Sliding Rear Convenience Tray ...Storage Compartment ...Storing a Flat or Spare Tire and Tools ...Stuck in Sand, Mud, Ice or Snow ...Sun Visors ...Sunglasses Storage Compartment...


