2004 Pontiac Aztek Support Question
2004 Pontiac Aztek Support Question
Find answers below for this question about 2004 Pontiac Aztek.Need a 2004 Pontiac Aztek manual? We have 1 online manual for this item!
Question posted by cadanika on April 17th, 2014
How To Remove Rear Door Speakers In 2004 Pontiac Aztec
The person who posted this question about this Pontiac automobile did not include a detailed explanation. Please use the "Request More Information" button to the right if more details would help you to answer this question.
Current Answers
Related Manual Pages
Owner's Manual - Page 1

2004 Pontiac Aztek Owner Manual
Seats and Restraint Systems ...1-1 Front Seats ...1-2 Rear Seats ...1-6 Safety Belts ...1-12 Child Restraints ...1-39 Air Bag Systems ...1-61 Restraint System Check ...1-71 Features and Controls ...2-1 Keys ...2-2 Doors and Locks ...2-7 Windows ...2-12 Theft-Deterrent Systems ...2-14 Starting and Operating Your Vehicle ...2-18 Mirrors ...2-31 OnStar® System ...
Owner's Manual - Page 12

...The seatbacks can be folded forward or reclined individually and the sections can easily remove the seats from your vehicle have seat operating features to adjust, fold, remove and reinstall the seats. Folding or Reclining the Seatbacks
{CAUTION:
If the ...sitting there.
That could move forward in a sudden stop or crash.
Rear Seats
Rear Seat Operation
The rear seats in your vehicle.
Owner's Manual - Page 14

... the floor pins and flip the seat forward. 4. Remove the seat by following the next steps.
5. Pull the lever, located at the base on the outboard side of the seat, to release the rear latches from the vehicle by rocking it out. Repeat these steps for the other section of...
Owner's Manual - Page 79
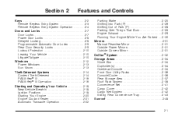
... Convenience Tray ...2-43 Sunroof ...2-48
Keys ...2-2 Remote Keyless Entry System ...2-3 Remote Keyless Entry System Operation ...2-4 Doors and Locks ...2-7 Door Locks ...2-7 Power Door Locks ...2-8 Delayed Locking ...2-8 Programmable Automatic Door Locks ...2-9 Rear Door Security Locks ...2-9 Lockout Protection ...2-10 Leaving Your Vehicle ...2-10 Liftgate/Tailgate ...2-10 Windows ...2-12 Power...
Owner's Manual - Page 86
... (DIC), see DIC Vehicle Personalization on the remote keyless entry transmitter is pressed while any door is open. The rear doors do not have power door lock switches. If your vehicle is equipped with the content theft-deterrent system, the power door lock switch may cause the system to program the delayed locking feature.
Power...
Owner's Manual - Page 87

... one of these locks do the following: 1. See Remote Keyless Entry System Operation on your vehicle from inside . The rear doors on page 2-4 for the other rear door lock. All of the doors will automatically lock when all doors are closed, the engine is running and the shift lever is shifted out of PARK (P).
Programmable Automatic...
Owner's Manual - Page 88

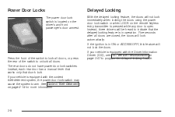
... Climate Control System on page 3-24. • If you . Then get out and close the door. 2-10 If you leave the key in the ignition when a door is opened. Unlock and open the rear door from the inside. The rear door locks will force outside . 2.
If you could still lock the key in the ignition or...
Owner's Manual - Page 91

...the other side of the sun visors. Sun Visors
To block out glare you can also remove them from the center mount and swing them to stop the window while it .
Visor ..., ACCESSORY, or when Retained Accessory Power is active. Press the rear of the switch. Switches on the driver's door armrest control each passenger's door has a window switch. You can swing down positions. The window...
Owner's Manual - Page 112

.... Store the liners in the glove box when not in the rear passenger doors and the tailgate.
2-34 If your vehicle has the OnStar® System, the OnStar® buttons will replace the front storage compartment. The cupholders have liners that remove for more information. Overhead Console
If your vehicle has the overhead...
Owner's Manual - Page 115
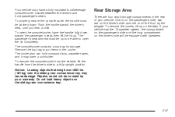
... you hear a click. Do not load heavy objects on the floor by your warranty. If your vehicle. Remove the top tray to put items in the rear of your vehicle has the 10-speaker system, the compartment on the passenger's side and the long compartment on the tabs. The cooler also can...
Owner's Manual - Page 230

...control or on the front of time, remove the batteries, and keep them in a cool, dry place. Loosen the screw on the battery compartment door located on the inside of the headphone ...earpiece. 2. The system requires standard RCA cables (not included) to the RCA jacks. Audio Speakers
Audio from an auxiliary device ...
Owner's Manual - Page 291
...you will be pulling a trailer that, when loaded, will not work well, or at the rear edge of the driver's door, or see Loading Your Vehicle on page 2-29. See Engine Exhaust on page 4-36. Be ...You will be provided by the hitch manufacturer or by and rough roads are a few reasons why you remove the hitch. Always leave just enough slack so you will find these numbers on the Certi&#...
Owner's Manual - Page 379

...the other end of the extension tube. 8. Insert one end of the sliding rear tray to remove the compact spare tire. 4. Turn the folding wrench counterclockwise to lower the spare ...storage compartment door of the storage compartment. 7. Retainer A. Storage G. Push the release lever located in order to the ground. Hoist Shaft D. This is locked into the extended position. Remove the ...
Owner's Manual - Page 396
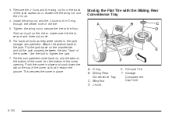
Use the bolt to the jack.
J-hook
E. Remove the J-hook and the wing nut from the back of the bracket. Attach the wrench back to tighten the jack. 7. This secures the cover in... the compartment cover back on, slip the tabs on the bracket tab and sit the jack properly between the two "ears" of the jack access door. Push the cover in the groove. Sliding Rear Convenience Tray C.
Owner's Manual - Page 397

...compartment and flip the D-ring up. 4. Push the sliding rear tray forward to tighten the jack. 10. Remove the rear cap on the bottom of the cover so that it rests in... place and push down . Push the cover in the groove. Install the wing nut and the J-hook to the jack. Open the driver's side storage compartment door...
Owner's Manual - Page 447

... ...7-9 Additives, Fuel ...5-6 Add-On Electrical Equipment ...5-112 Adjusting the Speakers (Balance/Fade) ...3-68, 3-78, 3-92 Air Bag Readiness Light...the Remote Keyless Entry Transmitter ...2-15 Ashtrays ...3-23 Audio Speakers ...3-104 Audio System(s) ...3-64 Audio Steering Wheel Controls...65, 3-75 Radio with Six-Disc CD ...3-89 Rear Audio Controller (RAC) ...3-116 Setting the Time ...3-64 Theft...
Owner's Manual - Page 448

... ...5-50 Front Turn Signal, Sidemarker and Parking Lamps ...5-53 Halogen Bulbs ...5-50 2
C
California Fuel ...5-5 Canada - Customer Assistance ...7-5 Canadian Owners ...ii Canadian Roadside Assistance ...7-7 Canceling the Rear Door Security Locks ...2-10 Capacities and Specifications ...5-118 Carbon Monoxide ...4-28, 2-10, 2-29 Care of Safety Belts ...5-106 Your CD and DVD Player ...3-118...
Owner's Manual - Page 450
... Entry Transmitter ...2-15 Disarming with Your Key ...2-15 Doing Your Own Service Work ...5-3 Dolly Towing ...4-35 Door Ajar Warning Message ...3-47 Delayed Locking ...2-8 Locks ...2-7 Power Door Locks ...2-8 Programmable Automatic Door Locks ...2-9 Rear Door Security Locks ...2-9 Driver Position, Safety Belt ...1-18 Driver Behavior ...4-2 Driver Information Center (DIC) ...3-53 DIC Controls...
Owner's Manual - Page 454

... 2-10 2-27 2-10 2-11 3-35 3-37 3-36 3-39 3-35 3-38 3-38 4-36 3-63
Lockout Protection ...2-10 Locks Delayed Locking ...2-8 Door ...2-7 Leaving Your Vehicle ...2-10 Lockout Protection ...2-10 Power Door ...2-8 Programmable Automatic Door Locks ...2-9 Rear Door Security Locks ...2-9 Loss of Control ...4-16 Low Brake Fluid Warning Message ...3-50 Low Fuel Warning Message ...3-50 Low Oil Pressure...
Owner's Manual - Page 457
... ...2-5 Remote Control ...3-109
Remote Door Unlock ...3-61 Remote Keyless Entry System ...2-3 Remote Keyless Entry System, Operation ...2-4 Remote Keyless Entry Transmitter Battery Low Warning Message ...3-52 Removing the Flat Tire and Installing the Spare Tire ...5-91 Removing the Floor Track Assembly ...2-45 Removing the Sliding Rear Convenience Tray ...2-44 Removing the Spare Tire and Tools...
Similar Questions


Remove Interior Door Panel
The rearview mirror arm on passenger side is disconnected from the door. How do we get to the interi...
The rearview mirror arm on passenger side is disconnected from the door. How do we get to the interi...
(Posted by thoms 11 years ago)
