Ricoh Priport DX 4545 Support Question
Ricoh Priport DX 4545 Support Question
Find answers below for this question about Ricoh Priport DX 4545.Need a Ricoh Priport DX 4545 manual? We have 1 online manual for this item!
Question posted by aubreymaeke on January 31st, 2016
Drum Unit.
Paper jam indicator in drum unit after single sheet feeds through. even though there is no paper jammed in the drum unit. can you help me identify the problem please..
Current Answers


Related Ricoh Priport DX 4545 Manual Pages
Printer Reference - Page 14

... the Optional Color Drum 74 Changing the Color Drum Unit 74 Making Color Prints 75 Printing in Two Colors 76
xii Edge Erase ...37 Printing on Thick or Thin Paper 39
Pressure Lever ... 54 Storing Class Mode Settings 56 Recalling the Stored Settings 57 Combine...58 Repeat ...60 Skip Feed Printing 61 Program ...62 Storing Print Settings 62 Recalling a Program 63 Security Mode ...64 Entering...
Printer Reference - Page 18

...
Lift to align the prints on .
4. Drum position indicator
It is shown that the drum is in this unit.
2 Paper delivery side plates
Use to unlock and pull out the drum unit.
2. Exposure glass
Position originals face down on or off.
9. Drum unit
The master is on the paper delivery tray.
12. Chocks
Use to the type of the prints...
Printer Reference - Page 80

... {Security} key. ments after you set a new original and press the {Master Making} key.
64
Operation
Security Mode
Use this function to pull out the drum unit. ❒ Security mode cannot be cleared by turning off the main switch. ❒ Security mode will be cancelled when you have made your masters and...
Printer Reference - Page 90

... lamp is
needed for five seconds, and then open it. Changing the Color Drum Unit
A Open the front cover.
AQN009S
Note ❒ If you cannot pull out the drum
unit, push the drum unit handle once before sliding out the drum.
or prints, a separate drum unit is on before pulling.
74
AQN007S dle. AQN006S
Note ❒ Make sure the...
Printer Reference - Page 91

... keys.
Making Color Prints
A Make sure that the open cov- er/unit indicator (M) goes off, and the color drum indicator on the panel display lights. AQN040S
B Set your original.
AQN014S
75 G Lower the drum unit lock lever.
2
ZFRH360E
Note ❒ Be careful not to let the drum
unit fall. AQN013S
F Slide in - AQN015S
H Close the front cover.
Color...
Printer Reference - Page 93

... in order to disable Auto Cycle mode.
ZFRY040E
AQN012S
Reference See p.74 "Changing the Color Drum Unit".
F Place the second original, and
then press the {Master Making} key. See p.18... Optional Color Drum
E Change the drum unit.
2
AQN024S
Printing starts automatically after the trial print. D Remove the prints from the paper
delivery tray and place them onto the paper feed tray again ...
Printer Reference - Page 100
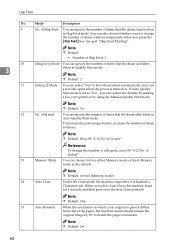
...specify the number of times that the drum rotates when
in Quality Start mode. To increase the print image density, increase the number of the paper, the machine automatically rotates the
original...See p.61 "Skip Feed Printing".
Note
❒ Default: See p.88 "4-12 No. If Auto Quality
Start mode is placed differs
from that the drum unit idles
3
when in Skip Feed mode. Note
&#...
Printer Reference - Page 105

... Q.start, and then press the
{OK} key.
5-2 Reset Counters
A Press the {User Tools} key. Mode, and then press the {OK} key.
of times that the drum
unit idles.
Printer Reference - Page 122

AQN011S
E Close the front cover.
Reference See p.109 "To prevent paper misfeeds".
106 Troubleshooting
B Unlock the lever and pull out the drum unit. ZFRH360E
Reference See p.74 "Changing the Color Drum Unit"
C Remove the misfed paper.
5
ZFRH440E
D Insert the drum unit until it locks in position, and then lower the drum unit
lock lever.
Printer Reference - Page 124

ZFRH360E
Reference See p.74 "Changing the Color Drum Unit"
D Remove the paper from the inside.
5
ZJVH040E
E Insert the drum unit until it locks in position, and then lower the drum unit
lock lever. AQN011S
F Close the front cover.
108 Troubleshooting
C Unlock the lever and pull out the drum unit.
Printer Reference - Page 128

Troubleshooting
B Unlock the lever and then pull out the drum unit.
AQN011S
E Close the front cover.
112 ZFRH360E
Reference See p.74 "Changing the Color Drum Unit"
C Remove the misfed paper from inside.
5
ZFRH421E
D Insert the drum until it locks into position, and then lower the lock lever.
Printer Reference - Page 129

A Open the master eject box. x Clearing Misfeeds
When "x" lights and "B", "E" are indicated
Either a master misfeed has occurred either in the master eject section, or the master is wrapped around the drum unit. ZFRH140E
113
C Close the master eject box.
ZJVH091E
B Remove the misfed master.
5
ZFRH120E
Note ❒ Be careful not to stain your hands...
Printer Reference - Page 130

ZFRH360E
Reference See p.74 "Changing the Color Drum Unit"
114
AQN007S
Note
5
❒ If the lower lamp is on , close the front cover, wait for five seconds, and then open it. B Unlock the lever and then pull out the drum unit. Troubleshooting
When the master is wrapped around the drum
A Confirm the upper lamp is on .
Printer Reference - Page 131

D Insert the drum until it locks into position, and then lower the lock lever.
5
AQN011S
E Close the front cover.
115 x Clearing Misfeeds
ZFRH462E
Note
❒ If you still cannot remove the master, release the lock lever at the back of the drum unit to open the clamp while pulling the master out.
C Pull out the misfed master from the clamp.
Printer Reference - Page 138

Troubleshooting
B Pull out the drum unit.
AQN011S
E Close the front cover.
122 AQN017S
Reference
For details about how to remove the drum unit, see p.74 "Changing the Color Drum Unit".
5
C Clean the pressure roller with a clean cloth. ZFRH430E
D Insert the drum unit until it locks in position, and then lower the drum unit
lock lever.
Printer Reference - Page 140

... the original guides contact the originals lightly. When blank or incomplete prints persist even after you use the optional document feeder, make sure that the paper feed side plates touch the paper lightly. A Unlock the lever and pull out the drum unit. AQN017S
Reference For details about how to remove the...
Printer Reference - Page 141

B Remove any paper wrapped around the drum.
AQN011S
125 D Insert the drum unit until it locks in position, and then lower the lock lever.
Poor Printing
ZFRH440E
C Remove the master from the drum.
5
ZFRH462E
Note ❒ If you still cannot remove the master, release the lock lever at the back of
the drum unit to open the clamp while pulling the master out.
Printer Reference - Page 143

If this is not done, feed roller marks will appear on the print image. • If the machine has not been used for a while before the... except originals on the machine. • Do not spill liquid on the printed paper. ual. • Do not operate the machine without covers. You might be careful not to let the
drum unit fall. • Do not modify or replace any parts other than the ones ...
Printer Reference - Page 152

...)
❖ Color Printing: Drum unit replacement system (red, blue, green, brown, yellow, purple, navy, maroon, orange, teal and grey)
❖ Image Position Adjustment:
• Forwards or backwards: ± 15mm, ± 0.6"
7
• Right or left: ± 10mm, 0.4" on either side
❖ Paper Feed Tray Capacity: 1,000 sheets (80g/m2, 20 lb)
❖ Paper Delivery Tray Capacity: 1,000...
Printer Reference - Page 156

...drum indicator, 6
A
Access to the right or left, 24 Saver Timer, 80 {Escape} key, 5 Ethernet Speed, 87 Exposure glass, 2
Cleaning, 132 Exposure glass cover, 1
Cleaning, 132
F
Feed roller pressure lever, 1 Adjusting the feed roller pressure, 39
{Fine} key, 5 Fine Mode, 27 Front Cover, 1 {Full Size} key, 4
G
Gateway Address, 86
I
Idlng for Q.Mode, 84 Ignore Paper... drum indicator, 6 Color Drum Unit,...
Similar Questions

Problème Prise De Papier
Bonsoir ! J'ai un problème avec mon duplicateur Ricoh au niveau de prise de papier. Comment fai...
Bonsoir ! J'ai un problème avec mon duplicateur Ricoh au niveau de prise de papier. Comment fai...
(Posted by ndoubadebienvenu1 2 years ago)

I Own A Ricoh Priport Dx 3343. What Does Error Code E-02 Mean?
I would like to understand what error code E-02 means and how it can be fixed so I can use my machin...
I would like to understand what error code E-02 means and how it can be fixed so I can use my machin...
(Posted by mimeventsasy 11 years ago)

Service Handbook For Duplicator Dx 4545
maintenance and reper this duplicator
maintenance and reper this duplicator
(Posted by aitradiahcene 11 years ago)
Service Handbook Duplicator Dx 4545
maintenance and reparation dx 4545
maintenance and reparation dx 4545
(Posted by aitradiahcene 11 years ago)

How To Install Printer Unit For Ricoh Aficio Priport Dx4545?
How to put together and install Network Printer Unit Type 4545A to My ricoh aficio priport DX4545 pr...
How to put together and install Network Printer Unit Type 4545A to My ricoh aficio priport DX4545 pr...
(Posted by ibctechnicianteam 12 years ago)