Ridgid 1822-I Support Question
Ridgid 1822-I Support Question
Find answers below for this question about Ridgid 1822-I.Need a Ridgid 1822-I manual? We have 1 online manual for this item!
Question posted by automaticairhvacr on May 17th, 2014
1822i Front Jaws Closing Distance
My 1822I will not close enought to thread anything smaller than 3/4" black. The jaws make a positive clicking sound each time they stop in the close position...they just do not close enought
Current Answers
Related Ridgid 1822-I Manual Pages
Owners Manual - Page 1

Read this Operator's Manual carefully before using this manual may result in electrical shock, fire and/or serious personal injury. Failure to understand and follow the contents of this tool. pág. 51
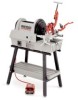
WARNING! 1822-I Pipe and Bolt Threading Machine
OPERATOR'S MANUAL
• Français - 25 • Castellano -
Owners Manual - Page 2

... Threading 21/2″ to 4″ Pipe (45 RPM) ...16
No. 821 Blade Cutter and No. 822 Adapter Kit Installing of No. 821 Blade Cutter ...17 Cut Grooving, Beveling and Cut-Off with No. 821 Blade Cutter (45 RPM 17
Left Hand Machine Operation Positioning Front Jaws for Left Hand Operation ...17 Positioning Rear Centering Jaws...
Owners Manual - Page 4
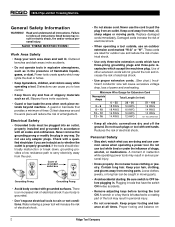
... . Read and understand all times. Do not use the cord to follow all electric connections dry and off the ground. Do not touch plugs or tool with grounded surfaces. Do not...what you to rain or wet conditions. 1822-I Pipe and Bolt Threading Machine
General Safety Information
WARNING! Be sure switch is grounded.
• Don't expose electrical tools to lose control.
• Keep ...
Owners Manual - Page 5
...tool's operation. Stop the machine before using . Allow the machine to come to wind up, pulling you have the tool serviced before using the 1822-I Pipe and Bolt Threading... complete stop before making any questions...CLOSE/OFF/OPEN switch. Do not reach across the machine or pipe.
free from rotating pipe and fittings. Any tool that may increase the risk of the tool...
Owners Manual - Page 6

...)
4
Ridge Tool Company 1822-I Threading Machine is provided to thread larger diameter pipe. High Speed Dies are for roll grooving equipment.
Roll-Type Cut-Off, Pipe - 1/8″ through 2″ Bolt - 1/4″ through 1″
Reamer No. 344 5-Flute Cone, Right Hand,1/8″ through 4″
Material Capability.........Black, Galvanized, Stainless Steel, Cast Iron, IMC, PVC...
Owners Manual - Page 7
...66845 66780 66860 70755
- Right Hand only in the 1822-I Pipe and Bolt Threading Machine
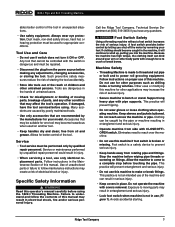
Die Heads and Dies
Model
Pipe Capacity
811A NPT... special set up Note: High Speed Dies are in-
Insert stand stop tabs into bottom of the stand (Figure 3).
3. R.H. R.H./L.H. H.S.... as
Ridge Tool Company
5 Parts diagram and parts list for the stands are recommended for threading 1″ ...
Owners Manual - Page 8
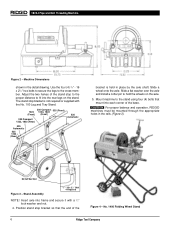
.../2″ Bolt 4 Required
NOTE! Position stand stop bracket is not required or supplied with a 1/2″ lock washer and nut.
4. Use the four (4) 3/8″ - 16 x 21/2″ hex bolts to secure the legs to hold the wheels on the stand. Adjust the two halves of the base. 1822-I Pipe and Bolt Threading Machine
Figure 2 - Slide...
Owners Manual - Page 9
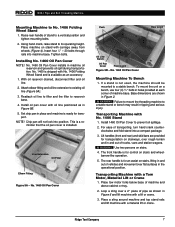
1822-I Pipe and Bolt Threading Machine
Mounting Machine to existing oil line (Figure 5A). 3. Tighten bolts.
No. 1460 is shipped with oil line positioned as in holes ...front handle is installed. NOTE!
Transporting Machine with carriage away from wheels (Figure 4).
Ridge Tool Company
7 Chip pan will not lock into machine base.
Place machine on stairs, lifting...
Owners Manual - Page 10

... Machine until the cord has been replaced. Foot Switch
Figure 7 - 1822-I Pipe and Bolt Threading Machine
CAUTION DO NOT use the Threading Machine until any of your tools and dies. Lubricate the Threading Machine if necessary according to the Threading Machine (Figure 7). Clean the chuck jaws with this Threading Machine.
9. If any problem has been repaired.
7. The correct...
Owners Manual - Page 11

... position.
8. Ridge Tool Company
9 A dirty or poor grade cutting oil can safely control the machine, tools and workpiece. If the workpiece extends beyond the Threading Machine, use with his left foot.
• Have convenient access to tip or becoming entangled in poor thread quality. Do not touch plug with RIDGID Thread Cutting Oil.
7.
1822-I Pipe and Bolt Threading...
Owners Manual - Page 12

... "make-on pipe.
3. Operation Using Machine-Mounted Tools
WARNING
Do not wear gloves or loose clothing when operating Threading Machine. Do not reach across the machine or workpiece.
5. Stop the machine before touching the pipe. Allow the machine to come to UP position.
2.
Mark the pipe at the desired length if it is located a sufficient distance...
Owners Manual - Page 13

...handwheel will allow threading 2″ pipe at 45 RPM. Swing die head to CLOSE position. 4.
For ... threaded is flush with throwout
lever set . 1822-I Pipe and Bolt Threading...position. 3. Self-Opening 815A Die Head (Figure 11) - NOTE! For 1/2″ to release the dies from the housing.
9.
When the end of the pipe being threaded is flush with No. 815A Die Head
6. Ridge Tool...
Owners Manual - Page 14

...2″). Place self-opening die head on the ground surrounding the Threading Machine. In this position dies will lock in dies.
9. Make sure roll pin points toward end of dies to mark on the ...Insert new dies to thread pipe ranging from the Threading Machine is released.
3. Tighten clamp lever.
12.
When left hand universal die heads.
12
Ridge Tool Company WARNING Never ...
Owners Manual - Page 15

... with a thread ring gage (Figure 14B).
Lay die head on the plunger knob and rotate the handle counter-clockwise all the way to OPEN position.
3. Slide throwout lever back so that tongue of clamp washer up .
6.
Select the correct dies for the desired size stop, move the block to the right to make it...
Owners Manual - Page 18

...to "Installing Dies In Die Heads").
16
Ridge Tool Company
Operating No. 141 Geared Threader
Installing No....stop screw.
2. Remove the pipe.
10. The pipe thread should be representative of machine, install drive shaft through rear chuck. 1822-I
Threading...operation.
1. Threading 21/2″ to standard line. To back off threader, place control switch in the CLOSE position and with...
Owners Manual - Page 19

...hand operation. Reverse front jaws and install on drive pins and remove front jaws.
5.
Remove retainer and spacers.
4. 1822-I Pipe and Bolt Threading Machine
Oil Spout
Connecting ... Positioning Front Jaws for desired operation.
2. Run machine in place. WARNING Make sure machine is required. Manually rotate front jaws toward CLOSE position and remove three E-Clips holding front jaws ...
Owners Manual - Page 20

... with the 1822-I Pipe and Bolt Threading Machine
Figure 21 - Remove spacers and rear jaws.
4. Reverse rear jaws and reinstall on this Threading Machine.
Other accessories designed for use only the accessories listed below.
Accessories For Threading Machine
Stands: No. 1406 Folding Wheel Stand with other tools may become hazardous when used to locating slots in position...
Owners Manual - Page 21

...Accessories For Threading By Close-Coupled Method
No. 241 Carriage Mount Kit No. 141 Geared Threader....for No. 141 Threader Oil Pan Cover Kit L.H./R.H. Maintenance Instructions
WARNING Make sure ... the OPEN position to separate from jaw assembly. (Figures 23A & B) 4.
Ridge Tool Company
19 Front Jaw Insert and Centering Finger Replacement 1. 1822-I Pipe and Bolt Threading Machine
Model ...
Owners Manual - Page 22
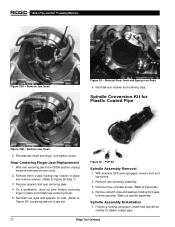
...Conversion Kit for plastic coated pipe.
20
Ridge Tool Company Reinstall rear jaws and spacers on Rods 6. Remove rear centering ...position unplug
machine and remove rear cover. 2. Remove Jaw Insert
5. Rear Centering Finger/Jaw Replacement 1.
With rear centering jaw in jaw slot.
Slide out spindle assembly.
Spindle Assembly Installation 1. 1822-I Pipe and Bolt Threading...
Owners Manual - Page 23
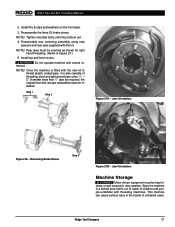
...is fitted with threading machines. Reassemble rear centering assembly using new spacers and rear jaws supplied with covers removed.
Jaw Orientation
Machine Storage
WARNING Motor-driven equipment must be installed.
If smaller sizes than ...3
Figure 27B - Ridge Tool Company
21 1822-I Pipe and Bolt Threading Machine
2. Rear jaws must be kept indoors or well covered in the hands of...
Similar Questions

When Turning On It Is Locked Up Due To The Feed Rollers Not Allowing The Cutting
head to turn
head to turn
(Posted by Janthonysupensky 7 years ago)

Rp-210 Crimper Tool
how can we order a replacement motor for the tool. the end has come off part way and the tool in una...
how can we order a replacement motor for the tool. the end has come off part way and the tool in una...
(Posted by webb97907 8 years ago)

Why Does Front Jaws Hold Pipe And Back Jaws Come Loose On Any Size Pipe 1822i
(Posted by draytaylor2003 11 years ago)

Ridgid 1822-i Pipe Threader Won't Turn On And Humms When You Try To Turn On Swit
my pipe threader humms when you try to turn it on and won't run the machine. How do I fix ?
my pipe threader humms when you try to turn it on and won't run the machine. How do I fix ?
(Posted by Hmdjustin 11 years ago)