Samsung SP-H03 Support Question
Samsung SP-H03 Support Question
Find answers below for this question about Samsung SP-H03.Need a Samsung SP-H03 manual? We have 3 online manuals for this item!
Question posted by call2shree on April 10th, 2012
When I Connect Projector To Tv . Showing A Messgae As 'audio Input Shared By Bot
The person who posted this question about this Samsung product did not include a detailed explanation. Please use the "Request More Information" button to the right if more details would help you to answer this question.
Current Answers
Related Samsung SP-H03 Manual Pages
User Manual (user Manual) (ver.1.0) (English) - Page 6

...Unplug the power plug before you move the projector.
• Otherwise, it may result in electric shock or fire due to use only the power cord supplied by connecting or removing the power plug. (Do not ...battery is removed, do not use an unapproved battery. In addition, do not attempt to turn the projector on a console or shelf, make sure that the front of the product does not protrude out of...
User Manual (user Manual) (ver.1.0) (English) - Page 7

..., or hairpins, or inflammable
30
LUMEN
objects into the power cord socket if the cord is connected to do so may result in electric
30
LUMEN
! Do not touch the power plug right ... and
cookies on .
• This is dangerous, especially for a long time etc. Do not install the projector in a small, poorly ventilated area.
30
LUMEN
• Otherwise, a fire may result in internal temperature. ...
User Manual (user Manual) (ver.1.0) (English) - Page 10

... Manual
Power Cord / Adapter
B
Battery
USB gender adaptor
3RCA gender adaptor
D-Sub Gender Cable
PICO Projector case
Ferrite Core for Power Cord (1EA)
SOLD SEPARATELY
B
USB Cable
Stereo Cable
Audio Cable
Video Cable
2-1
Installation and Connection PICO Projector CONTENTS
Quick Setup Guide
Warranty Card (Not available in case you need to move the product...
User Manual (user Manual) (ver.1.0) (English) - Page 11

... and fasten the grooves on the battery. Installation and Connection
2-2 Disconnecting the Battery
Press the lock, marked [PUSH], on the back of the projector with the counterparts on the bottom of the battery. With the lock held down, lift the back of the projector forward simultaneously until you hear a click.
Push the top...
User Manual (user Manual) (ver.1.0) (English) - Page 12

... not be able to adjust the focus correctly.
2-3
Installation and Connection 2-3 Zoom and Focus Adjustment
FOCUS
Move the [FOCUS] slide bar left or right until the picture is clear. The size of your screen determines the distance you set your projector at the projection distance specified in the Screen Size and Projection...
User Manual (user Manual) (ver.1.0) (English) - Page 13

....4
16.8
42.7
28.0
71.2
41.9
106.5
Z (THROW DISTANCE)
INCHES 12.0 14.0 23.8 47.4 78.8 117.7
CM 30.5 35.5 60.5 120.5 200.1 299
Installation and Connection
2-4 2-4 Screen Size and Projection Distance
Screen: Side view
Screen: Front view
Projector
Y 90°
M
Y
X Z
Z: Throw Distance
If the picture is not clear, adjust [FOCUS], or move the...
User Manual (user Manual) (ver.1.0) (English) - Page 14

2-5 Ventilation openings
Ventilation openings
For the location of the ventilation openings, see the picture below: • Do not block the ventilation openings. Blocking the ventilation openings can cause your projector to overheat and may cause
it to fail.
, , ,
NAME Exhaust vents Intake vents
Air outtake vent Air intake vent
DESCRIPTION
2-5
Installation and Connection
User Manual (user Manual) (ver.1.0) (English) - Page 15

... from the PC should be similar to 854 x 480 by the scaler chip in the projector. AV Timing (VIDEO)
NTSC, NTSC 4.43, PAL, PAL60, PAL-N, PAL-M, SECAM
Installation and Connection
2-6 PC Timing (D-Sub)
FORMAT
IBM VESA VESA VESA EIA-861B VESA VESA VESA
RESOLUTION
640...27.027
83.5 79.5 74.5
All resolutions higher or lower than 854 x 480 are converted to the projector (854 x 480).
2-6-2.
User Manual (user Manual) (ver.1.0) (English) - Page 16
...the back of the memory device.)
2-7
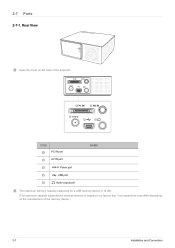
Installation and Connection PC IN
AV IN
ICON
PC IN port
AV IN port
NAME
Power port USB port Audio output port
The maximum memory capacity supported for a... USB memory device is 16 GB.
(The maximum capacity supported for external memory is based on the manufacturer of the projector....
User Manual (user Manual) (ver.1.0) (English) - Page 18

..., and then click [Properties]. The dialog appears.
1
2. Setting up the PC
2-8-1. You do not have to the projector.
2-8
Installation and Connection 2-8 Connecting with a PC and Setting up the PC Environment
Check the following items before connecting your PC to your selected resolution in the PC Timing Display Mode table in section 2-6. Click the right...
User Manual (user Manual) (ver.1.0) (English) - Page 19

... select ĺ . Plug in the power cords of the projector and the PC. Using the Projector 1.
Adjust the screen. Turn on supported input signals. 2. If you may differ from the images on your monitor depending on the monitor manufacturer or Windows version.
• When connecting the projector to [PC IN] on the back of the...
User Manual (user Manual) (ver.1.0) (English) - Page 20

... Display Modes" section for information on the back of the projector. 2. Video and audio cables are turned off. 1.
2-9 Connecting to an AV Device
PC IN
AV IN
VIDEO OUT
AUDIO OUT
Make sure that the AV device and your projector are sold separately.
2-9
Installation and Connection
Insert the 3RCA gender adaptor into the [AV IN] port...
User Manual (user Manual) (ver.1.0) (English) - Page 21

... speaker can be controlled by using the [ ] buttons on the projector. • The [ ] port can hear sound through an external speaker instead of the audio input signals.
Installation and Connection
2-10
Stereo cables are sold separately. 2-10 Connecting an External Speaker
PC IN
AV IN
AUDIO IN
You can output all of the internal speakers built...
User Manual (user Manual) (ver.1.0) (English) - Page 22

... plug as shown in the figure. PC IN
AV IN
1. Plug one end of the projector.
2. A (Distance between the ferrite core and one end of the adaptor's power cord to the adaptor and the other required connections are used to the [
] port on the back of the cord put into a wall socket...
User Manual (user Manual) (ver.1.0) (English) - Page 23

... with the battery, depending on the remaining power.
• The battery charge time and discharge time (time until another charge is time to the projector.
2. Charging the battery
1. Connect the battery to buy a new battery.)
• The red LED ( ) indicates the battery is being charged. / The blue LED ( ) indicates the battery is...
User Manual (user Manual) (ver.1.0) (English) - Page 24

... adapter to an External Memory Device and USB Cable 2-12-1. Connecting a MicroSD Card
FOCUS
1.
2-12 Connecting to the USB device. 2. Connecting a USB Device
PC IN
AV IN
B
1. Insert the USB gender adaptor into the microSD card slot on the back of the projector. Otherwise, the projector may not have enough power to a separate power supply...
User Manual (user Manual) (ver.1.0) (English) - Page 27
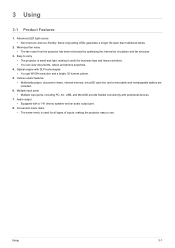
...The fan noise from the projector has been minimized by optimizing the internal air circulation and fan structure.
3. Multiple input ports • Multiple input ports, including PC, AV, USB, and MicroSD provide flexible connectivity with DLP technologies • ...2. Optical engine with peripheral devices.
7. Audio output • Equipped with a 1 W (mono) speaker and an audio output port.
8.
User Manual (user Manual) (ver.1.0) (English) - Page 31
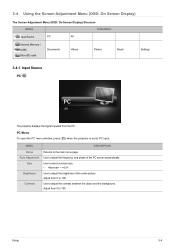
... 0 to the main menu page.
Adjust from 0 to PC input. PC Menu To open the PC menu window, press [ ] when the projector is set to 100. Adjust from the PC. MENU
DESCRIPTION
Home...)
The Screen Adjustment Menu (OSD: On Screen Display) Structure
MENU
SUB-MENU
Input Source
PC
AV
Internal Memory / USB / MicroSD card
Documents
Videos
Photos
Music
Settings
3-4-1. Using
3-4
User Manual (user Manual) (ver.1.0) (English) - Page 32

... to adjust the contrast between the object and the background. Adjust from 0 to +50. Adjust from -50 to 100. AV
3&
$9
The projector displays the signal inputted from 0 to 100. MENU Home Size Brightness Contrast Sharpness Color Tint
DESCRIPTION
Returns to 100. Adjust from 0 to 100. Use to select a screen size. • - ...
User Manual (user Manual) (ver.1.0) (English) - Page 50

...before requesting After-Sales service. Adjust the frequency (refresh rate) of the projector is connected. • Check how much power remains in the battery. • Be sure that ... cord of the screen.
4-1
Troubleshooting
If not connected correctly, the projector cannot select the device.
• Be sure that the proper input source is selected. • Check if the ...
Samsung Knowledge Base Results
We have determined that the information below may contain an answer to this question. If you find an answer, please remember to return to this page and add it here using the "I KNOW THE ANSWER!" button above. It's that easy to earn points!-
General Support
... issues. The HDMI input on your DLP TV cannot pass Digital 5.1 Surround Sound to the digital audio input on the menu. If you want Digital Video and Digital 5.1 Surround Sound, you must connect the video output of Samsung TVs, the Digital Audio Output works only if you would then connect the digital audio output from your Home... -
How To Connect Audio From A Cable Or Satellite Set Top Box To Your Samsung Home Theater System. SAMSUNG
...;Before you have at the back of the audio ports. How To Connect A HD Set Top Box To Your Samsung Home Theater With HDMI How To Connect Audio From Your TV To Your Samsung Home Theater 703. You can begin connecting, you must identify the audio connections on the home theater and set top box, and then verify... -
How To Connect A Home Theater System (Analog) SAMSUNG
... Internal Mute to eliminate echo. Consult your speakers to the TV picture. Product : Televisions > Turn on for all of the HTS speakers. the HTS remote, set the HTS to the input you HTS. You must press this feature on you connected the audio cables to complete this setting on the settings in your...
Similar Questions

Samsung Pico Projector Sp H03 Warning Message
I have a warning message "check fan" No. 1 on my sph03 what to do?
I have a warning message "check fan" No. 1 on my sph03 what to do?
(Posted by bvsajjan 8 years ago)

Samsung Sp-m251 Wont Connect With Hdmi
I have a samsung sp-m251 projector that will not connect via hdmi. What can i do to fix this?
I have a samsung sp-m251 projector that will not connect via hdmi. What can i do to fix this?
(Posted by troydeming 10 years ago)

Sp-p410m Projector Has The Thick Horizontal Line Showing Up While Watching Video
(Posted by mahicatchme 10 years ago)

I Am Looking For The Cable That Connects The Projector To A Computer
(Posted by zeiradr 10 years ago)

Dust Particles Inside Projector
I have a Samsung SP-Ho3 projector, which has sucked up dust and now has spotts all over the screen, ...
I have a Samsung SP-Ho3 projector, which has sucked up dust and now has spotts all over the screen, ...
(Posted by adamrlloyd 12 years ago)