Sanyo DP55441 Support Question
Sanyo DP55441 Support Question
Find answers below for this question about Sanyo DP55441.Need a Sanyo DP55441 manual? We have 1 online manual for this item!
Question posted by ktrue9301 on April 6th, 2014
Handshake Issue With Comcast X1 Box
TV picture blinks off and on with X1 comcast cable box. Was told it was a handshake issue and had to remove HDMI cable and put on Manual picture controls.
Current Answers
Related Sanyo DP55441 Manual Pages
Owners Manual - Page 3

... (including amplifiers) that the
cable ground shall be
mounted to ...TV.
22. NATIONAL ELECTRICAL CODE
NEC ART 250, PART H)
"Note to CATV system installer:
This reminder is connected to the television...MANUAL WITH THIS UNIT. Heed all instructions.
Protect the power cord from being walked on the LCD TV... THE RISK OF ELECTRIC SHOCK, DO NOT REMOVE COVER (OR BACK). extreme care should not...
Owners Manual - Page 4
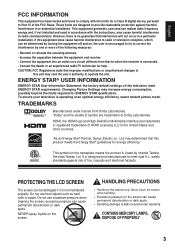
...the factory default settings of Dolby Laboratories. Changing Picture Settings may cause harmful interference to correct the ... meets the Energy Star® guidelines for help. HDMI, the HDMI logo and High-Definition Multimedia Interface are designed to...the dealer or an experienced radio/TV technician for energy efficiency." To ensure your television is not maintained properly.
HANDLING ...
Owners Manual - Page 5

... STARTED 7 PReCAUTIONS 7 GETTING STARTED-CONTROLS AND JACKS 8 REMOTE CONTROL OPERATION 9 GETTING STARTED-CONNECTIONS.....10 ...HDMI TO HDMI.......12 DVI TO HDMI 12 DIGITAL AUDIO 12 AUDIO OUT JACKS 12
PC CONNECTIONS 13 PC MONITOR OPERATION 13
SPORTS MODE 14
ON-SCREEN MENU OPERATION 15 MENU NAVIGATION MAP 15 CHANNEL ADJUSTMENT 15 CHANNEL LIST OPERATION 16 PARENT ADJUSTMENT 17 PICTURE...
Owners Manual - Page 6
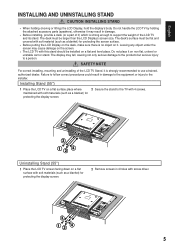
... display screen.
3 12 4
Uninstalling Stand (55")
1 Place the LCD TV screen facing down on non flat, unlevel or unstable cart or stand. maintained with 4 screws.
Do not place it on a flat surface with soft materials (such as a blanket) for protecting the display screen.
2 Remove screws in 4 holes with soft material (such as a blanket) for...
Owners Manual - Page 7
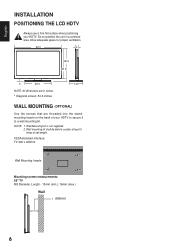
... x 400mm
Wall Mounting Inserts
Mounting screws measurements: 55" TV M8 Diameter, Length - 13mm (min.); 16mm (max.)
Wall
• (60mm)
6 Wall Mounting kit is not supplied. 2.
English
INSTALLATION POSITIONING THE LCD HDTV
Always use a firm-flat surface when positioning your HDTV to secure it to sustain at least 3 times of set weight.
Wall...
Owners Manual - Page 8

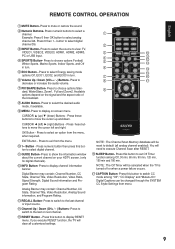
... a direct Cable TV connection. Do not expose the Remote or batteries to HDMI or component (VIDEO3) jacks. Analog or Clear QAM cable channels from an antenna.
Digital and Analog off -air signals. OR
b.
Please recycle used up batteries.
2 Antenna Connection for Clear QAM Cable channels. (see page 11)
For the best picture, connect your Cable box or Satellite...
Owners Manual - Page 9
... television's firmware and accessing JPEG files.
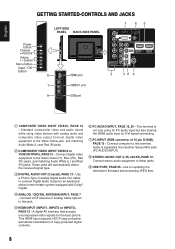
8 PC INPUT (RGB connector of copy-protected digital contents. Standard (composite) video and audio inputs while using for PC audio input but also sharing the HDMI audio input for DVI signal connecting.
English
V DEO 1 NPUT
GETTING STARTED-CONTROLS AND JACKS
Input / OK button
LEFT-SIDE PANEL BACK-SIDE PANEL...
Owners Manual - Page 10
... ECO1, ECO2, and ECO3 in turn .
Press this button to view: TV, VIDEO1, VIDEO2, VIDEO3, HDMI1, HDMI2, HDMI3, PC or USB Input. ...Sound information and Program Rating.
You will be canceled when the TV is turned off or when a power failure occurs.
SPORTS Button...) Buttons - Button - If you execute RESET function, the TV will be changed through the SYSTEM CC Stytle Settings from menu.
...
Owners Manual - Page 11
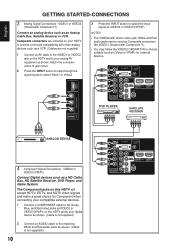
...select Video1 or Video2.
3 Press the INPUT button to select the input signal as a HD Cable Box, HD Satellite Receiver, DVD Player, and Game System.
Connect an analog device such as Composite ...; The VIDEO2 with Green video jack, White and Red audio jacks can be used as an Analog Cable Box, Satellite Receiver or VCR.
VIDEO1 or VIDEO2 (Shared with Component-Y).
• You may follow the ...
Owners Manual - Page 12

... Use the CURSOR ▲ and ▼ buttons to highlight the
Channel Scan. TVs will enter INITIAL CHANNEL SCAN automatically. Move
OK Enter
INITIAL CHANNEL SCAN
NOTE : ...9650; and ▼ buttons.
11
Press the OK button. To 120V AC outlet. Store : This mode is no cable or antenna being plugged-in to tuner connector.
8 Use the CURSOR ▲ and ▼ buttons to highlight
Store or...
Owners Manual - Page 13
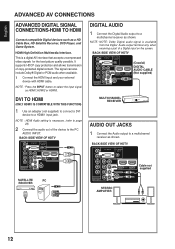
...AV interface that accepts uncompressed video signals for the best picture quality possible. BACK-SIDE VIEW OF HDTV
(Coaxial) DIGITAL AUDIO CABLE (Not supplied)
MULTICHANNEL RECEIVER
AUDIO OUT JACKS 1 ... SIGNAL CONNECTIONS-HDMI TO HDMI
Connect compatible Digital devices such as HDMI1,HDMI2 or HDMI3.
NOTE : Press the INPUT button to select the input signal as a HD Cable Box, HD Satellite...
Owners Manual - Page 14
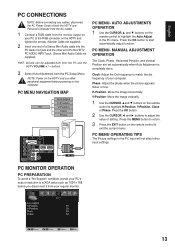
...- PC MENU- Phase-
V-Position-
buttons.
3 Select Auto Adjustment from your regular monitor.
13 MANUAL ADJUSTMENT OPERATION
The Clock, Phase, Horizontal Position, and Vertical Position are set automatically when Auto Adjustment is completely done. Adjust the phase when the picture appears flicker or blur. PC MONITOR OPERATION
PC PREPARATION
To avoid a "No Support...
Owners Manual - Page 15
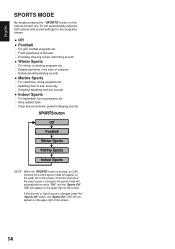
...By simply pressing the " SPORTS" button on the remote control, the TV will automatically optimize both picture and sound settings for the programs shown.
■■...−− Delightful splashing and surf sounds
■■ Indoor Sports
−− For basketball, boxing programs etc. −− Alive reddish flesh −− Clear announcements, powerful banging sounds
NOTE ...
Owners Manual - Page 16

Press the OK button. (A red hook will search for analog cable channels and
unscrambled (Clear QAM) digital cable channels.
1 Press the MENU button on the remote control to
display the Main menu.
English
ON-SCREEN MENU OPERATION
MENU NAVIGATION MAP
MAIN MENU SUB-MENU OPTIONS
CHANNEL ADJUSTMENT
SIGNAL SOURCE OPERATION
There are ...
Owners Manual - Page 18
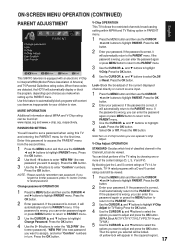
... times to enter "Confirm" numbers. ON-SCREEN MENU OPERATION (CONTINUED)
English
PARENT ADJUSTMENT
This SANYO television is equipped with a D and V content rating could still be viewed.
1 Press the MENU ...MENU button and then use the CURSOR ◄ and ► buttons to interpret MPAA (Motion Picture Association of TV-14, for your password. Press the OK button.
2 Use the 0 - 9 buttons to...
Owners Manual - Page 21
...DVD player, cable/satellite box and digital camera
Press the OK button. NOTE : Even though the HDMI is pure HDMI type, the audio still is Auto) For the other HDMI port, the HDMI Audio setting will...ADJUSTING THE AUDIO LEVELS TREBLE/ BASS/ BALANCE OPERATION
1 Press the MENU button on the remote control to display the Main menu.
2 Use the CURSOR ◄ and ► buttons to highlight...
Owners Manual - Page 22
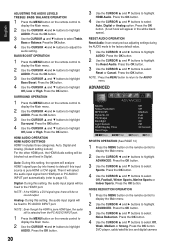
... buttons to Middle, Low or Off if a picture is High.
• Change this setting to select the
OSD Display Time option.
Try having the TV setting on this function. Press the OK button.
...and ► buttons to User then can turn on FULL first, and adjust via the cable/satellite box's remote control.
NOTE : Please set Light sensor operation to select the
Dynamic AI. NOTE:
•...
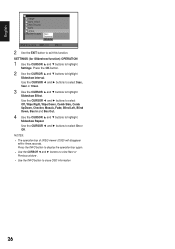
Owners Manual - Page 24

... min, 60 min, 90 min,120 min, 150 min, and 180 min for your panel.
1 Press the MENU button on your choice of setting the counting down of time you...button.
5 Use the CURSOR ▲ and ▼ buttons to highlight
Sleep. Automatic power saving, when no TV signal input display on the remote control to display the Main menu.
2 Use the CURSOR ◄ and ► buttons to highlight
SYSTEM.
3 ...
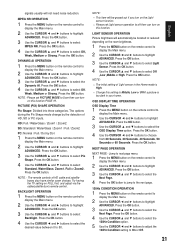
Owners Manual - Page 27
...Down, Comb Side, Comb UpDown, Checker, Mosaic, Fade, Blind Left, Blind Down, Box In and Box Out.
4 Use the CURSOR ▲ and ▼ buttons to highlight
Slideshow Effect.... Press the INFO button to display the operation bar again. • Use the CURSOR ◄ and ► buttons to view Next or Previous picture...
Owners Manual - Page 30
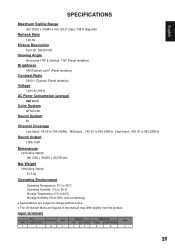
... Hz
Picture Resolution
Full HD 1920X1080
Viewing Angle
Horizontal 178° & Vertical: 178° (Panel tentative)
Brightness
450(Typical) cd/m2 (Panel tentative)
Contrast Ratio
5000:1 (Typical) (Panel tentative)...;■ The On-Screen Menu and figures in this manual may differ slightly from the product.
Input terminals
VGA 1
PC AUDIO JACK
1
HDMI/DVI 3
ANT 1
Video 1
Video 2/3
USB
AV AV...
Similar Questions

Can I Connect My Care Sara Hydrophone To My Sanyo Dp46840 Flat Panel Tv And How
(Posted by freespirittonya 9 years ago)


What Is Comcast Hd Box Should I Use With My Sanyo Dp55441
(Posted by Daddleo 9 years ago)
Sanyo Dp55441 Will Not Change Channels Through Cable Box
(Posted by BYG7te 10 years ago)

Having Problems Getting The Set To Turn On To A Channel. Hooked To Comcast Cabl
When set turned on by comcast remote it comes up no signal if I go to an anolog channel it comes up ...
When set turned on by comcast remote it comes up no signal if I go to an anolog channel it comes up ...
(Posted by wljones001 11 years ago)