
Sanyo DP55441 Support Question
Sanyo DP55441 Support Question
Find answers below for this question about Sanyo DP55441.Need a Sanyo DP55441 manual? We have 1 online manual for this item!
Question posted by joycndsgu on April 2nd, 2014
Sanyo Dp55441 How Do I Get Hdmi Channel To Be Default Channel On Start Up
The person who posted this question about this Sanyo product did not include a detailed explanation. Please use the "Request More Information" button to the right if more details would help you to answer this question.
Current Answers
Related Sanyo DP55441 Manual Pages
Owners Manual - Page 3

...be sure the antenna system is to qualified service personnel. If an outside antenna is connected to the television equipment, be fatal.
6. Install the LCD TV in the
2 If not, it can reduce ...from tip-over.
13. Do not defeat the safety purpose of the LCD TV cabinet for choosing SANYO. When a cart is damaged, liquid has been spilled or objects have fallen into your product. ...
Owners Manual - Page 4
...for help.
"As an Energy Star® Partner, Sanyo Electric co., Ltd. This symbol on the nameplate .... Increase the separation between the equipment and receiver. - HDMI, the HDMI logo and High-Definition Multimedia Interface are trademarks of the ... or television reception, which the receiver is not maintained properly. It is operating at an optimal energy efficiency, select default picture ...
Owners Manual - Page 5

... MOUNTING (OPTIONAL 6
GETTING STARTED 7 PReCAUTIONS 7 GETTING STARTED-CONTROLS AND JACKS 8 REMOTE CONTROL OPERATION 9 GETTING STARTED-CONNECTIONS.....10 POWER CONNECTION 11 INITIAL SETUP 11 INITIAL CHANNEL SCAN 11 GETTING STARTED-POWER CONNECTION/CHANNEL SEARCH..11
ADVANCED AV CONNECTIONS........... 12 ADVANCED DIGITAL SIGNAL CONNECTIONS-HDMI TO HDMI.......12 DVI TO HDMI 12 DIGITAL AUDIO...
Owners Manual - Page 8

OR
b. English
GETTING STARTED
1 Install batteries in the Remote.
Please recycle used up batteries.
2 Antenna Connection for Clear QAM Cable channels. (see page 11)
For the best picture, connect your Cable box or Satellite receiver to HDMI or component (VIDEO3) jacks. NOTES: You must use rechargeables together with dry cells, other types, mixed new...
Owners Manual - Page 9
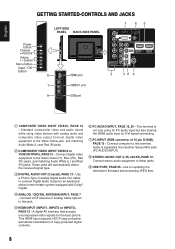
... interface that accepts uncompressed video signals for updating the television's firmware and accessing JPEG files.
8 This terminal ...Cable system to this jack. HDMI INPUT (INPUT1, INPUT2 or INPUT3), PAGE 12 -
Audio is ...signal type. English
V DEO 1 NPUT
GETTING STARTED-CONTROLS AND JACKS
Input / OK button
LEFT-SIDE PANEL BACK-SIDE PANEL
Y
PC INPUT
PC AUDIO
INPUT
Pb
Pr...
Owners Manual - Page 10
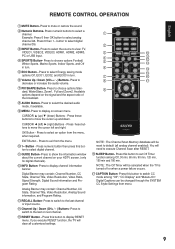
..., ECO2, and ECO3 in turn . Press to display on-screen menu. EXIT Button - Press numeric button then press this button to default (all customized settings.
CAPTION Button- Press to the last channel or input source. INPUT Button- ECO Button - INFO Button- Press to switch to mute or restore the sound.
NOTE : The...
Owners Manual - Page 11
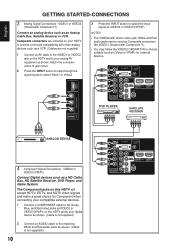
... Signal Connections -
The Component jacks on this HDTV will accept HDTV, EDTV, and SDTV video signals and make a great choice for external devices.
English
GETTING STARTED-CONNECTIONS
3 Analog Signal Connections -
Owners Manual - Page 12

... automatically. Press the OK button. Choose the Scan to highlight
Store or Home. INITIAL setup 7 Use the CURSOR ▲ and ▼ buttons to start the channel scanning. Home : This mode qualifies for the retail display setup.
To 120V AC outlet. Store : This mode is no cable or antenna being plugged-in ...
Owners Manual - Page 13
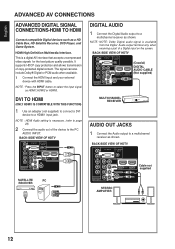
... Connect the audio out of the device to a HDMI1 input jack. NOTE : HDMI Audio setting is compatible with HDMI cable. BACK-SIDE VIEW OF HDTV
(Coaxial) DIGITAL AUDIO CABLE (Not supplied)... digital AV interface that accepts uncompressed video signals for the best picture quality possible. HDMI-High-Definition Multimedia Interface. BACK-SIDE VIEW OF HDTV
SATELLITE
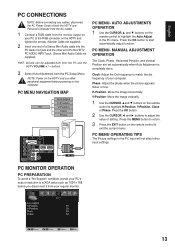
PC
RECEIVER
STEREO AMPLIFIER
...
Owners Manual - Page 14
... any cables, disconnect the AC Power Cords of setting. Move the image vertically.
1 Use the CURSOR ▲and ▼ buttons on the remote control to start automatically adjust function.
AUTO ADJUSTMENTS OPERATION
1 Use the CURSOR ▲ and ▼ buttons on your computer. Move the image horizontally. HINT: Volume can be adjusted...
Owners Manual - Page 15
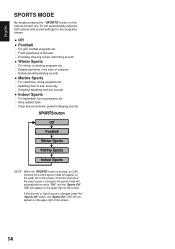
... sports mode will automatically be set to "Off", and the "Sports Off" OSD will appear on the upper right of the screen.
14 Once the channel or the input source is pushed, an OSD showing the current sports mode will appear on the lower left of the screen. English
SPORTS MODE...
Owners Manual - Page 16

... the OK button.
2 Highlight Air or Cable.
Choose the
Scan to highlight
All. Press the OK button.
3 Use the CURSOR ▲ and ▼ buttons to start the channel scanning. Move
OK Enter
MENU Return EXIT Exit
15 Press the OK button. (A red hook will search for analog cable...
Owners Manual - Page 17

...Channel Scan. Press the OK button. This means the channel is a database of the Channel List with
each channel of active channels you want to delete.
4 Press the VOL+ button to delete the channel from the Channel List.)
RENAMING CHANNELS FROM THE CHANNEL.... (HINT: Use CURSOR ◄ and ► buttons to highlight
the Channel List. Press the OK button.
2 Use the CURSOR ◄ and &#...
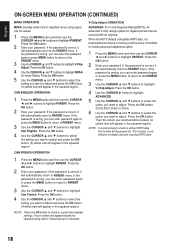
Owners Manual - Page 18
... setting up the PARENT menu. ON-SCREEN MENU OPERATION (CONTINUED)
English
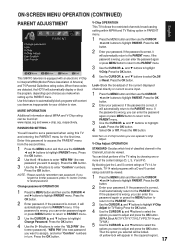
PARENT ADJUSTMENT
This SANYO television is equipped with a D and V content rating could still be locked. (A yellow ...; buttons to highlight PARENT menu. If the password is correct, it will appear in the Channel List can be viewed. Press the OK button. Decides which kind of the content ratings (D,...
Owners Manual - Page 19
...buttons to select the
setting you want to PARENT menu. An advanced V-Chip ratings system for digital channels that it is downloaded and stored in the squared region.)
NOTE : Press the OK button to... the PARENT menu.
3 Use the CURSOR ▲ and ▼ buttons to highlight MPAA for digital channels including RRT5 data.
18 Press the OK button.
4 Use the CURSOR ▲ and ▼ buttons...
Owners Manual - Page 20
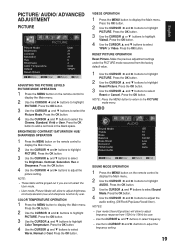
... hook in the blank space. RESET PICTURE OPERATION Reset Picture- NOTES: • User mode (Sound Equalizer) will allow to adjust
frequency response from the factory default value.
1 Use the CURSOR ◄ and ► buttons to highlight Video2. Press the OK button.
3 Use the CURSOR ▲ and ▼ buttons to adjust the...
Owners Manual - Page 21
..., Medium or Strong. It can reset previous adjusting settings during the AUDIO mode to the factory default value.
1 Use the CURSOR ◄ and ► buttons to adjust the
audio setting. ... and ► buttons to highlight
the Reset Audio. HDMI AUDIO OPERATION HDMI AUDIO SETTINGS HDMI1 includes three categories, Auto, Digital and Analog. (Default setting is a DVI signal type, there will be no...
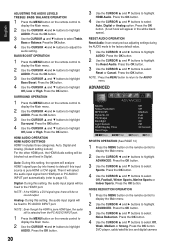
Owners Manual - Page 23
Reset the previous adjustment settings under the ADVANCED mode to the factory default value.
1 Use the CURSOR ◄ and ► buttons to the previous
.... Press the OK button.
English
NOTES : • When you select to PC source or USB mode, the120Hz
CONDITION default setting is set to select
Reset or Cancel.
Press the OK button.
3 Use the CURSOR ▲ and ▼...
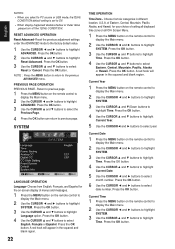
Owners Manual - Page 29
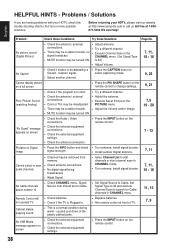
... Signal Type
• MUTE function may be removed from memory.
• Check antenna connections. • No digital signal being
broadcasted.
• Selec Channel List to add channels or start channel scan in CHANNEL menu.
7,9 19 - 20
7 - 13
7, 11 7, 11, 15 - 18
11, 15
Remote Control will not operate TV
• Check batteries. • Check if...
Owners Manual - Page 30
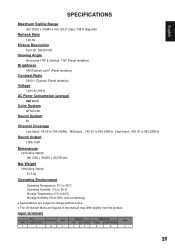
...: 178° (Panel tentative)
Brightness
450(Typical) cd/m2 (Panel tentative)
Contrast Ratio
5000:1 (Typical) (Panel tentative)
Voltage
120V AC 60Hz
AC Power Consumption (average)
342 Watts
Color System
NTSC3.58
Sound System
M
Channel Coverage
Low band:... product. Input terminals
VGA 1
PC AUDIO JACK
1
HDMI/DVI 3
ANT 1
Video 1
Video 2/3
USB
AV AV Audio YPbPr YPbPr Audio
1
1
2
2
1
29
Similar Questions

Can I Connect My Care Sara Hydrophone To My Sanyo Dp46840 Flat Panel Tv
(Posted by freespirittonya 9 years ago)
Can I Connect My Care Sara Hydrophone To My Sanyo Dp46840 Flat Panel Tv And How
(Posted by freespirittonya 9 years ago)

Sanyo Hdtv Model Dp55441 What Channel Do You Need To Be On For Over-the-air
channels?
channels?
(Posted by sarandr 10 years ago)
