Schwinn Airdyne AD6 Support Question
Schwinn Airdyne AD6 Support Question
Find answers below for this question about Schwinn Airdyne AD6.Need a Schwinn Airdyne AD6 manual? We have 1 online manual for this item!
Question posted by esalmon1744 on January 22nd, 2023
Seat Knob Is Stripped .
ho to remove seat adjustment knob ?
Current Answers
Answer #1: Posted by MercedesAMG on January 22nd, 2023 4:36 PM
MercedesAMG

Member since:
January 26th, 2013 Points: 193,710

Member since:
January 26th, 2013 Points: 193,710
To remove the seat adjustment knob on a Schwinn Airdyne AD6, you will need to follow these steps:
- Locate the knob on the seat post of the bike.
- Using a pair of pliers, grip the knob tightly and turn it counterclockwise to loosen it.
- If the knob is stripped and will not turn with pliers, you may need to use a rubber mallet or a small hammer to gently tap it counterclockwise.
- If the knob is still not coming off, you can try to use penetrating oil or WD-40 to loosen it up.
- Once the knob is loose, remove it from the seat post by pulling it off.
- You should now be able to access the seat post and make any necessary adjustments or repairs.
Note: Be careful not to damage the threads of the seat post when removing the knob as it may affect the ability to adjust the seat.
Please respond to my effort to provide you with the best possible solution by using the "Acceptable Solution" and/or the "Helpful" buttons when the answer has proven to be helpful. Please feel free to submit further info for your question, if a solution was not provided. I appreciate the opportunity to serve you!
Answer #2: Posted by SonuKumar on January 22nd, 2023 6:48 PM
SonuKumar

Member since:
May 9th, 2021 Points: 16,673,770
Member since:
May 9th, 2021 Points: 16,673,770
To remove the seat adjustment knob on a Schwinn Airdyne AD6, follow these steps:
- Locate the knob on the seat post.
- Use a Phillips head screwdriver to remove the screw that is holding the knob in place.
- Carefully pull the knob off of the seat post.
It's important to note that if the knob is stuck or difficult to remove, you may need to use some penetrating oil or a lubricant to loosen it up first. Also make sure to keep the screw safe.
Please respond to my effort to provide you with the best possible solution by using the "Acceptable Solution" and/or the "Helpful" buttons when the answer has proven to be helpful.
Regards,
Sonu
Your search handyman for all e-support needs!!
Related Schwinn Airdyne AD6 Manual Pages
Assembly and Owner's Manual - Page 2
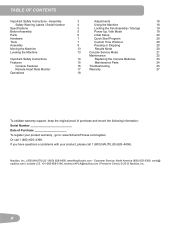
... 7
Assembly 8
Moving the Machine
13
Leveling the Machine
13
Important Safety Instructions
14
Features
15
Console Features
16
Remote Heart Rate Monitor
17
Operations 18
Adjustments 18
Using the Machine
18
Locking the Fan Assembly / Storage
19
Power Up / Idle Mode
19
Initial Setup
20
Quick Start Program
20
Custom Time...
Assembly and Owner's Manual - Page 6

... Strap, Left
2
1 Console Support Bar
10
1 Pedal, Left
3
1 Console
11
1 Foot Peg, Left
4
1 Water Bottle Holder
12
1 Stabilizer, Front
5
1 Handlebar, Left
13
1 Foot Peg, Right
6
1 Seat
14
1 Pedal, Right
7
1 Seat Post
15
1 Pedal Strap, Right
8
1 Stabilizer, Rear
16
1 Handlebar, Right
6
Assembly and Owner's Manual - Page 8
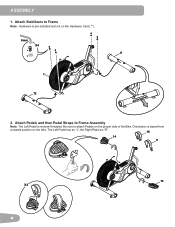
... Pedal has an "L", the Right Pedal an "R".
15
14
R
9
10
10 X2
X2
8 Attach Stabilizers to Frame Assembly
Note: The Left Pedal is based from
a seated position on the proper side of the Bike. Be sure to attach Pedals on the bike. ASSEMBLY
1.
Assembly and Owner's Manual - Page 9
... fingers or hands being caught or pinched.
2
6mm
X4
D E
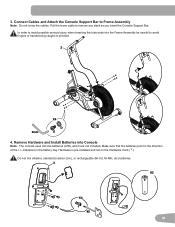
4. Hardware is pre-installed and not on the Hardware Card ( * ). Remove Hardware and Install Batteries into the Frame Assembly be careful to remove any slack as you insert the Console Support Bar. 3.
Make sure that the batteries point in the battery bay. In...
Assembly and Owner's Manual - Page 11
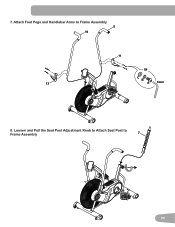
7. Attach Foot Pegs and Handlebar Arms to
Frame Assembly
7
STOP
11 Loosen and Pull the Seat Post Adjustment Knob to Attach Seat Post to Frame Assembly
5
16
11
X4
C
13
B A
6mm
8.
Assembly and Owner's Manual - Page 12

9. Attach Seat to ensure that all hardware is straight and then tighten the hardware. 6
10. Do not use or put the machine into service until the machine has been fully assembled and inspected for correct performance in accordance with the Owner's Manual.
12 Final Inspection
Inspect your machine to Seat Post
NOTICE: Be sure the Seat is tight and components are properly assembled.
Assembly and Owner's Manual - Page 13

... to such a height that they are all physically fit and able to move the machine.
Make sure the machine is uneven. NOTICE: B e careful when you exercise.
13
Injury to you and others are evenly balanced and in contact with the floor. Do not adjust the levelers to the machine can
affect the computer...
Assembly and Owner's Manual - Page 14
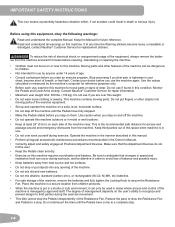
... not use if found in areas where access and control of the machine, remove the batteries and fully tighten the Locking Knob to anticipate that the Adjustment Devices do not hit the user. • Keep the Pedals clean and dry. • Exercise on this equipment, obey the following warnings:
Read and understand the complete...
Assembly and Owner's Manual - Page 15

...K
A Console B Hand Grip C Handlebar D Water Bottle Holder E Battery Compartment F Locking Knob
G Air Resistance Fan H Transport Roller I Leveler J Stabilizer, Front K Foot Peg L Pedal
G
H I J
M Stabilizer, Rear N Foot Step Pad O Seat Post Adjustment Knob P Seat
R
Q
S
Accessories
Q AirDyne® Reading Rack
R AirDyne® Wind Screen
To order, go to www.schwinnfitness.com or call 1 (800...
Assembly and Owner's Manual - Page 16
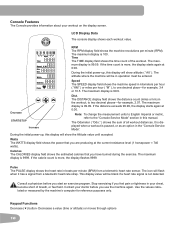
...flash when it has a signal from a telemetric heart rate sensor. Stop exercising if you have burned during the exercise. Decrease START/STOP
Increase
RPM The RPM display field shows the machine revolutions... calories that you are producing at 0:00.
Consult a physician before you start an exercise program. Use the values calculated or measured by the machine's computer for example, ...
Assembly and Owner's Manual - Page 17
... Heart Rate Monitor Monitoring your cardiovascular system. The longer you maintain your target heart rate, the more fat your body will not work with all exercises and fitness regimens, always use your best judgment when you have readings of what is no indication that operates in childhood to find this equipment.)
If...
Assembly and Owner's Manual - Page 18

... foot.
Release the Seat Post Adjustment Knob to move the others do as the Handlebars move the seat
downward.
Do not lift the Seat post above the "STOP" mark on the Seat Post. Pedal straps can be reached. How Often Should You Exercise Consult a physician before you start an exercise program. Seat Adjustment Correct seat placement encourages exercise efficiency and comfort...
Assembly and Owner's Manual - Page 19

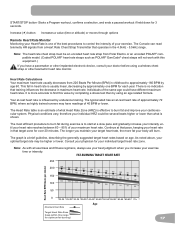
... turn the Locking Pin a full 90 degrees. To increase the air resistance and workload, increase your level of the machine, remove the batteries and engage the Locking Pin to a complete stop .
To exercise all the muscle groups in approximately 5 minutes, it receives a signal from the RPM sensor as a result of the workout...
Assembly and Owner's Manual - Page 20

... the last custom time value. Push the START/STOP button to accept the custom time workout. To adjust the value, consult the "Console Set-Up Mode" section. Sit on the machine. 2. Note: ...Note: The default time value is no RPM signal for the altitude. Push the Increase and Decrease buttons to adjust the custom time value. 5. Push START/STOP to set. Pausing or Stopping To Pause a workout: ...
Assembly and Owner's Manual - Page 21

...buttons to either English or Metric, see the total time and distance the machine has been used, adjust the altitude value for a more accurate calorie count, or find out which Firmware Version is total... hours followed by the remaining minutes. 5. Push START/STOP to adjust the Altitude value. To fully exit the Console Service Mode push and hold down the Increase...
Assembly and Owner's Manual - Page 22

... examine the exercise machine for Indoor Cycling and can be used in this condition. If needed, sparingly apply a thin coating of Pedals may not be regularly examined for smooth seat operation. NOTICE..., maintaining or repairing the machine. Only manufacturer supplied components can cause danger to remove any repair work. Clean the machine to users and bystanders.
22 Tighten as ...
Assembly and Owner's Manual - Page 24
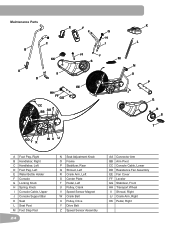
...DD Y X
WV U
K
L
N O
P
Q R S
T
A Foot Peg, Right B Handlebar, Right C Handlebar, Left D Foot Peg, Left E Water Bottle Holder F Console G Locking Knob H Spring, Knob I Console Cable, Upper J Console Support Bar K Seat L Seat Post M Foot Step Pad
24
N Seat Adjustment Knob O Frame P Stabilizer, Rear Q Shroud, Left R Crank Arm, Left S Center Plate T Pedal, Left U Pulley, Crank V Speed Sensor Magnet...
Assembly and Owner's Manual - Page 25
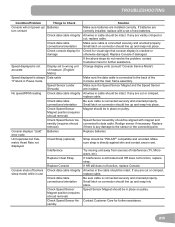
... cable connections/orientation Check Speed Sensor Magnet position (requires shroud removal) Check Speed Sensor Assembly (requires shroud removal) Batteries
Chest Strap (optional)
Interference
Replace Chest Strap
Console...Check data cable connections/orientation
Check Speed Sensor Magnet position (requires shroud removal)
Check Speed Sensor Assembly
Solution Make sure batteries are in the cable...
Assembly and Owner's Manual - Page 26
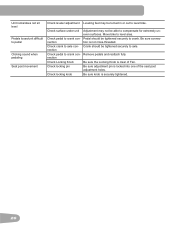
... connection Check crank to axle connection Check pedal to crank connection Check Locking Knob Check locking pin
Check locking knob
Adjustment may be turned in or out to level bike.
Remove pedals and reattach fully. Be sure knob is clear of the seat post adjustment holes. Unit rocks/does not sit level
Pedals loose/unit difficult to...
Assembly and Owner's Manual - Page 27

..., representative, dealer, person or employee has the authority to state. Limitation of any WARRANTY OF FITNESS FOR A PARTICULAR PURPOSE, are not available at our discretion. SOME STATES DO NOT ALLOW THE ..., PRIVACY OR FOR ANY PUNITIVE DAMAGES ARISING OUT OF OR RELATED TO THE USE OF THE FITNESS MACHINE EVEN IF NAUTILUS, INC. HAS BEEN ADVISED OF THE POSSIBILITY OF SUCH DAMAGES. contact ...
Similar Questions

Ad6 Adjustment For Use By A Short Person.
How can the AD6 be adapted for use by a shorter person? Using the handlebars requires an exaggerated...
How can the AD6 be adapted for use by a shorter person? Using the handlebars requires an exaggerated...
(Posted by kazmirrg 1 year ago)

Need To Repalce The Bike Seat. What Seat Can I Order To Fit This Bike,,schwinn
Need To Replace The Bike Seat. 225 Schwinn Recumbent Bike. What Seat Fits This Bike. The One I Order...
Need To Replace The Bike Seat. 225 Schwinn Recumbent Bike. What Seat Fits This Bike. The One I Order...
(Posted by pappastedted 7 years ago)

Parts For An Ad3 Airdyne Bike.
I recently received an AD3 Airdyne exercise bike. Probably from the late 1970,s. Works fantastic, ho...
I recently received an AD3 Airdyne exercise bike. Probably from the late 1970,s. Works fantastic, ho...
(Posted by stevenmills 8 years ago)

Console On Brand-new Airdyne Ad6 Will Not Shut Off Automatically!
Help! The console on my brand-new Airdyne AD6 will not shut off and stay off. It just keeps beeping ...
Help! The console on my brand-new Airdyne AD6 will not shut off and stay off. It just keeps beeping ...
(Posted by cannataco63 8 years ago)

Schwinn Ad6 Seat Adjustment
How do I connect the seat, it is not tightening to the bar
How do I connect the seat, it is not tightening to the bar
(Posted by keb5 9 years ago)