Sharp CV10NH Support Question
Sharp CV10NH Support Question
Find answers below for this question about Sharp CV10NH - 10,000 BTU Portable Air Conditioner.Need a Sharp CV10NH manual? We have 1 online manual for this item!
Question posted by adaircda on October 6th, 2011
Removing The Foam Seal Strip
How can I remove this foam seal strip? It is completely stuck to our sliding door frame. We can pull pieces of the foam off, but we are left with bits of foam and glue.
Current Answers
Related Sharp CV10NH Manual Pages
CV-10NH Operation Manual - Page 3
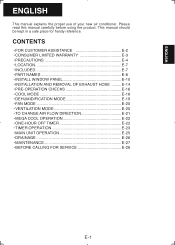
...• LOCATION E-7 • INCLUDED E-7 • PART NAMES E-8 • INSTALL WINDOW PANEL E-10 • INSTALLATION AND REMOVAL OF EXHAUST HOSE .........E-14 • PRE-OPERATION CHECKS E-16 • COOL MODE E-18 •...
ENGLISH
This manual explains the proper use of your new air conditioner. This manual should be kept in a safe place for handy reference.
Please read this manual...
CV-10NH Operation Manual - Page 4

... TO ACCESS THE INTERNET: www.sharpusa.com
Please provide the following information when you write or call: model number, serial number, date of purchase, your complete mailing address (including zip code), your daytime telephone number (including area code) and description of the unit.
CV-10NH Operation Manual - Page 5

...Sealed Cooling System parts;
labor and service are not provided free of change for this Sharp brand product (the "Product"), when shipped in its option, either repair the defect or replace the defective Product or part thereof with respect to Obtain Service:
CV-10NH
Portable Air Conditioner.
USERS
SHARP ELECTRONICS CORPORATION warrants to remove... shall constitute complete fulfi...
CV-10NH Operation Manual - Page 6
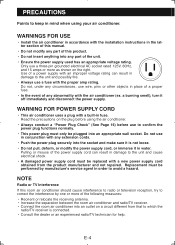
... in conjunction with the proper amp rating. WARNING FOR POWER SUPPLY CORD
• This air conditioner uses a plug with the air conditioner (ex. Do not use a fuse with any extension cords.
• Push the ...not repaired. WARNINGS FOR USE
• Install the air conditioner in order to which the
radio/TV receiver is not loose. • Do not pull, deform, or modify the power supply cord, or ...
CV-10NH Operation Manual - Page 7

...The temperature around the drainage hose must be performed whenever moving the air conditioner. (See Page 26)
If any circumstances cut or remove the round grounding pin from this plug. Screw
Grounding adapter
Grounding ...fied electrician or serviceman if the grounding instructions are not completely understood, or if in through the openings. • To ensure proper drainage, the drainage ...
CV-10NH Operation Manual - Page 8

.... (See page 26)
OPERATING CONDITIONS
• The air conditioner must remove the heat produced by the unit outside through any openings into the room.
• When cooling operation is normal and does not indicate a problem with the unit.
• This air conditioner blows the warm air generated by your air conditioner work harder and less efficiently...
CV-10NH Operation Manual - Page 9

...unit must be cut down in size because the
window is too narrow for efficient air-conditioning. Tape measure or ruler 3.
For safe and secure positioning, place the unit on ....
• Never place any obstacles around the air inlet or outlet of space from the wall for direct installation.)
E-7 ENGLISH
LOCATION
• The air conditioner should only be placed on a firm...
CV-10NH Operation Manual - Page 12

... Side "A" will be unable to shut the exhaust cover.
(1) Remove the adjustment panel from the window panel, and cut the window ... panel on each rain Insect guard guard into the holes in a sliding sash window. )
1 Connect the rain guards to ensure that its... panel
3 Cut the foam seal A (adhesive type) to the proper length and attach it to the window stool. E-10
Cut
Window panel Window stool...
CV-10NH Operation Manual - Page 13

...foam seal B to the adjustment panel.
6 Close the window sash securely against the Window panel. Adjustment panel 24"~36.8"
If the inner width of the window is between 24" (609mm) and 36.8" (934mm) inclusive.
(1) Open the window sash and place the window panel on the window stool.
(3) Slide... the adjustment and extension panels to fit the window frame width.
(4) Secure...
CV-10NH Operation Manual - Page 14

... fit into the window frame.
INSTALL WINDOW PANEL
Installation in a sliding sash window
(See page 10 for installation in a double-... inclusive. Window panel
E-12
"A" Rain guard Window panel "A"
Foam seal A (adhesive type)
Cut
22"~24"
If the inner height ... cover.
(1) Remove the adjustment panel from the window panel, and cut the window panel to the window frame with 2 screws...
CV-10NH Operation Manual - Page 15

... panel to the adjustment panel.
(2) Open the window sash and place the window panel on the window frame.
(2) Slide the adjustment panel to fit the window frame height.
(3) Secure the window panel to the window frame with 3 screws. Foam seal
Foam seal B (adhesive type)
Foam seal A (adhesive type)
Bracket
E-13 Adjustment panel
Extension panel
24"~36.8" 36.8"~48"
5 Cut the...
CV-10NH Operation Manual - Page 16

...securely attached.
2 Attach the exhaust hose adapter to each other.
3 Slide and open the exhaust cover on the window frame side when it is installed in a double-hung sash window. Window ...is installed in a sliding sash window.
Surface of window exhaust adapter marked "TOP" should be as short as possible for operational efficiency; INSTALLATION AND REMOVAL OF EXHAUST HOSE
The ...
CV-10NH Operation Manual - Page 17

"PUSH" Projection
E-15 Lift up and remove the exhaust hose adapter from the unit. Pull out and remove the window exhaust adapter by pushing down two "PUSH" markings, and slide and close the exhaust cover in the window panel.
2 Remove the exhaust hose adapter from the unit by pushing down on the two projections. ENGLISH
Removal of the exhaust hose
1 Remove the window exhaust adapter.
CV-10NH Operation Manual - Page 18

...E-16 The circuit breaker is activated, power is supplied, and the air conditioner is functioning correctly.
4 Press the RESET button until you hear another ...,
press the RESET button using the unit for a prolonged period, remove the batteries from
the remote control. Always check the power plug before use the air conditioner if the above procedure cannot be using a thin pointed implement. &#...
CV-10NH Operation Manual - Page 19

... remote control up slightly and pull it out. When attached, to
23 feet (7 meters) away. Remote control hook
E-17 A beep will sound when the unit receives the signal. • Make sure nothing, such as curtains,
blocks the signal receiver window. • The remote control operates up to remove the remote control from...
CV-10NH Operation Manual - Page 21

...with the unit turned off .
Dehumidification with container
1 Remove the exhaust hose (See Page 15) 2 Turn the drainage nozzle to the OPEN position.
3 Pull the stopcock out from the drainage nozzle. • Always perform ... the room temperature to rise. In this mode, the air conditioner dehumidifies the room.
CAUTION
When operating dehumidification with the stopcock.
CV-10NH Operation Manual - Page 25

... 1.5h 10h 11h 12h
1
Display shown when you can be set the unit to a maximum of 12 hours.
E-23
Up to 9.5 hours, you set from 10 to your setting.
CV-10NH Operation Manual - Page 26

... SETTING AND OPERATION
• The latest time setting will be memorized and will appear on the unit.
1 Press the OFF TIMER button and set from 10 to your setting. Up to 9.5 hours, you set together. TO CANCEL TIMER
Press the CANCEL button. • The orange TIMER lamp on the unit will...
CV-10NH Operation Manual - Page 28

...of re-used.
5 Turn the drainage nozzle to the CLOSE position.
6 Remove the stopcock from the drainpipe nozzle, and completely drain any water within the unit.
• Always prepare a receptacle to ... the drainage nozzle to the CLOSE position. Drainage nozzle
3 Pull the stopcock out from the drainage nozzle. • When the stopcock is removed, a small amount of water may be drained out is ...
CV-10NH Operation Manual - Page 29

... insulation.
Carefully remove any part of the unit.
2 CLEAN THE FILTERS • Use a vacuum cleaner to disconnect the power from the window panel and clean the insect guard net with clean water. Never use hot water (120°F/50°C or hotter) when cleaning. Insect guard net
MAINTENANCE AFTER AIR CONDITIONER SEASON
1 Perform...
Similar Questions

Replacement Window Exhaust Unit For Sharp Portable Air Conditioner Model Cv-10nh
Do you have a replacement window exhaust kit available for sharp portable air conditioner model cv-1...
Do you have a replacement window exhaust kit available for sharp portable air conditioner model cv-1...
(Posted by jnohner18 2 years ago)

Where Can I Buy The Window Panel Kit For Sharp 10,000 Btu Portable Air
conditioner
conditioner
(Posted by buEdna 9 years ago)
How To Install Sharp 10000 Btu Portable Air Conditioner #cv10ctxb
(Posted by cmarbi 10 years ago)
How To Drain Water From 10,000 Btu Sharp Portable Air Conditioner
(Posted by DBIBLEto 10 years ago)

How Do You Easily Drain A Sharp Portable Air Conditioner, Model # Cv-10nh?
I am having issues with my Sharp air conitioner, Model # CV-10 NH. I've misplaced the manual and can...
I am having issues with my Sharp air conitioner, Model # CV-10 NH. I've misplaced the manual and can...
(Posted by kashka 12 years ago)