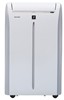
Sharp CV-2P10SC Support Question
Sharp CV-2P10SC Support Question
Find answers below for this question about Sharp CV-2P10SC.Need a Sharp CV-2P10SC manual? We have 1 online manual for this item!
Question posted by Jamieugh on April 12th, 2014
How To Remove Cover On Cv-2p10sc
The person who posted this question about this Sharp product did not include a detailed explanation. Please use the "Request More Information" button to the right if more details would help you to answer this question.
Current Answers
Related Sharp CV-2P10SC Manual Pages
CV-2P10SC Operation Manual - Page 3

...8226; INSTALL WINDOW PANEL EN-10 • INSTALLATION AND REMOVAL OF EXHAUST HOSE EN-14 • PRE-OPERATION CHECKS EN-16
USE FOR AIR CONDITIONER • COOL MODE EN-18 • DEHUMIDIFICATION MODE ...EN-27 • BEFORE CALLING FOR SERVICE EN-28
Declaration of Conformity SHARP ROOM AIR CONDITIONER CV-2P10SC This device complies with Part 18 of FCC rules. ENGLISH
ENGLISH
Please read this ...
CV-2P10SC Operation Manual - Page 5

...Servicer to obtain in-home service for your home, and if it is necessary to remove the Product, the Servicer will reinstall it will be liable or in any way responsible... available when you need service for this Product. Your Product Model Number & Description:
CV-2P10SC Portable Air Conditioner. labor and service are not provided free of the seller nor any incidental or consequential...
CV-2P10SC Operation Manual - Page 6

... • Always conduct a "Power Plug Check" before use a fuse with a built-in fuse. CV-2P10SC_en.indd 4
EN-4
11.3.22 11:00:11 AM
Do not, under any circumstances, use
in ...relocate the receiving antenna. • Increase the separation between the room air conditioner and radio/TV receiver. • Connect the room air conditioner into an outlet on the plug before using your unit. tions ...
CV-2P10SC Operation Manual - Page 7

...The drained water may spill out into the room. • Do not block the exhaust air outlet with a cord that is equipped with obstacles. ing any doubt as to whether the appliance is ...used .
If any circumstances cut or remove the round grounding pin from this plug. If a grounding adapter is properly grounded.
EN-5
CV-2P10SC_en.indd 5
11.3.22 11:00:12 AM
Drained ...
CV-2P10SC Operation Manual - Page 8

....
• This unit blows the warm air generated by your lights or other heat-producing appliances. OPERATING CONDITIONS • The unit must remove the heat produced by the unit outside through...to restart cooling. Accordingly, the same amount of air, making your unit freezing up? ENERGY EFFICIENCY TIPS • Avoid direct sunlight.
EN-6
CV-2P10SC_en.indd 6
11.3.22 11:00:12 ...
CV-2P10SC Operation Manual - Page 9

...seal A
1
1
Screw
Foam seal B
8 (adhesive type)
1
Window kit
Manual
Window panel
1
Exhaust cover
Remote control
1
Battery
(AAA.1.5V)
2
Extension panel
Adjustment panel
SUGGESTED TOOLS FOR WINDOW PANEL INSTALLATION 1. ...8226; Never place any obstacles around the air inlet or out- let of space from the wall for direct installation.)
EN-7
CV-2P10SC_en.indd 7
11.3.22 11:00:12...
CV-2P10SC Operation Manual - Page 10

EN-8
CV-2P10SC_en.indd 8
11.3.22 11:00:13 AM PART NAMES FRONT VIEW
1
1 Air Outlet
2
2 Vertical louvers
3
3 Horizontal louvers
4
4 POWER Button
5
5 Receiver window (for remote
6
control)
7
6 AIR CON Lamp (green)
8
7 TIMER Lamp (orange)
9
8 MAXIMUM Lamp (red)
10
9 ION GENERATOR Lamp (blue)
10
10 Air inlet
10
REAR VIEW
11
11 Exhaust air outlet
12
12...
CV-2P10SC Operation Manual - Page 11

ENGLISH
REMOTE CONTROL
12 9
10 11 13 14 15 16 17
REMOTE CONTROL DISPLAY 18 19 20 21 22 23 24
1
1 Tramsmitter
2 Display
AIR CON MODE ONLY 3 A/C Button
4 TEMP Button
5 MAX COOL Button
2
6 MODE Button
7 SLEEP Button
8 ON TIMER Button
3
ION ...: High
25 Temperature and timer count down indicator
26 Transmitting Symbol
27 ON TIMER/OFF TIMER Symbol
CV-2P10SC_en.indd 9
11.3.22 11:00:13 AM
CV-2P10SC Operation Manual - Page 12

Projection
Push the insect guard net firmly to ensure "A" that the exhaust cover is attached to the window panel. Side "A" will now be at the top, as....
Projection
Rain guard "A"
2 Attach the guard combined above to the window stool.
EN-10
Exhaust cover Window panel Cut
21.3"-28.3"
CV-2P10SC_en.indd 10
11.3.22 11:00:13 AM INSTALL WINDOW PANEL
Installation in a double-hung sash ...
CV-2P10SC Operation Manual - Page 14

...be installed in windows less than 21.3" (540mm) high, as you will be unable to shut the exhaust cover. (1) Cut the window panel to the same height
as the window. (2) Open the window sash and place ...the
window panel on each rain guard into the window frame. Exhaust cover Window panel Cut
21.3"-28.3"
EN-12
CV-2P10SC_en.indd 12
11.3.22 11:00:14 AM Side "A" will now be at the...
CV-2P10SC Operation Manual - Page 16

... side. Window adapter
Extend Exhaust hose
2 Attach the exhaust hose to the exhaust hose. Exhaust cover
"TOP"
The exhaust hose should be as short as possible for operational efficiency; three times) ...must not be twisted or bent. Unacceptable
Acceptable
Acceptable
CV-2P10SC_en.indd 14
EN-14
11.3.22 11:00:15 AM INSTALLATION AND REMOVAL OF EXHAUST HOSE
Installation of the exhaust hose
1 ...
CV-2P10SC Operation Manual - Page 17

..."
Exhaust hose Projection
CV-2P10SC_en.indd 15
EN-15
11.3.22 11:00:15 AM ENGLISH
Removal of the exhaust hose
1 Remove the window adapter. Lift up and remove the exhaust hose from the unit by pushing down two "PUSH" markings, and slide and close the exhaust cover in the window panel.
2 Remove the exhaust hose...
CV-2P10SC Operation Manual - Page 18

... into the wall sock-
LOADING BATTERIES
1 Remove the battery cover. 2 Insert two batteries. (AAA(R03))
• Make sure the (+) and (-) polarities are properly installed.
3 Reattach the battery cover. 4 Press the RESET button using the...Disconnect the power plug and call for a long time, re- EN-16
CV-2P10SC_en.indd 16
TEST RESET
Battery cover
11.3.22 11:00:15 AM et.
3 Press the TEST button. ...
CV-2P10SC Operation Manual - Page 19
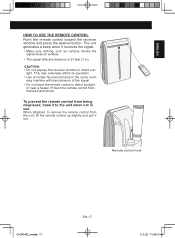
..., lift the remote control up slightly and pull it out. CAUTION: • Do not expose the receiver window to remove the remote control from moisture and shock. light.
Remote control hook
CV-2P10SC_en.indd 17
EN-17
11.3.22 11:00:15 AM This may adversely affect its operation. • Use of...
CV-2P10SC Operation Manual - Page 20

...
3
• The green AIR CON lamp will turn off... to start operation. • The green AIR CON lamp will blink. USE FOR AIR CONDITIONER
Use when the unit operates with hose ... TURN OFF
1
Press the OFF button.
• The green AIR CON lamp will light. • The temperature cannot be installed ...
the unit may frequently become full.
Remove the stopcock and attach the hose to the drainpipe ...
CV-2P10SC Operation Manual - Page 21

... fan speed. COOL DEHUM
FAN
VENT
2 Press the A/C button to set .
QUIET
LOW
HIGH
CV-2P10SC_en.indd 19
EN-19
2 1 3
2 1 3
11.3.22 11:00:16 AM
ENGLISH
QUIET
LOW
HIGH
VENTILATION MODE
The unit ventilates the air to outdoors.
1 Press the MODE button to select FAN mode. FAN MODE
The unit simply...
CV-2P10SC Operation Manual - Page 22

... extended period of time, condensation may form on the louvers. CV-2P10SC_en.indd 20
EN-20
11.3.22 11:00:16 AM
NOTE: • During VENTILATION mode, UP/DOWN air flow direction
cannot be changed. USE FOR AIR CONDITIONER
TO CHANGE AIR FLOW DIRECTION
UP / DOWN AIR FLOW DIRECTION
1 Press the LOUVERS button. • The horizontal...
CV-2P10SC Operation Manual - Page 24

...set, the TIMER setting will be can- onds and then return to a maximum of 12 hours.
USE FOR AIR CONDITIONER
TIMER OPERATION ON TIMER
1 Press the ON TIMER button and set the time as desired. 0.5h 1.0h ... during timer setting, the temperature will count down to show in the display for 5 sec- EN-22
CV-2P10SC_en.indd 22
11.3.22 11:00:17 AM
TO CANCEL Press the CANCEL button. • The orange...
CV-2P10SC Operation Manual - Page 28

...operation in the following cases. • When the unit stops operating and the TIMER, AIR CON and MAXIMUM lamps are
blinking, the water tank is full and need to be ... AUTO. TO TURN OFF Press the POWER button during operation.
Stopcock Drainpipe
CV-2P10SC_en.indd 26
EN-26
11.3.22 11:00:19 AM If the ... the room.
2 Remove the stopcock from the drainpipe, and drain water within 5 seconds.
CV-2P10SC Operation Manual - Page 29

...water (120°F/50°C or hotter) when cleaning. EN-27
CV-2P10SC_en.indd 27
11.3.22 11:00:19 AM Grill Air inlet filter
CLEANING THE UNIT AND THE REMOTE CONTROL
Wipe them with ...filter should be reduced, resulting in direct sun light.
3 REINSTALL THE FILTER
AIR INLET FILTER Remove the grill and clean the air inlet filter with a damp cloth and dry completely.
Dry the filter before ...
Similar Questions

Parts For Discontinued Sharp Portable Air Conditioner/ Ion Generator..cv-2p10sc.
I need the back plate 9jq26116114 and extender panel 9jq26116121 for window that is 41 inches wide. ...
I need the back plate 9jq26116114 and extender panel 9jq26116121 for window that is 41 inches wide. ...
(Posted by Oldladyanderson 3 years ago)

How To Program A Sharp Cv-2p10sc Portable Air Conditioner
(Posted by bdisda 9 years ago)

How Do You Empty Water From Sharp Portable Air Conditioner Model Cv-2p10sc
(Posted by regg1marc 9 years ago)

How To Remove Cover Of Sharp Air Conditioner
(Posted by a09ro 10 years ago)