Singer 191D-30 Support Question
Singer 191D-30 Support Question
Find answers below for this question about Singer 191D-30.Need a Singer 191D-30 manual? We have 1 online manual for this item!
Question posted by Ernib on October 23rd, 2018
Is There A Safety Shut Off On This Motor When's Needle Is Broken ? My Wheel Wi
not turn but the motor sounds good. Is there a way to reset the sewing machine so I can continue to use it
Current Answers


Related Singer 191D-30 Manual Pages
Instruction Manual - Page 2

Contents
1 Safety Instructions
1
1.1 Important Safety Instructions
1
1.2 Safe Operation
2
2 Product Description and Machine Specification
3
2.1 Product Description
3
2.2 Machine Specification
4
2.3 Motor, Motor Pulley and V-Belt Specifications
4
3 Setup and Adjustment Instructions
5
3.1 Table Cut-Out Drawing
5
3.2 Oil Reservoir Installation
6
3.3 Belt Cover and Bobbin Winder ...
Instruction Manual - Page 3

Contents
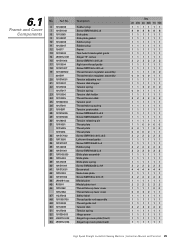
6 Parts List
23
6.1 Frame and Cover Components
24
6.2 Arm Shaft andThreadTake-Up Lever Components
26
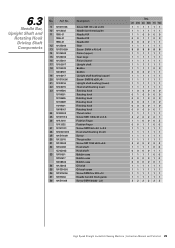
6.3 Needle Bar, Upright Shaft and Rotating Hook Driving Shaft
28
Components
6.4 Presser Foot Components
30
6.5 Feed Mechanism Components
32
6.6 Lubrication Components
34
6.7 Oil Reservoir Components
36
6.8 Belt Cover, Bobbin Winder andThread Stand Components
38
6.9 ...
Instruction Manual - Page 4
... not running the machine.
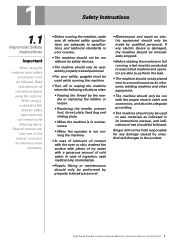
• Turn off or unplug the machine when the following items. Read all instructions, take care of this manual, and use it , understand that machine and operator are adequate to specifications and technical standards in your safety, goggles must be used to sew materials as indicated in its safety devices.
• The machine should only be...
Instruction Manual - Page 5
... cover or in case of the machine always turn the machine off when laying it down or lifting the machine head.
• To avoid accident in case any other safety device is removed.
• To avoid possible injuries keep fingers, head and clothes far from wheel, belt and motor when the machine is equipped with a servomotor, it .
•...
Instruction Manual - Page 7
... of Presser Foot by hand / by knee [mm]
Needle Bar
Stroke [mm]
Hook Type
Hook Origin
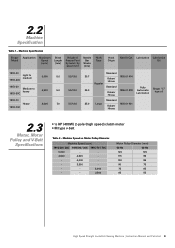
Needle Cat. 2.2
Machine Specification
Table 1 - Lubrication Lubrication Oil
191D-20 Light to medium
191D-20C
Standard
5,000
5.0
5.5/13.0
30.7
1955-01 #14 Koban/
Hirose Regular
191D-30
Medium to heavy
4,500
5.0
5.5/13.0
35.0
191D-30C
Standard
Koban/ Hirose
1955-01 #18
Fully Automatic...
Instruction Manual - Page 10
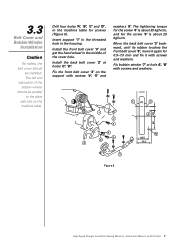
...Fix the front belt cover '3' on the machine table. Install the front belt cover '3' and get the hand wheel in the housing.
The left and right parts...machine table for the screw '5' is about 30 kgf×cm, and for screws (Figure 6). Figure 6
High Speed Straight Lockstitch Sewing Machine | Instruction Manual and Parts List 7 3.3
Belt Cover and Bobbin Winder
Installation
Caution
For safety...
Instruction Manual - Page 11

... the amount of disuse, run your machine after set up to the thread take-up and needle bar crank '2' by turning the adjusting pin '1' in direction 'B'.
When the oil level lowers below 'MIN' mark 'B', refill the oil reservoir with sewing machine oil up or after lubrication, you operate the machine after an extended
period of the...
Instruction Manual - Page 13

... indented part 'A' facing exactly to the left in direction 'D'.
Turn the hand wheel until it will go no further.
Tighten the screw '2'.
Figure 12
High Speed Straight Lockstitch Sewing Machine | Instruction Manual and Parts List 10 Insert the needle in direction 'B'. 3.7
Needle Attachment
Caution
Choose a proper needle size
according to the count of thread and the type...
Instruction Manual - Page 14

... the thread through thread slit 'A', and pulls it in the order shown below.
Figure 13
3.9
Machine Threading
When threading the machine head, the needle bar should rotate in the needle (Figure 14). Figure 14 High Speed Straight Lockstitch Sewing Machine | Instruction Manual and Parts List 11 By doing so, the thread will pass un-
Thread the...
Instruction Manual - Page 15

... direction of the arrow. Figure 16
Figure 17
High Speed Straight Lockstitch Sewing Machine | Instruction Manual and Parts List 12
3.10
Stitch Length Adjustment
Turn stitch length dial '1' in direction 'D'), the bobbin thread tension will decrease.
When you want to different sewing conditions. The indication of the dial is in the direction of the...
Instruction Manual - Page 17

...Lifter Height Adjustment
When using the knee lifter, the standard height of the needle bar '2' in direction 'B' (Figure 23).
Figure 20
Figure 21
3.14
Presser Foot Lifter Adjustment
Turn the presser foot ...Figure 23
High Speed Straight Lockstitch Sewing Machine | Instruction Manual and Parts List 14 The presser foot will go back to 13 mm by turning the knee lifter adjusting screw ...
Instruction Manual - Page 19

..., adjust so that the top surface of feed dog and the top end of needle eyelet are flush with top surface of the arrow, and firmly tighten the screws... far, the needle will
be broken.
To advance the feed timing in order to increase stitch tightness, move the feed eccentric cam '1' in the direction from the arrow. Figure 25
High Speed Straight Lockstitch Sewing Machine | Instruction Manual...
Instruction Manual - Page 21

... rotating hook point '5' aligns with the center of the needle bar (Figure 27)
Turn the handwheel until the line 'B' on the needle bar '2' align with the bottom end of needle bar lower bushing '3', then securely tighten the setscrew '1'.
Figure 27 High Speed Straight Lockstitch Sewing Machine | Instruction Manual and Parts List 18 When replacing the
rotating...
Instruction Manual - Page 24

... the electrical motor and check if the power cord and plug are not damaged. Check if there is not excessively worn and if it has the right tension. High Speed Straight Lockstitch Sewing Machine | Instruction Manual and Parts List 21
Check if all safety devices are properly installed and adjusted.
Do not use any kind...
Instruction Manual - Page 25

... tension is bended 4. Wrong relation with rotary hook 5. Replace needle 4. Readjust the needle plate and presser foot
1. Wrong threading 4. Thread is thicker than needle hole 3. Inadequate pressure of throat plate
or presser foot 1. Use proper needle for fabric and thread
High Speed Straight Lockstitch Sewing Machine | Instruction Manual and Parts List 22 Readjust the thread...
Instruction Manual - Page 28
...10112005 25 101S30002 26 10127001 27 10103011 28 101S15005 29 101S15006 30 10126002 31 10115001
10115005 10115014 32 101S17002 33 10113005 34 ... Model plate rivet Thread take-up lever cover Thread take-up lever cover Safety label Thread guide rod assembly Thread guide rod Tension disk Tension spring Hinge ...Sewing Machine | Instruction Manual and Parts List 25 6.1
Frame and Cover Components
No.
Instruction Manual - Page 30

...link assembly Needle bearing Needle bar crank Needle bar crank Needle bar crank Needle bar ...30 30C 70 70C 111111 111111 111111 110000 001100 000011 222222 110000 001100 000011 111111 111111 111111 111111 222222 111111 111111 111100 000011 222222 111111 222222 111111 111111 222222 111111 111111 111111 111111 111111 111111 222222 111111 111111 111111
High Speed Straight Lockstitch Sewing Machine...
Instruction Manual - Page 31

...
Cap Needle bar bushing (upper) Needle bar Needle bar Needle bar Needle bar connection Screw SM9/64 x 40 L=6 Slide block Needle bar thread guide Needle bar thread guide Needle bar bushing (lower) Needle bar bushing (lower)
Qty.
20 20C 30 30C 70 70C 111111 111111 110000 001100 000011 111111 111111 111111 110000 001111 110000 001111
High Speed Straight Lockstitch Sewing Machine | Instruction...
Instruction Manual - Page 32
... 20C 30 30C 70 70C 111111 111111 110000 001100 000011 111111 888888 111111 111111 111111 111111 111100 000011 111111 111111 111111 111111 100000 010000 001000 000100 000010 000001 111111 222221 110002 001100 111111 111111 111111 111111 222222 111100 000011 111100 000010 000001 111111 111111 111111 111111 222222
High Speed Straight Lockstitch Sewing Machine...
Instruction Manual - Page 44

... Set Needle #14 Needle #18 Needle #21 Screw driver (large) Screw driver (medium) Screw driver (small) Bobbin Bobbin Dust cover Machine rest pin Oil container Oil reservoir magnet
Qty.
20 20C 30 30C 70 70C 222222 222222 444444 330000 003300 000033 111111 111111 111111 333300 000033 111111 111111 111111 111111
High Speed Straight Lockstitch Sewing Machine | Instruction...
Similar Questions

Singer 191d 30 Is It Compatable With What Sizes Needles
(Posted by vbrighton222 2 years ago)

Motor Size
I have a Singer 191 D300AA that I inherited. It has needed several repairs and adjustments made to i...
I have a Singer 191 D300AA that I inherited. It has needed several repairs and adjustments made to i...
(Posted by freespiritedgirl53 9 years ago)


Needle Positions
My sewing machine needle adjustment is an 1/8" Off. It does not matter how many times I try to set t...
My sewing machine needle adjustment is an 1/8" Off. It does not matter how many times I try to set t...
(Posted by Jandjmason 9 years ago)

Hand Wheel On New Machine Will Not Turn (stuck) New Machine Has Not Been Used.
(Posted by robinmyoung 10 years ago)