Singer 5500 Fashion Mate Support Question
Singer 5500 Fashion Mate Support Question
Find answers below for this question about Singer 5500 Fashion Mate.Need a Singer 5500 Fashion Mate manual? We have 3 online manuals for this item!
Question posted by gmessina on March 9th, 2013
Drive Belt Singer Fashionmate 5500
How do I get the covers off to get at the drive belt?
Current Answers
Related Singer 5500 Fashion Mate Manual Pages
Instruction Manual - Page 2

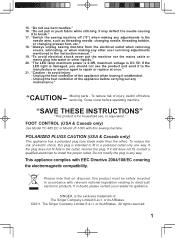
... 5. "Switch off ("0") position, then remove plug from
outlet." 11. Always unplug this sewing machine." Children should be used as contained in . "Indoors use as this manual. To unplug...8. "Keep fingers away from all instructions before using this sewing machine from the accumulation of the sewing machine and foot control free from the electric outlet immediately after using...
Instruction Manual - Page 3

... electromagnetic compatibility. If in the outlet, reverse the plug. or its Affiliates. ©2011 The Singer Company Limited S.à r.l. "Do not pull or push fabric while stitching. "Always unplug sewing machine from the electrical outlet when removing covers, lubricating, or when making any maintenance."
If the plug does not fit fully in doubt, please...
Instruction Manual - Page 8

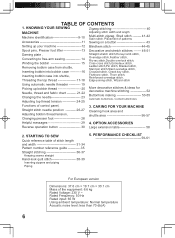
...-stitch zigzag, Shell stitch--------- 41-42 Satin stitch, Placement of patterns
Accessories 11 Sewing on a button 43
Setting up your machine 12 Blindhem stitch 44-45
Spool pins, Presser foot lifter 13 Darning plate , Converting to free-arm sewing 14 Winding the bobbin 15 Removing bobbin case from shuttle, Inserting bobbin into bobbin...
Instruction Manual - Page 11
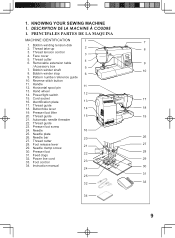
... Face cover
3
5. Reverse stitch button
11. Horizontal spool pin
11
13. Hand wheel 14. Cord socket 16. Foot release lever 29. PRINCIPALES PARTES DE LA MAQUINA
MACHINE IDENTIFICATION
1...lifter
20. Pattern number reference guide
10. Needle bar
20
27. KNOWING YOUR SEWING MACHINE 1. Bobbin winder shaft
8. Power line cord 33. Identification plate
13
17. Thread...
Instruction Manual - Page 23
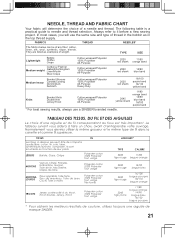
...de leur poids. NEEDLE, THREAD AND FABRIC CHART
Your fabric will use a SINGER branded needle. TYPE
SIZE
Lightweight
Batiste Chiffon Crepe
Corduroy/Flannel
Medium weight
Gabardine/Gingham...de couture, utilisez toujours une aiguille de marque SINGER.
21 The following table is a practical guide to it before a new sewing project.
FABRICS
THREAD
NEEDLES*
The fabrics below can...
Instruction Manual - Page 61

... cm) and hold until a few stitches are not drawn back under presser foot before starting seam.
- Shorten stitch length.
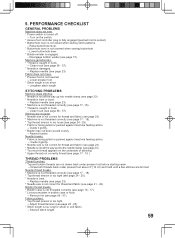
59 PERFORMANCE CHECKLIST
GENERAL PROBLEMS
Machine does not sew. * Power switch is caught in hook.
- Disengage bobbin winder (see page 56 - 57). * Needle is bent or blunt.
- Bobbin thread breaks. * Bobbin case is...
Instruction Manual 3 - Page 2
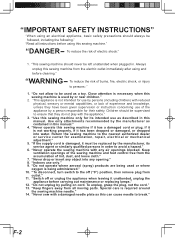
..., its intended use as this can cause needle to break." "Use this sewing machine only for its service agent or similarly qualified persons in . Use only attachments recommended... needle plate as described in this manual." 4. "IMPORTANT SAFETY INSTRUCTIONS" "When using this sewing machine." "T his appliance is damaged, it unattended, unplug the
appliance before carrying out maintenance or...
Instruction Manual 3 - Page 3
...national legislation relating to electrical/ electronic products. Please note that on disposal, this sewing machine. It may deflect the needle causing
it still does not fit, contact a qualified... ©2011 The Singer Company Limited S.à r.l. "Do not pull or push fabric while stitching. "Always unplug sewing machine from the electrical outlet when removing covers, lubricating, or when ...
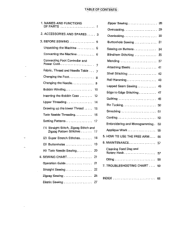
Instruction Manual 3 - Page 8
... guide 35
Straight stitching 36-37 Keeping seams straight
Hand-look quilt stitch 38-39 Inserting zippers and piping Piping
5. TABLE OF CONTENTS
1. KNOWING YOUR SEWING
Zigzag stitching 40
MACHINE
Adjusting stitch width and length
Machine identification 9-10
Multi-stitch zigzag, Shell stitch--------- 41-42 Satin stitch, Placement of patterns
Accessories 11...
Instruction Manual 3 - Page 11

... plate
13
17. Presser foot lifter
20. Thread guide
15
21. Needle
16
25. Needle plate
26. Foot control
23
34. KNOWING YOUR SEWING MACHINE 1. Bobbin winding tension disk 2. Face cover
3
5. Thread cutter 6. Bobbin winder stop
6
9. Horizontal spool pin
11
13. Thread guide
18. Pattern number reference guide
10. Buttonhole lever
14
19...
Instruction Manual 3 - Page 23

...yellow shank
11/80 orange band
14/90 blue band
16/100 purple band
* For best sewing results, always use the same size and type of thread in the bobbin as examples of weight... bague pourpre
* Pour obtenir les meilleurs résultats de couture, utilisez toujours une aiguille de marque SINGER.
21 Le tableau suivant vous aidera à faire un choix, avant d'entreprendre votre ouvrage. TABLEAU ...
Instruction Manual 3 - Page 61
....
- Adjust thread tension (see page 56 - 57). * Needle is bent or blunt.
- PERFORMANCE CHECKLIST
GENERAL PROBLEMS
Machine does not sew. * Power switch is not lowered when sewing buttonhole.
- Lower buttonhole lever. * Bobbin winder is not lowered
- Machine jams/knocks. * Thread is not all the way up into needle clamp (see page 16 - 17). * Lint...
Instruction Manual 2 - Page 2
BEFORE SEWING
5
Unpacking the Machine
5
Converting the Machine
6
Connecting Foot Controller and
Power Cord
7
Fabric, Thread and Needle Table ... HOW TO USE THE FREE ARM. 56
6. MAINTENANCE
57
Cleaning Feed Dog and
Rotary ...
Instruction Manual 2 - Page 8

... in
the
free-arm
condition
* Be sure the machine is mounted steadily. in front and the arm.
...- For flat-bed use
Without an extension table, the machine is supported back side of
Fit two pins of the leg to ... trousers, sleeves, cuffs and the like. * Set the machine on the table. Step-i
Place the machine on a steady surface.
Step-2
ever
Step-3 extensftDn
-extension...
Instruction Manual 2 - Page 9

...to put on the machine and turn on the back side of the machine. Step-i
Step-2 OF switch
Step-3
Make sure the voltage is the same as stated on the nameplate on the sewing light.
tulle, ...
EUROPEAN
DELICATE- foot controller
The more you depress the foot controller, the faster the machine runs.
* Be careful not to get better stitch performance.
7 Always use Ball-point Needle to drop ...
Instruction Manual 2 - Page 13

...the bob bin several times.
a
the needle little when
Step.-4
* Never press the spindle while sewing. Push the bobbin toward the handwheej and press down the foot controller. Needle bar may move ...spool pin through the thread
guides A and B as it in © and ©.
Step-5
The machine stops automatically when winding is not running. Return the spindle by pushing it will go.
*
Not to...
Instruction Manual 2 - Page 26

... to the needle plate, and adjust the dis tance.
(2 Run the machine with the edge of the fabric touching the guide. Set the guide in the hole of the arm, right to sew a seam with the adjustment of the fabric.
* When sewing a very thin fabric, loosen the lower thread tension a little. (See p.13...
Instruction Manual 2 - Page 28
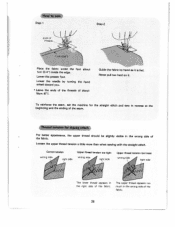
...upper threac nppedrs too much in the wrong side of the fabric. Thread tension for the straight stitch and sew in
the right side of about 1cm (0.4") inside the edge.
Guide the fabric by tUrning the hand wheel...and the ending of the fa brie.
26
To reinforce the seam, set the machine for zigzag stitch
For better appearance, the upper thread should be slightly visible in the wrong sice ...
Instruction Manual 2 - Page 32
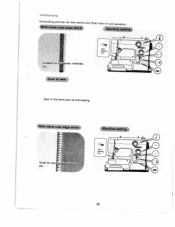
M*ch1esetng
I over -edge stitCt
Good for tersey materials, etc.
WItfr crosS-ovOr-edge stitch
Machine tIñgi
Suitable for thic etc. With blind-over casting
ZØ®
l
30
How to sew
Sew in one operation.
______
ier oak nq
Overlocking stitches can sew seams and finish them in the same way as overcasting.
Instruction Manual 2 - Page 60

... part in the hook.
*
Too much oil may stain some sewing difficulty
Your
fabric
and
cause
arm top Cover
(1) Remove the arm top Cover by taking out the screws.
2) Apply one drop of oil to the parts indicated by arrows.
* After oiling, run the machine 5 or 6 times or run it . specifically
for more than...
Similar Questions

I Get E7 Error Message On My Singer Model 7258 Sewing Machine. There Is No Refe
Error message E7 is up on my Singer Stylist model 7258 sewing machine. It is not working at all. I t...
Error message E7 is up on my Singer Stylist model 7258 sewing machine. It is not working at all. I t...
(Posted by ebellamybellamy9 5 years ago)

How To Thread Singer Fashionmate Sewing Machine Twin Needle?
How to thread the singer fashionmate sewing machine with twin needle without inertwining the threads...
How to thread the singer fashionmate sewing machine with twin needle without inertwining the threads...
(Posted by sindssly 9 years ago)

Beeping From Singer Sewing Machine Stylist Ii 5625
My sewing machine will beep and stop sewing after three inches of sewing. I have taken it to be repa...
My sewing machine will beep and stop sewing after three inches of sewing. I have taken it to be repa...
(Posted by arusheria 9 years ago)
Singer Sewing Machine Series 5500/5400
I just got this sewing machine and I have read the manual. I cannot get the machine to engage. I am ...
I just got this sewing machine and I have read the manual. I cannot get the machine to engage. I am ...
(Posted by skalvig 10 years ago)

Installing tension screw in bobbin case of singer fashionmate 5500
(Posted by dmb1951 10 years ago)