Singer 5532 Heavy Duty Support Question
Singer 5532 Heavy Duty Support Question
Find answers below for this question about Singer 5532 Heavy Duty.Need a Singer 5532 Heavy Duty manual? We have 1 online manual for this item!
Question posted by colette271 on January 30th, 2013
How To Remove Plate Under Presser Foot?
I think that a needle broke off and fell through the plate underneath the presser foot. I need to know how to remove that plate and get in there. I have remove one screw but have been unable to remove the second. How can I accomplish this?
Current Answers
Related Singer 5532 Heavy Duty Manual Pages
Instruction Manual - Page 2

...
in the needle area, such as threading needle, changing needle, threading bobbin, or changing presser foot, and the like. 10. An appliance should never be used or where oxygen is being administered. 14. WARNING - Do not allow to be left unattended when plugged in. 2. Do not use the proper needle plate. Switch the sewing machine off the machine or unplug...
Instruction Manual - Page 6

... Basics Principle Parts of the Machine ...2/4 Connecting Machine to Power Source...6 Two Step Presser Foot Lifter/ Adjusting Presser Foot Pressure...8 Accessories...10
Threading the Machine Winding the Bobbin...12 Inserting the Bobbin ...14 Threading the Upper Thread...16 Automatic Needle Threader ...18 Raising the Bobbin Thread ...20 Thread Tension ...22
Sewing How to Choose Your Pattern...24...
Instruction Manual - Page 9

Presser foot
4
12
7. Removable extension table/ accessory storage
5
13
9. One step buttonhole lever
14
15
2 Thread take-up lever 2
10
4. Thread cutter
6. Bobbin stopper
11. EN Principal Parts of the Machine
1. Three needle position dial
6
10. Presser foot pressure adjustment
1
9
3. Reverse sewing lever
11
3
5. Needle plate cover
8. Thread tension dial
...
Instruction Manual - Page 11

... for auxiliary spool pin
17
19. Foot speed control 30. Bobbin winding spindle
16
18. Power and light switch 19
22. Main plug socket
23. Presser foot lifter 22
28. Handle
21
27. Horizontal spool pin
17. Handwheel
20. Upper thread guide
25. EN Principal Parts of the Machine
16. Power cord
4
23 24...
Instruction Manual - Page 13

..., this plug is not in doubt of how to connect machine to be grounded
2
6
A 3 a b
a.
Polarized attachment plug
b.
IMPORTANT NOTICE For appliance with a polarized plug (one way. Foot control The foot control pedal regulates the sewing speed. (3)
Attention: Consult a qualified electrician if in use . The foot control must be used with the appliance by FC1902A (110...
Instruction Manual - Page 15

... hold up the presser foot lifter.
Adjusting Presser Foot Pressure
The presser foot pressure of fabric (light-or-heavy weight).
As soon as you release it, the presser foot will remain raised as long as you need to the type of the machine has been pre-set and requires no particular readjustment according to adjust the presser foot pressure, turn the screw in one...
Instruction Manual - Page 17

...supplied with this machine; Cording foot r. Darning/ embroidery foot v. Bobbin (3x) j. Overcasting foot p. Twin needle
2 Optional ...needles h. Spool holders i. Spool pin felt m. Gathering foot u. Buttonhole foot d. Button sewing foot e. Auxiliary Spool Pin l. Satin stitch foot o. Quilting/ straight stitch foot t. Even Feed foot w. Hemmer foot q. All purpose foot...
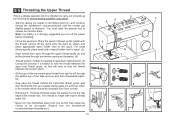
Instruction Manual - Page 19

... end securily. (7) 1
- Trim thread close to spool pin. (1/2)
- To start sewing, push the bobbin winder spindle to right. (6)
- Thread bobbin as illustrated and place on foot control pedal. (8)
-
EN Winding the Bobbin
- Step on spindle. (5)
- Push bobbin spindle to the left (10) and remove. Please Note: When the bobbin winder spindle is full. (9)
2
-
Instruction Manual - Page 21

EN Inserting the Bobbin
When inserting or removing the bobbin, raise the presser foot & make sure the needle is fully raised.
1. Pull the thread through the slit (A).
4. Insert the bobbin in the bobbin case with the tip of the cover towards the
1
back of the plate and attach the bobbin cover plate. (C)
Attention: Turn power switch to...
Instruction Manual - Page 23
...the needle eye. Lift up lever and then downwards again. (6)
- For small thread spools, place small side of thread under the presser foot to spool. (2)
- Trim thread to back.
- You must raise the presser foot to ... down
1
to left through pre-tension spring as by not doing so several sewing problems could result.
- Always turn the handwheel
counterclockwise (towards you turn the ...
Instruction Manual - Page 27

..., check to make sure the thread is not trapped by the hinged cover or the Removable Extension Table.
1 Gently pull on the upper thread to bring the bobbin thread up through the needle plate hole. (2) Lay both threads to the back under the presser foot. (3)
2
3
20 Turn the handwheel (1) towards you (counterclockwise) lowering, then raising...
Instruction Manual - Page 35
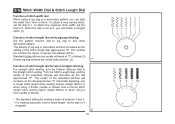
... of the individual stitches will decrease as the
setting of the stitch length dial approaches "0". Generally speaking, use a longer stitch length when sewing heavier weight fabrics or when using a finer needle or thread.
- The density of zig zag or decorative stitches increases as the dial approached "0". EN Stitch Width Dial & Stitch Length...
Instruction Manual - Page 37

Place the fabric under the presser foot with the fabric edge lined up with the desired seam guide line on the needle plate. (2)
Lower the presser foot lifter, and then step on the foot controller to between 2 and 3.
EN Sewing Straight Stitch
To begin sewing, set the machine for straight stitch. (1)
Set the stitch length to start sewing. (3)
1
2
3
30
Instruction Manual - Page 39

...face plate and into thread cutter (B).
Pull threads down
the reverse sewing lever (A). Sew a few reverse stitches. Guide the threads to its highest position, raise the
presser foot and remove work behind the needle and presser 1
2
foot. (2)
Cutting the Thread
Pull the threads under and behind the presser foot. A
Release the lever and the machine will sew forward again. (1)
Removing...
Instruction Manual - Page 43

...hem to sew slowly along the fold, so that the needle drops through the edge of the
page. Generally, a narrower stitch is used for heavier weight fabrics.
Sew a test first to make blind hem sewing even easier, use a blind hem
foot, available ... and press.
Blind hem for firm fabrics. Note:
2
To make sure the machine settings are normally sewn
with a longer stitch length setting.
Instruction Manual - Page 45

...
fabric. 2. Sew a test first to the front of the buttonhole foot,
PUSH
then bring the two heavy thread ends under the buttonhole foot. Open the button plate and insert the button (B). 5. Hook the heavy thread onto the back end of the
foot, insert them into the grooves and temporarily tie them there.
3. Lower the presser foot and start the machine. 7.
Instruction Manual - Page 49

... the back two holes.
3
4
42 LR
Place the button and fabric under the Button Sewing foot, as needed, according to check that the needle goes cleanly into the left and right holes of the fabric. Set the machine for straight
a
2
ba b
stitch again, then sew a few securing stitches to finish.
1
If a shank is required, place a darning...
Instruction Manual - Page 53

...disengages.
EN Attaching the Presser Foot Shank
Raise the presser bar (a) with the opening in the slot as needed for hems, pleats, quilting, etc. (4)
Attention:
Turn power switch to off ("O") when carrying out any of
e
the above the pin (d). (2) The presser foot (f) will engage automatically. Adjust as illustrated. Loosen
or remove the presser shank screw. b
1
Attaching the edge...
Instruction Manual - Page 62

Replace the face plate and tighten screw. Remove the face plate (B). - B A
Should there be any problem, consult your SINGER® retailer. 1
C
2
55
EN Changing the Bulb
Disconnect the machine from the power supply by removing the plug from the main socket! Unscrew the bulb and install a new one (C). (2) - Replace bulb with same type rated 15 watts (110...
Instruction Manual - Page 64

... is damaged. 3. The needle is adjusted wrong. 3. The needle is not correctly threaded. 2. The machine is not correctly inserted. 3. The machine is not inserted correctly. 2. Check both bobbin and bobbin case.
1. Thread tension wrong.
1. Select the correct foot.
1. The needle is noisy
The machine jams
1.
Wrong needle size for the fabric. 4. Remove and reinsert the...
Similar Questions

I Can't Seem To Get The Feed Dogs Working On My Heavy Duty Singer 5532.
I haven't made any adjustments on my machine since the last time I used it, but now it won't feed th...
I haven't made any adjustments on my machine since the last time I used it, but now it won't feed th...
(Posted by polarbowler 5 years ago)

I Get E7 Error Message On My Singer Model 7258 Sewing Machine. There Is No Refe
Error message E7 is up on my Singer Stylist model 7258 sewing machine. It is not working at all. I t...
Error message E7 is up on my Singer Stylist model 7258 sewing machine. It is not working at all. I t...
(Posted by ebellamybellamy9 5 years ago)

Beeping From Singer Sewing Machine Stylist Ii 5625
My sewing machine will beep and stop sewing after three inches of sewing. I have taken it to be repa...
My sewing machine will beep and stop sewing after three inches of sewing. I have taken it to be repa...
(Posted by arusheria 9 years ago)

Singer Heavy Duty 5532
How do you install your zipper foot can not find in Manuel. Please show me how would like to us it. ...
How do you install your zipper foot can not find in Manuel. Please show me how would like to us it. ...
(Posted by sarviachong 9 years ago)

Does The 5532 Have An Automatic Needle Threader On It?
(Posted by hdevantier 10 years ago)