Singer 7640 CONFIDENCE Support Question
Singer 7640 CONFIDENCE Support Question
Find answers below for this question about Singer 7640 CONFIDENCE.Need a Singer 7640 CONFIDENCE manual? We have 1 online manual for this item!
Question posted by Sallieferguson on October 30th, 2017
Reverse Button
Hi I started using my new machine today and although I love it already, the reverse button doesn't seem to work. I press it as I would have my previous machine but it appears to carry on sewing forward. Am I missing something, I really don't want to return/be without my machine again.Sallie
Current Answers
Answer #1: Posted by techyagent on October 30th, 2017 4:23 PM
techyagent

Member since:
June 17th, 2014 Points: 4,799,780

Member since:
June 17th, 2014 Points: 4,799,780
Check the link below to know more about the issue so that we can isolate the problem together
https://sewing.patternreview.com/SewingDiscussions/topic/78420
Tyhanks
Techygirl
Related Singer 7640 CONFIDENCE Manual Pages
Instruction Manual and Troubleshooting Guide - Page 1

INSTRUCTION MANUAL
7640
Instruction Manual and Troubleshooting Guide - Page 2
Assistance on purchasing a brand new SINGER® sewing machine! Personal assistance via email: [email protected] 4. Live, one-on-one help and hope that you enjoy your SINGER® sewing machine. An instruction manual with easy-to help from one of our SINGER® Sewing Assistants,
at www.singerco.com 3. It is important to the SINGER®...
Instruction Manual and Troubleshooting Guide - Page 6
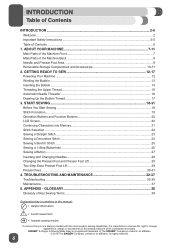
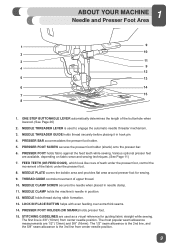
...always provided with the most modern sewing capabilities, the manufacturer reserves the right to change appearance, design or accessories of the Machine Back ...8 Needle and Presser Foot Area...9 Removable Storage Compartment and Accessories 10-11
2. ABOUT YOUR MACHINE 7-11 Main Parts of the Machine Front ...7 Main Parts of this sewing machine when considered necessary. SINGER® & Singer...
Instruction Manual and Troubleshooting Guide - Page 7
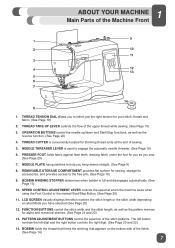
.... PRESSER FOOT holds fabric against feed teeth, drawing fabric under the foot for trimming thread ends at which the machine sews when
using the Foot Control or the manual Start/Stop Button. (See Page 20) 11. FUNCTION BUTTONS control the stitch width and the stitch length, as well as the pattern memory
for
accessories, and provides...
Instruction Manual and Troubleshooting Guide - Page 8

...) 7. This chart is inserted into the left side of the Machine Back
1. It should be
used to view the stitches. POWER CORD connects the machine to help maintain the Àow of the needle and the
thread take-up for machine
threading and down for sewing. (See Page 29) 15. HORIZONTAL SPOOL PIN holds the...
Instruction Manual and Troubleshooting Guide - Page 9
...
movement of upper thread. 10. The 1/2" seam allowance is the 2nd line, and the 5/8" seam allowance is used as a visual reference for sewing. 9. Various optional presser feet
are 1/2" (13mm) and 5/8" (16mm). NEEDLE CLAMP holds the machine's needle in needle clamp. 11. NEEDLE THREADER LEVER is the 3rd line from center needle position. STITCHING...
Instruction Manual and Troubleshooting Guide - Page 11
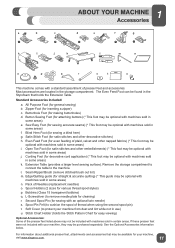
Button Sewing Foot (for attaching buttons) (* This foot may be optional with
machines sold in some areas) e. Soft Cover (to cushion the spool of Needles (replacement needles) o. Most accessories are located in use) u. All Purpose Foot (for satin stitches and other decorative stitches) h. l. Edge/Quilting guide (for sewing accurate seams) (* This foot may be optional with...
Instruction Manual and Troubleshooting Guide - Page 12
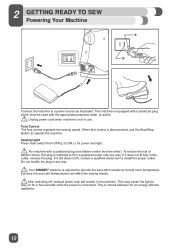
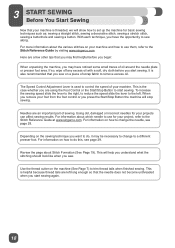
... not ¿t fully in use the Start/Stop Button to provide the best stitch results at normal room temperature. Foot Control The foot control regulates the sewing speed. This may still remain in the machine. 2 GETTING READY TO SEW Powering Your Machine
Connect the machine to install the proper outlet.
This is consumed. Sewing Light Press main switch from OFF...
Instruction Manual and Troubleshooting Guide - Page 13
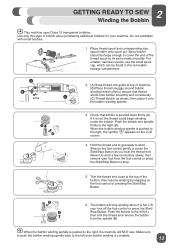
..., the symbol " " appears on the foot control or pressing the Start/Stop Button. Push the bobbin to the left once bobbin winding is pushed to the top of bobbin when purchasing additional bobbins for your foot off the foot control or press the Start/ Stop Button.
A B
3. 2 GETTING READY TO SEW Winding the Bobbin
¤ This machine uses Class 15 transparent...
Instruction Manual and Troubleshooting Guide - Page 18
... thread cutter on how to start sewing. For information on a piece of your machine. This is helpful because thread tails are using the Foot Control or the Start/Stop Button to do , it may ¿nd helpful before you press the Start/Stop Button the machine will stop sewing. The Speed Control Adjustment Lever is used to control the speed of scrap...
Instruction Manual and Troubleshooting Guide - Page 20
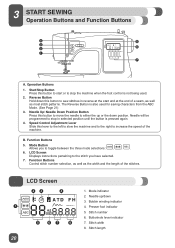
... 2. Stitch number 6. Stitch length Reverse Button Hold down this button to start and at the end of a seam, as well as the width and the length of the machine. Bobbin winding indicator 4. Presser foot indicator 5. Start/Stop Button Press this button to stop the machine when the foot control is also used .
2. Needle will be programmed to sew stitches in selected position...
Instruction Manual and Troubleshooting Guide - Page 21

...You are selected by pressing the Reverse Button.
3. Clear the Memory: 1. SINGER - After selecting each letter press the + side of the ABC Function Button. 3. In order to the right.
2. Stitch Width Function Button scroll to 40 alpha or numerical stitches from the ABC. Press the -
Combining Stitches: Example - 3 START SEWING
Combining Characters into Memory
Your machine has the...
Instruction Manual and Troubleshooting Guide - Page 22
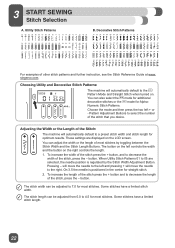
... move the needle to decrease the length of the Stitch: The machine will automatically default to 4.5 for most stitches. Adjusting the Width or the Length of the stitch, press the - button. Decorative Stitch Patterns
For examples of the stitch press the + button and to the right.
Utility Stitch Patterns
B. will move the needle to the...
Instruction Manual and Troubleshooting Guide - Page 23
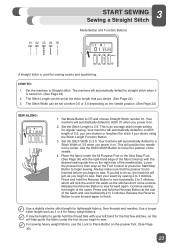
...) 3. This is turned on the needle position. (See Page 22)
SEW ALONG:
1. Release the Reverse Button to sew forward again to sew forward again. Set Mode Button to 2.5. Your machine will automatically default to 3 stitches, which will automatically default to move the position of 3.5 when you begin to 3 stitches. Press and hold the thread tails with the desired seam guide...
Instruction Manual and Troubleshooting Guide - Page 24

...on your sewing projects. (Go to www.singerco.com to view other decorative stitches that can be used almost anywhere on the Foot Control or press the Start/Stop Button to reinforce the seam.
Use a ... 0.4 when you select stitch # 08.
5. Decorative stitching can be used ). The LCD screen on your machine displays the foot that is recommended for embellishing and adding Àair ...
Instruction Manual and Troubleshooting Guide - Page 25
...guide line on the Foot Control or press the Start/Stop Button to begin sewing.
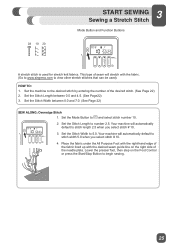
25 Set the Stitch Width between 0.5 and 4.5. (See Page22) 3. 3 START SEWING
Sewing a Stretch Stitch
Mode Button and Function Buttons
A stretch stitch is used ). Set the Stitch Length between 0.0 and 7.0. (See Page 22)
SEW ALONG: Overedge Stitch 1. Your machine will automatically default to view other stretch...
Instruction Manual and Troubleshooting Guide - Page 26
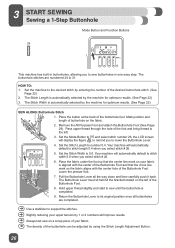
...# 26. 6. Your machine will display the ¿gure , to lower the Buttonhole Lever. 4. 23 START SEWING Sewing a 1-Step Buttonhole
Mode Button and Function Buttons
This machine has built-in one ...using the Stitch Length Adjustment Button.
26 Your machine will improve results. ¤ Always test sew on a scrap piece of the buttonhole foot. The buttonhole stitches are completed.
¤ Use...
Instruction Manual and Troubleshooting Guide - Page 27
... Page 8)
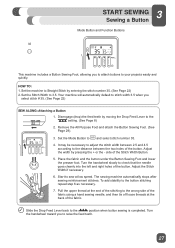
2. side of the button. The sewing machine automatically stops after sewing reinforcement stitches. 3 START SEWING Sewing a Button
Mode Button and Function Buttons
This machine includes a Button Sewing Foot, allowing you
select stitch # 35. (See Page 22)
SEW ALONG: Attaching a Button
1. Remove the All Purpose Foot and attach the Button Sewing Foot. (See Page 29).
3. Set...
Instruction Manual and Troubleshooting Guide - Page 30
... for more information on the
foot.
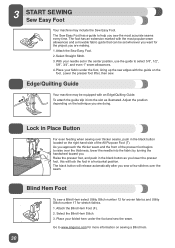
23 START SEWING Sew Easy Foot
Your machine may be set in a horizontal position. Place your folded hem under the foot, lining up the raw edges with an Edge/Quilting Guide.
The black button will lock the foot in the center position, use the guide to help you are doing.
Instruction Manual and Troubleshooting Guide - Page 38

... undone.
Seam Allowance The seam allowance is special material used for example, cuffs, collars, plackets, etc. Topstitching Topstitching is stitching that appears on the top side of fabric between fabrics, used for 3-4 stitches. Start sewing forward again and continue sewing the seam to the end, then sew in reverse for buttonholes to ¿nish.
Seam A seam is straight...
Similar Questions

Function Buttons Not Working.
I am just learning this QS 9960. The function buttons do nothing when I press them. I want to adjust...
I am just learning this QS 9960. The function buttons do nothing when I press them. I want to adjust...
(Posted by lrcampbell 1 year ago)

Sewing Machine Drowned
Machine drowned in flood, any chance for survival
Machine drowned in flood, any chance for survival
(Posted by Cajunlizard33 4 years ago)

Brand New Singer 7640 And Back Stitch Don't Work.
just got a brand new singer 7640 and the back stitch button does nothing but beep why? And how do I ...
just got a brand new singer 7640 and the back stitch button does nothing but beep why? And how do I ...
(Posted by Kcchiefs61146 6 years ago)


12 Of The Stitch Buttons Won't Work. 2nd And 4th Rows. Machine Is New.
(Posted by jkbp 9 years ago)