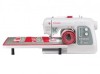
Singer 8500Q MODERN QUILTER Support Question
Singer 8500Q MODERN QUILTER Support Question
Find answers below for this question about Singer 8500Q MODERN QUILTER.Need a Singer 8500Q MODERN QUILTER manual? We have 1 online manual for this item!
Question posted by Anonymous-148126 on January 10th, 2015
Keep Getting Error Messages That Thread Is Broken When It Is Not
And also get message that bobbin is jammed and to clean. When I retread and clean the bobbin area still jams, lower tension and still get error messages
Current Answers
Answer #1: Posted by waelsaidani1 on January 16th, 2015 10:40 PM
waelsaidani1

Member since:
May 12th, 2013 Points: 19,501,787

Member since:
May 12th, 2013 Points: 19,501,787
You are not threading it right. It does not thread like all those other sewing machines. Or any that you have ever had before in the past. Go look here and follow all the instructions- because it has a very unusual/uncommon way of threading it.
In a nutshell, when you put the thread in/through the top tension device (which is a plastic roller device not round metal normal tension friction disks at all) you need to hold thread with both hands and more "pull and pop it in" pullling it towards you. After you think it is in right, still holding it in both hands, one on either side of the top tension device, you need to move your hands back and forth sideways, sort of like flossing your teeth with dental floss, to be sure you have that upper thread fully in there. It's threading is just very different from other machines in that one weird, unusual way. So, if you do not get the thread fully into your upper tension device, it will give you that broken thread message over and over again, even if your upper thread is not broken at all.
In a nutshell, when you put the thread in/through the top tension device (which is a plastic roller device not round metal normal tension friction disks at all) you need to hold thread with both hands and more "pull and pop it in" pullling it towards you. After you think it is in right, still holding it in both hands, one on either side of the top tension device, you need to move your hands back and forth sideways, sort of like flossing your teeth with dental floss, to be sure you have that upper thread fully in there. It's threading is just very different from other machines in that one weird, unusual way. So, if you do not get the thread fully into your upper tension device, it will give you that broken thread message over and over again, even if your upper thread is not broken at all.
Video guide: https://www.youtube.com/watch?v=xtwnmOWAlSw
Related Singer 8500Q MODERN QUILTER Manual Pages
Instruction Manual - Page 2
³,03257$176$)(7
Instruction Manual - Page 5
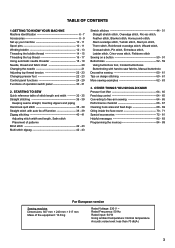
..., Corded buttonholes Buttonholing with hard-to free-arm sewing 64 - 65 Performance checklist 66 - 67 Cleaning hook area and feed dogs 68 - 69 Oiling inside the face cover 70 - 71 Special accessories 72 - 81 Helpful messages 82 - 83 Programming the memory 84 - 89
For European version
Sewing machine Dimensions: 567 mm × 240 mm × 317...
Instruction Manual - Page 8

...
15 16 17 18
24 25 26 27 28 29 30 31
32
33
34
6 Bobbin winder spindle
8. Horizontal spool pin 11. Presser foot screw
22. Bobbin cover plate 24. GETTING TO KNOW YOUR MACHINE
MACHINE IDENTIFICATION
2
1
1. Pre-tension guide
2. Bobbin winding tension disk
3. Thread cutter/holder
6. Thread guide
12
20. Twin thread guide
21. Foot control
19
34. 1. Face cover...
Instruction Manual - Page 10
... bobbins. Button sewing foot 16. Darning / embroidery foot 22. Even feed / walking foot 23. Spool pin cap (mini) 6. Screwdriver for most decorative sewing. Zipper foot 13. Satin foot 15. Thread ...17
18
19
20
21
22
23
24
25
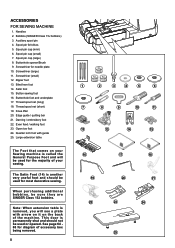
ACCESSORIES FOR SEWING MACHINE
1.
See page 64 65 for the majority of your Sewing machine is removed, you will be used for diagram of the...
Instruction Manual - Page 12

... sure to wipe off any surplus oil from needle plate area EHIRUHXVLQJ\RXUPDFKLQHWKH¿UVWWLPH
POWER LINE CORD/FOOT CONTROL
Connect the plug of the power line cord into the machine socket (3), when using sewing machine only. Always disconnect the machine from power supply by removing the plug from the power...
Instruction Manual - Page 20

...) when using the automatic needle threader. º +HDY\WKUHDGFDQQRWEHWKUHDGHGWKURXJK¿QHQHHGOH º Don't lower the threading lever while the machine is recommended that the guide doesn't touch fabric, etc.
5.
Pull thread loop away from you leaving about 4" (10 cm) clear.
2. Ne pas tirer trop fort sur le fil car...
Instruction Manual - Page 24

... 'down'. Lower the presser foot lifter so that the machine is well balanced when these two threads 'lock' in the highest position. ADJUSTING TOP THREAD TENSION
Helpful Hint: A slight adjustment to remove the foot. 2. A balanced tension (identical stitches both top and bobbin threads. CHANGING PRESSER FOOT
Be sure the needle is usually only desirable for straight stitch sewing. Push...
Instruction Manual - Page 30
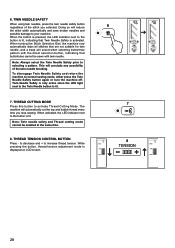
... LED indicator next to selecting a pattern. This will automatically cut the top and bobbin thread every time you selected. To disengage Twin Needle Safety and return the machine to activate Thread Cutting Mode. Doing so will sound when selecting buttonhole pattern with twin needle. THREAD TENSION CONTROL BUTTON
Press - 6. When turning the Stitch Selection Dial, the...
Instruction Manual - Page 32
... of the tacking
3
stitches will return to the button is pushed. THREAD CUTTER
Press Thread Cutter to start. ¿ Red light indicates machine is ready to automatically cut the top and bobbin
5
threads.
3. SPEED CONTROL LEVER
Sliding the lever sets desired sewing speed. The lower speed continues until you sew thick fabric. Press Tacking Stitch button when the...
Instruction Manual - Page 38
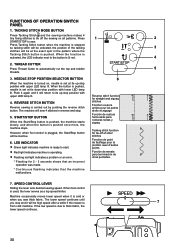
... B. Start/stop the sewing machine. Presser foot lifter H. Thread tension control button I
4
2.
Start the machine. First turn the handwheel counter clockwise (toward the left of the machine, leaving about 6" (15 cm) clear.
3
3. Let's begin by following the steps below.
1. General Purpose Foot
NOTE: Based upon the weight of the fabric, stop button F. ...
Instruction Manual - Page 40
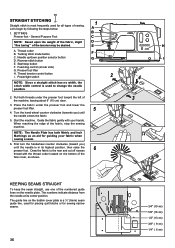
... top stitching color.
2. Increase thread tension toward 6 or higher until the foot control is designed to look like hand sewing for the piping. Start to sew forward until you achieve the desired... control and the machine will sew 4 stitches in reverse and then 4 stitches in reverse and continue to sew.
HAND-LOOK QUILT STITCH 02
This stitch is released.
2. To sew down the right side...
Instruction Manual - Page 56
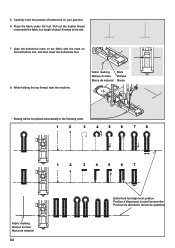
Pull out the bobbin thread
underneath the fabric to the rear.
7. Align the buttonhole mark on the fabric with the mark on your garment. 6. While holding the top thread, start the machine.
5. Fabric marking Marque du tissu Marca de material
Mark Marque Marca
* Sewing will be completed automatically in the...of buttonhole on the buttonhole foot, and then lower the buttonhole foot.
8.
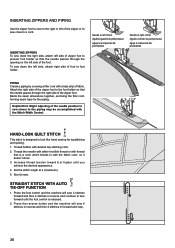
Instruction Manual - Page 68

... breaks. * Fabric is not lowered when sewing buttonhole.
- Adjust thread tension.
(see page 52 - 55). * Buttonhole lever is being pulled or pushed against machine feeding
action. - Clean hook. (see page 20). Replace needle. (see page 21). * Needle size is not threaded correctly. (see page 68 - 69). Bobbin thread breaks. * Bobbin case is not correct for thread and fabric. (see page 20...
Instruction Manual - Page 70
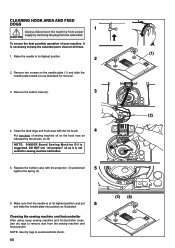
... to remove dust from the sewing machine and footcontroller. Replace the bobbin case with the lint brush.
4
Put one drop of your machine, it is necessary to its highest position and put
6
and slide the needle plate into position as illustrated for sewing machine lubrication.
5.
CLEANING HOOK AREA AND FEED DOGS
1
Always disconnect the machine from power
CAUTION supply...
Instruction Manual - Page 72

... : It should be oiled periodically. Remove two screws and face cover. 2. For best results always use SINGER Brand Sewing Machine Oil. Use of sewing machine oil to your machine.
Put one drop of oil other than Sewing Machine Oil will cause damage to the points indicated
by arrows.
1
Face cover Plaque frontale Cubierta frontal
Helpful Hints : For...
Instruction Manual - Page 74
...machine, leaving about 6" (15 cm) clear.
Helpful Hints: 1.
NOTE on starting to sew with Satin foot: Pull both threads to the left of the foot before starting to sew in broken...Thread the two threads as one thread through each spool pin.
Pick up bobbin thread as an alternative to your machine. To disengage Twin Needle Sewing mode and return the machine...thread tension for sewing...
Instruction Manual - Page 76
... lowering of the presser foot using your machine.
74
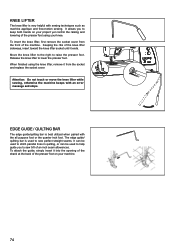
The edge guide/ quilting bar is very helpful with sewing techniques such as machine applique and free-motion sewing. It allows you to sew ...sewing, otherwise the machine beeps with the all purpose foot or the quarter inch foot. EDGE GUIDE / QUILTING BAR
The edge guide/quilting bar is best utilized when paired with an error message...
Instruction Manual - Page 78
... a non-permanent fabric marking tool to Straight Stitch. Select straight stitch. Sew in even movements.
Lower the presser foot. DARNING 1. Once the area has been covered with a medium width setting.
Draw up the bobbin thread, then hold the bobbin and QHHGOHWKUHDG¿UPO\DV\RXEHJLQWRVHZ 2. FREE-MOTION EMBROIDERY AND MONOGRAMMING 1. Sew. MACHINE PREPARATION ‡...
Instruction Manual - Page 80

... WRS IDEULF EDWWLQJ DQG backing fabric together with the sewing machine's feeding system to desired stitch. Replace the presser bar screw. OPEN TOE FOOT
The Open Toe Foot provides a more easily.
1. Set machine to aid the movement of the garment. Lower the presser foot, then sew the layers together. Select straight stitch, with this foot...
Instruction Manual - Page 82

... Foot with Guide gives a perfect 1/4" seam guideline, which is flush around sewing machine (unevenness of table could cause uneven feeding of fabric when sewing). Readjust legs height if needed, so that the needle is also perfect for... even feeding. INSTRUCTIONS FOR SEWING PERFECT CIRCLES The holes provided on table will offer a variety of circle ...
Similar Questions

After An Inch Get Error 6 Broken Top Thrd Rethreaded New Needle Stich Looks Ok
after an inch 8500q gives error code 6 but the top thread is not broken rethreaded changed needle ad...
after an inch 8500q gives error code 6 but the top thread is not broken rethreaded changed needle ad...
(Posted by gfurgy 5 years ago)

I Get E7 Error Message On My Singer Model 7258 Sewing Machine. There Is No Refe
Error message E7 is up on my Singer Stylist model 7258 sewing machine. It is not working at all. I t...
Error message E7 is up on my Singer Stylist model 7258 sewing machine. It is not working at all. I t...
(Posted by ebellamybellamy9 5 years ago)

I Keep Getting Error Po1 On My Modern Quilter
I keep getting error po 1 on my modern quilter and the hand wheel seems very tight how do I fix this...
I keep getting error po 1 on my modern quilter and the hand wheel seems very tight how do I fix this...
(Posted by Mryharvey 6 years ago)

Getting Error 6 On My New Singer Mq 8500q
When I am sewing a straight stitch, it runs for a few seconds then stops and gives me error 6 even t...
When I am sewing a straight stitch, it runs for a few seconds then stops and gives me error 6 even t...
(Posted by ymcaninch 7 years ago)
Beeping From Singer Sewing Machine Stylist Ii 5625
My sewing machine will beep and stop sewing after three inches of sewing. I have taken it to be repa...
My sewing machine will beep and stop sewing after three inches of sewing. I have taken it to be repa...
(Posted by arusheria 9 years ago)