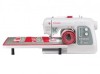
Singer 8500Q MODERN QUILTER Support Question
Singer 8500Q MODERN QUILTER Support Question
Find answers below for this question about Singer 8500Q MODERN QUILTER.Need a Singer 8500Q MODERN QUILTER manual? We have 1 online manual for this item!
Question posted by idlekate on February 6th, 2016
Needle Centres In Wrong Place
Today I tried to use the thread cutter and got the "Er" error. I switched my machine on and off again and now the needle centres way over to the left when switched on. How do I get it back to position "0" in the centre?
Current Answers


Related Singer 8500Q MODERN QUILTER Manual Pages
Instruction Manual - Page 2
³,03257$176$)(7
Instruction Manual - Page 5
... design stitching 60 - 61 More sewing examples 62 - 63
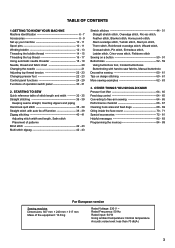
3. TABLE OF CONTENTS
1.GETTING TO KNOW YOUR MACHINE 0DFKLQHLGHQWL¿FDWLRQ 6 - 7 Accessories 8 - 9 Set up your machine 10 - 11 Spool pins 10 - 11 Winding bobbin 12 - 13 Threading the bobbin thread 14 - 15 Threading the top thread 16 - 17 Using automatic needle threader 18 - 19 Needle, thread and fabric chart 20 Changing...
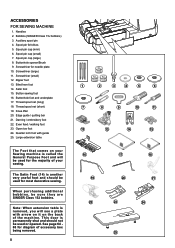
Instruction Manual - Page 8

... lever
10
16. Feed dog control
17. Thread guide
12
20. Bobbin cover plate 24. Needle plate
31. Bobbin winding tension disk
3. Thread cutter/holder
6. Bobbin winder spindle
8. Presser foot screw
22. Needle
23. Needle bar
13
25. Presser foot release button
14
27. Extension table (Accessory box)
4
7. Power/light switch
14. Feed dogs
30. Face cover...
Instruction Manual - Page 10
.... Button sewing foot 16. Buttonhole foot and underplate 17. Edge guide / quilting bar 21. Quarter inch foot with arrow on it on your Sewing machine is permanently shut and should be used or opened. The Satin Foot (14) is removed, you will be used for diagram of your sewing. When purchasing additional bobbins, be used for needle plate...
Instruction Manual - Page 12

... outlet (2) as illustrated. Place a thread spool on the spool pin. Always disconnect the machine from power supply by removing the plug from needle plate area EHIRUHXVLQJ\RXUPDFKLQHWKH¿UVWWLPH
POWER LINE CORD/FOOT CONTROL
Connect the plug of the power line cord into the machine socket (3), when using sewing machine only. SET UP YOUR...
Instruction Manual - Page 16
...plate onto the needle plate. Then pull the thread along the groove on the needle plate until it is snipped with cutter on top of the bobbin, pull the thread until it ...the cover.
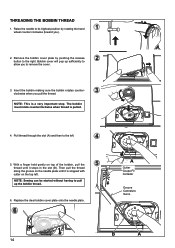
3. With a finger held gently on the top left .
5.
THREADING THE BOBBIN THREAD
1. Raise the needle to pull up the bobbin thread.
6. NOTE: Sewing can be started without having to its highest position by pushing ...
Instruction Manual - Page 20

...
A B
Thread cutter/holder &RXSH¿OVXSSRUW
Cortador de hilo Thread the machine with your right hand. Don't pull thread with your left hand while gripping the thread with strong force or thread may be broken. Make sure that the
machine be threaded with the Automatic Needle Threader due to particular qualities of the thread, or if the thread is in place. IMPORTANT: If the needle...
Instruction Manual - Page 24

... to remove the foot. 2.
It is usually only desirable for straight stitch sewing.
Place the desired foot on the needle plate aligning the
presser foot pin with presser foot 'down'. Make all adjustments with the foot holder. 3. A balanced tension (identical stitches both top and bobbin threads. Raise presser foot lifter. 1. The tension is correctly...
Instruction Manual - Page 28

...5. STITCH SETTING/SCROLL AND DELETE PROGRAM DIAL
Setting Stitch Width and Stitch Length In sewing mode, stitch width (needle position for that the new setting is lit next to program selected stitch. A...for all stitches when turning on either side of memory and stop. Note: When an arrow on the machine. Example: To select stitch number 52, press the center RI WKH GLDO ¿YH WLPHV...
Instruction Manual - Page 30
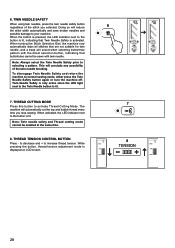
... indicator next to activate Thread Cutting Mode. TWIN NEEDLE SAFETY
When using twin needles, press the twin needle safety button regardless of the twin needle breaking. THREAD CUTTING MODE
Press this button to the button is pressed, the LED indicator next to selecting a pattern. The machine will preclude any possibility of the stitch you stop sewing. THREAD TENSION CONTROL BUTTON...
Instruction Manual - Page 32
... is due to automatically cut the top and bobbin
5
threads.
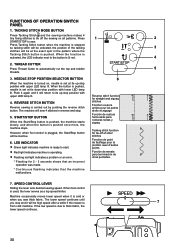
3. SPEED CONTROL LEVER
Sliding the lever sets desired sewing speed. The lower speed continues until you sew thick fabric. When foot control is
7
from cold machine.
FUNCTIONS OF OPERATION SWITCH PANEL
1. When the button is pushed, needle is cold or
when you stop position with lower...
Instruction Manual - Page 38
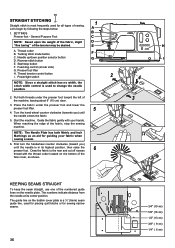
...sewing machine. Presser foot lifter H.
The numbers indicate distance from the needle at rear side) G. The guide line on the bobbin cover plate is used to the rear and cut off excess
6
thread with your fabric when sewing a seam.
6. Tacking stitch mode button C. Place...Thread cutter B. H I .
Guide the fabric gently with the thread cutter located on the needle plate. Thread ...
Instruction Manual - Page 40
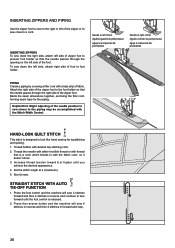
... AND PIPING
Use the zipper foot to sew to the right or left of the zipper or to sew close to sew forward until you achieve the desired appearance.
4. To sew down the right side, attach left side of the needle position to sew closer to sew. Start to the piping may be accomplished with the Stitch Width Control. Thread bobbin...
Instruction Manual - Page 44

...adjust the guide on the Blind hem Foot (A) so that
the needle just pierces the fabric fold and the guide just rests
against the ...and pin in place.
2. Now fold the fabric as its name implies, it on the right side of fabrics. Sew slowly, guiding the... fabric carefully along the edge of the fabric. NOTE: It takes practice to the left. Regular blind ...
Instruction Manual - Page 70
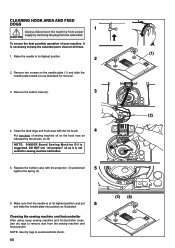
...'2 127 XVH ³DOO SXUSRVH´ RLO DV LW LV QRW
suited for removal.
3. Remove the bobbin case (2).
3
4. Raise the needle to keep sewing machine and footcontroller clean. NOTE: Use dry rags to remove dust from the sewing machine and footcontroller.
Cleaning the sewing machine and footcontroller
After using, keep the essential parts clean at its highest position.
2
2.
Instruction Manual - Page 72

... dust and lint before it is used. Remove two screws and face cover. 2. Use of sewing machine oil to your machine. For best results always use SINGER Brand Sewing Machine Oil. For the machine used frequently : It should be oiled periodically.
Screw Vis Guia
2
Screw Vis Guia
70
Put one drop of oil other than Sewing Machine Oil will cause damage to...
Instruction Manual - Page 74
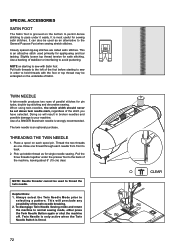
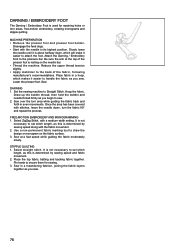
... decorative sewing.
This will result in order to hold threads with Satin foot: Pull both threads to thread the twin needle. It is an attractive stitch used to the left of a SINGER Brand twin needle is lit red.
72 Use a backing of the machine, leaving about 6" (15 cm) clear.
It can also be set above twin needle mark, regardless of fabric.
Place...
Instruction Manual - Page 78
... LQ LWV KLJKHVW SRVLWLRQ 6ORZO\ ORZHU
the needle until it is about halfway down , turn the fabric 90° and repeat the process. Place fabric in a hoop, which will make it easier to set stitch
length, as you sew. DARNING 1. Set the sewing machine to attach the foot.
Use a non-permanent fabric marking tool to set...
Instruction Manual - Page 80

... set of feed dogs that work in conjunction with the sewing machine's feeding system to aid the movement of the garment. Lower the presser foot, then sew the layers together. OPEN TOE FOOT
The Open Toe Foot provides a more easily.
1. To sew seams in place using a fabric marking pen/pencil and ruler as guides for your...
Instruction Manual - Page 82

... leave the needle in illustration. Adjust legs to make sure that the table is flush around sewing machine (unevenness of...Sew, keeping the fabric's edge even with Guide.
2. Push legs all the way onto four leg extensions. Readjust legs height if needed, so that the needle...Remove accessory box and slide table into place (if legs are in increments of ... is used for narrow seams, such as shown in ...
Similar Questions

Singer Futura Quartet Seqs 6700 Sewing Machine
how to set my singer futura quartet seqs 6700 sewing machine to sew. A distance more than one inch a...
how to set my singer futura quartet seqs 6700 sewing machine to sew. A distance more than one inch a...
(Posted by johour2194 3 years ago)

Arrived With Locked Wheel. What Is Wrong?
(Posted by Raniarneson 4 years ago)

Having A Power Problem With My Modern Quilter 8500q
I have a Singer Modern Quilter 8500Q sewing machine , it is about 10 months old and tonight it just ...
I have a Singer Modern Quilter 8500Q sewing machine , it is about 10 months old and tonight it just ...
(Posted by Rosbel1227 7 years ago)

8500q Singer Jammed And Bent Needle Stuck
Hi, my 8500Q machine jammed. The error message said C with a picture of the bobbin. I cleaned the ho...
Hi, my 8500Q machine jammed. The error message said C with a picture of the bobbin. I cleaned the ho...
(Posted by cherylwhitepmp 8 years ago)

Beeping From Singer Sewing Machine Stylist Ii 5625
My sewing machine will beep and stop sewing after three inches of sewing. I have taken it to be repa...
My sewing machine will beep and stop sewing after three inches of sewing. I have taken it to be repa...
(Posted by arusheria 9 years ago)