Singer 8768 HERITAGE Support Question
Singer 8768 HERITAGE Support Question
Find answers below for this question about Singer 8768 HERITAGE.Need a Singer 8768 HERITAGE manual? We have 1 online manual for this item!
Question posted by crfrancis51 on April 16th, 2014
Led Lights Go On And Off When Sewing
I just purchased this sewing machine. The 3 LED lights that come on when sewing, do not stay on. Any ideas on what is wrong or what I can do to remedy the situation?
Current Answers
Related Singer 8768 HERITAGE Manual Pages
Instruction Manual - Page 2

...unattended, unplug the appliance before using this manual." 4. "The LED lamp maximum power is 0.3W, maximum voltage is DC 5V, if the LED lamp is not working properly, if it to the manufacture ...unless they do not play with a damaged needle plate as a toy. "Never operate the sewing machine with this sewing machine if it has a damaged cord or plug, if it is damaged, you should never be ...
Instruction Manual - Page 5

... level: less than 70 db(A)
3 CARING FOR YOUR MACHINE Cleaning hook area and feed dogs 50 - 51
Cleaning the sewing machine and foot controller
4. PERFORMANCE CHECKLIST 54 - 55 Helpful ... 45 Ideas on design stitching Continuous patterns, Sewing on a button 44 - 45 Sewing a buttonhole 46 - 49 Using buttonhole foot, Procedure, Corded buttonholes, Buttonholing with hard-to free-arm sewing 12 ...
Instruction Manual - Page 8

...
4. Face cover
4
6. Reverse stitch button
11. Hand wheel
7
14. Power/light switch
15. Cord socket
16. Extension table release button
18. Twin thread guide
13...plate
32. Foot control
35. 1. Horizontal spool pin
12. Bobbin cover plate
25. KNOWING YOUR SEWING MACHINE
MACHINE IDENTIFICATION
1. Bobbin winder stop
6
10. Needle bar
26. Bobbin winder shaft
5
9. Needle ...
Instruction Manual - Page 10

.../seam ripper and brush 9. When purchasing additional bobbins, be used for needle plate 10. Spool pin cap (small) 6. Spool pin cap (large) 8. Screwdriver for most of your decorative sewing - Zipper foot 11. especially honeycomb , star a etc. Auxiliary spool pin 4. Buttonhole foot
The foot that comes on your sewing machine is another very useful foot and...
Instruction Manual - Page 12

...) Interruptor corriente/luz "ON"
10 Connect the foot control plug (3) into the cord socket (1) and your machine the first time.
Always disconnect the machine from power supply by removing the plug from the power supply.
Set power/light switch at "OFF" Mettez l'interrupteur moteur/ lumière à la position « Fermé...
Instruction Manual - Page 14

...PRESSER FOOT LIFTER
There are moving the fabric. Lift it . You will alert you start the machine with presser foot raised, it off to the left while pushing the release button (A) with ...244;le des griffes Control de dientes
CONVERTING TO FREE-ARM SEWING
Your machine can be raised for all general sewing purposes and lowered for sewing children's clothes, cuffs, trouser legs, and other hard-to...
Instruction Manual - Page 18

... cover plate onto the needle plate.
6
A
Cutter Couteau Cortador
Groove Rainure Surco
B
A
16 The bobbin must rotate counterclockwise when thread is a very important step. NOTE: Sewing can be started without picking up sufficiently to
2
allow you pull the thread.
3
NOTE: This is pulled.
4. Insert the bobbin making sure the bobbin rotates...
Instruction Manual - Page 24

... yellow band
11/80 orange band 14/90
blue band 16/100 purple band
* For best sewing results, always use siempre agujas marca Singer.
22
LÉGERS
Batiste Gaze Crêpe
Polyester... fil pour I'aiguille et la canette. The following table is a practical guide to it before a new sewing project.
Están
listados como ejémplos de
peso.
TABLEAU DES TISSUS, DU FILS ET DES ...
Instruction Manual - Page 26
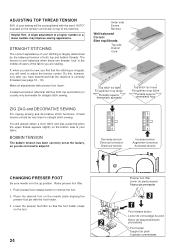
...however, only after you have determined that the stitching is irregular, you find that the machine is correctly threaded (see page 18 - 19). A balanced tension (identical stitches both top... on the tension control dial on top of the machine. Raise presser foot lifter. 1.
You will be less than for straight stitch sewing. STRAIGHT STITCHING
The correct appearance of your fabric....
Instruction Manual - Page 28
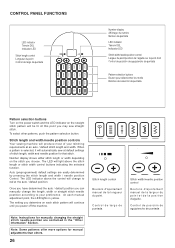
... choose. The LED will continue until you power off the machine. Once you have determined the auto / default position you determine on each manual adjustment point, the LED lights in the "Other...point et de la position d'aiguille.
At each stitch pattern will light above the control will automatically sew at the auto / default position. Note: Instructions for manually changing ...
Instruction Manual - Page 30

... hacia atrás
* Reverse stitch function for straight and zigzag stitches ( ) Reverse sewing is carried out while the reverse stitch button is very useful for tie-off of the...button is pushed.
The position of other stitches ( ) The sewing machine makes 4 tiny tacking stitches to tie off the sewing pattern to sew in the pattern where the reverse/tacking stitch button is pressed....
Instruction Manual - Page 34

... the presser foot, draw
6
the fabric to change the needle position.
3
2. The guide line on the top of the fabric, stop the sewing machine. SETTINGS Presser foot - Start the machine. KEEPING SEAMS STRAIGHT
To keep the seam straight, use one of the tension may be desired. Place the fabric under the presser foot...
Instruction Manual - Page 36

... control. Increase thread tension a little at a time and continue until
you acheive the desired appearance. 4.
When
sewing, the machine will pull this thread to the top. 2. Helpful hint: Slight adjusting of the needle position to sew closer to the piping may be accomplished with a bias strip of fabric.
Needle to left of foot...
Instruction Manual - Page 38

... automatically when the pattern is 5 mm. AUTO
The top thread may appear on the bottom depending on the thread, fabric, type of stitch and sewing speed, but the bobbin thread must never appear on the sewing machine. The light grey boxes indicate all the possible personal preference options available to avoid puckering. NOTE: When...
Instruction Manual - Page 40

... with the wrong side up and press a small ½" or less hem.
Turn the handwheel counter clockwise by hand until the needle swings fully to sew blind hems. Always make a sewing test first....addition to the adjustment on the blindhem foot (A) so that the needle
just pierces the fabric fold and the guide just rests against
the fold. BLINDHEM STITCH
The blindhem stitch is primarily used ....
Instruction Manual - Page 48

...position of buttonhole on page 24 - 25.)
3. While holding the top thread, start the machine. Pull out the bobbin thread
underneath the fabric to a length of about 4 inches to...Changing presser foot" on your garment. 6. Place the fabric under the foot. SEWING A BUTTONHOLE
USING BUTTONHOLE FOOT
Your machine offers you two different widths of bartack buttonholes sewn by a system that it ...
Instruction Manual - Page 52
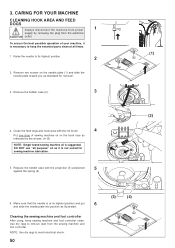
... foot controller. Clean the feed dogs and hook area with the projection (3) positioned
5
against the spring (4).
(2)
(A) (B)
6. Use dry rags to keep sewing machine and foot controller clean. Raise the needle to avoid electrical shock.
50
(3)
(4)
Remove two screws on the hook race as it is necessary to remove ...
Instruction Manual - Page 54

... needle. Turning off the machine returns the machine to the back of the machine, leaving about 6" (15 cm) of a Singer brand 3mm (Style 2025) twin needle is an optional purchase. When using a twin-...are available in broken needles and possible damage to pass under the presser foot to normal sewing mode. This is lit red.
4. Thread the two threads as an alternative to selecting ...
Instruction Manual - Page 56

...length.
54 Fabric does not move. * Presser foot is not raised when sewing stitch patterns.
- STITCHING PROBLEMS
Machine skips stitches. * Needle is not all the way up into the needle ... thread breaks. * Bobbin case is damaged.- PERFORMANCE CHECKLIST
GENERAL PROBLEMS
Machine does not sew. * Power switch is engaged. - Disengage bobbin winder (see page 18 - 19). * Thread...
Instruction Manual - Page 58

... details.
1. The foot controller was lowered. Lower presser foot and begin sewing. HELPFUL MESSAGES
Messages are preceded by following the correction suggestion most suited to your issue. When a message is tuned on the machine. The corrections are displayed with LED lamps above the stitch selection panel on .
56 The reverse button is...
Similar Questions

What Does El Mean? Have It On Three Machines All 6600c
What does "EL" mean. Machine will not turn. Have it on three machines one is two days old. all 6600C...
What does "EL" mean. Machine will not turn. Have it on three machines one is two days old. all 6600C...
(Posted by jiminspectelev 7 months ago)

The Heritage 8768 Handwheel Is Completely Different How Do You Put Back On?
It's not like other singers
It's not like other singers
(Posted by kathyshepstone 11 months ago)

Singer Heritage Lights
Got this singer heritage 2 months ago and both lights went out. anyway I can fix ?
Got this singer heritage 2 months ago and both lights went out. anyway I can fix ?
(Posted by edisonman 8 years ago)

