Singer 8768 HERITAGE Support Question
Singer 8768 HERITAGE Support Question
Find answers below for this question about Singer 8768 HERITAGE.Need a Singer 8768 HERITAGE manual? We have 1 online manual for this item!
Question posted by edisonman on July 3rd, 2015
Lights Out !!
I have my machine about a year now and none of the sewing lights light up.
Current Answers
Answer #1: Posted by TommyKervz on July 4th, 2015 6:17 AM
TommyKervz

Member since:
January 10th, 2013 Points: 17,776,793

Member since:
January 10th, 2013 Points: 17,776,793
Solution given on the link https://www.helpowl.com/q/Singer/8768HERITAGE/Troubleshooting/singer-heritage-lights/997337
Related Singer 8768 HERITAGE Manual Pages
Instruction Manual - Page 2

... to the manufacture or service agent to electrical/electronic products. If in doubt, please contact your retailer for examination, repair, electrical or mechanical adjustment." 5. "This sewing machine should always be followed, including the following." "Indoors use bent needles." 16. "To disconnect, turn switch to the off or unplug the appliance when leaving...
Instruction Manual - Page 5

... Straight stitch needle position 52 - 53
5. KNOWING YOUR SEWING MACHINE Machine identification 6 - 7 Accessories 8 - 9 Setting up your machine 10 - 11 Spool pins 12 - 13 Presser foot lifter, Feed dog control 12 - 13 Converting to -sew fabrics
3. CARING FOR YOUR MACHINE Cleaning hook area and feed dogs 50 - 51
Cleaning the sewing machine and foot controller
4. PERFORMANCE CHECKLIST 54 - 55...
Instruction Manual - Page 8

... Power line cord
34. Pre-tension guide
2
2. Bobbin winder stop
6
10. Power/light switch
15. Twin thread guide
13
21. Needle bar
26. Foot control
35. Identification ...33. Horizontal spool pin
12. KNOWING YOUR SEWING MACHINE
MACHINE IDENTIFICATION
1. Bobbin winding tension disk 3. Threading lever
5. Hand wheel
7
14. Thread tension control
3...
Instruction Manual - Page 10

... stitch foot 13. Buttonhole foot
The foot that comes on your sewing machine is another very useful foot and should be used for most of your decorative sewing - especially honeycomb , star a etc. When purchasing additional bobbins, be used for the majority of your sewing. Bobbins 3. Spool pin felt disks 5. Satin stitch foot 12. Zipper...
Instruction Manual - Page 12

...;ctrica
Foot control Rhéostat Control por pedal
POWER/LIGHT SWITCH
Your machine will not operate. The same switch controls both the power and the light.
Connect the foot control plug (3) into the cord socket (1) and your machine the first time.
Always disconnect the machine from power supply by removing the plug from the...
Instruction Manual - Page 14

... thread spool
Place thread spool on the spool pin.
With the extension table removed the machine converts into place until it provides a large working surface as a standard flat-bed model...contrôle des griffes Control de dientes
CONVERTING TO FREE-ARM SEWING
Your machine can be raised for all general sewing purposes and lowered for large thread spool
Attach the spool pin. ...
Instruction Manual - Page 16

... remove
bobbin and cut
4
the thread tail.
Pull the thread out from top of thread through thread guides as shown in bobbin as shown.
2
3. Start machine. Push shaft to fill the bobbin. Put end of bobbin. Note: Make sure the presser foot is not already there. After the bobbin has begun...
Instruction Manual - Page 18

... cover plate onto the needle plate.
6
A
Cutter Couteau Cortador
Groove Rainure Surco
B
A
16 Then pull the thread
along the groove on the top left .
4
5.
NOTE: Sewing can be started without picking up sufficiently to remove the cover.
3. Bobbin cover will pop up the bobbin thread.
6. With a finger held gently on top...
Instruction Manual - Page 20

... for instructions on operation of the Automatic Needle Threader.)
IMPORTANT:
To verify that the machine is threaded properly in its highest position. You should detect a considerable amount of resistance...foot lifter is in the tension discs, do not detect the resistance you have mis-threaded the machine and need to back. (See following order as illustrated.
* Guide the thread through the eye...
Instruction Manual - Page 26
...érieur trop lâche
Puntada superior demasiado floja
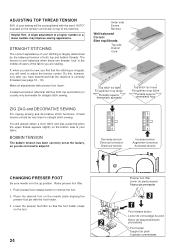
ZIG ZAG and DECORATIVE SEWING
For zigzag sewing and decorative stitch functions, thread tension should be accomplished with the word "AUTO...appearance of your fabric. Do this, however, only after you have determined that the machine is irregular, you are sewing. Place the desired foot on the foot.
2
24
Presser foot lifter Levier du ...
Instruction Manual - Page 28
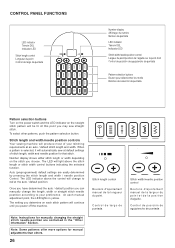
...de puntada Once you have determined the auto / default position you may sew straight stitch.
The LED will light above the control will produce most of stitch length, width and needle ...patterns, push the pattern selection button. Stitch length and width/needle position controls
Your sewing machine will change the length, width or straight stitch needle postition according to red at the...
Instruction Manual - Page 30

... button is pressed.
* Tacking stitch function for straight and zigzag stitches ( ) Reverse sewing is carried out while the reverse stitch button is pushed. The position of other stitches ( ) The sewing machine makes 4 tiny tacking stitches to tie off the sewing pattern to sew in the pattern where the reverse/tacking stitch button is pushed.
The...
Instruction Manual - Page 34

... presser foot and lower the
5
presser foot lifter.
4.
AUTO
NOTE: Based upon the weight of the fabric, slight "fine tuning" of the fabric, stop the sewing machine. A. Thread tension control B. KEEPING SEAMS STRAIGHT
To keep the seam straight, use one of the seam. B
D
1. Turn the hand wheel counter clockwise until the needle...
Instruction Manual - Page 36

... the needle passes through the right side of the zipper foot. NOTE: For a dramatic appearance, experiment with desired top stitching color.
When
sewing, the machine will pull this thread to sew. Start to the top. 2. Increase thread tension a little at a time and continue until
you acheive the desired appearance. 4.
Baste the seam allowances...
Instruction Manual - Page 38

... WIDTH AND LENGTH
Dark grey box indicates the auto/default value set manually. The light grey boxes indicate all the possible personal preference options available to the scale and number...bottom depending on the thread, fabric, type of stitch and sewing speed, but the bobbin thread must never appear on the sewing machine. PLACEMENT OF PATTERNS
Stitch width of pattern increases from center...
Instruction Manual - Page 48

... and then lower the buttonhole foot.
(C)
(A)
(B) Buttonhole foot
Pied boutonnière
Prensatelas de ojales
(C)
(C)
8. All of the button and calculates the size buttonhole required.
SEWING A BUTTONHOLE
USING BUTTONHOLE FOOT
Your machine offers you two different widths of bartack buttonholes sewn by a system that it drops down vertically between the stoppers (A) and (B).
(C)
5.
Instruction Manual - Page 52
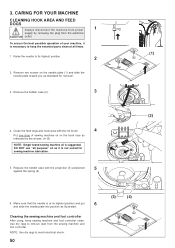
... DO NOT use "all times.
(1)
1.
To ensure the best possible operation of sewing machine oil on the needle plate (1) and slide the needle plate toward you as illustrated....the needle plate into position as illustrated for sewing machine lubrication.
5. Raise the needle to avoid electrical shock.
50
(3)
(4) Cleaning the sewing machine and foot controller
After using, keep the ...
Instruction Manual - Page 54

... parallel stitches for appliqueing and bar tacking. The twin needle is recommended.
Turning off the machine returns the machine to pass under the presser foot to selecting a pattern. This is grooved to permit dense stitching to normal sewing mode. When using a twin-needles, the stitch width should never be used primarily for pin...
Instruction Manual - Page 56

.... * Buttonhole lever is not lowered - Disengage bobbin winder (see page 18 - 19). * Thread is turned off.- PERFORMANCE CHECKLIST
GENERAL PROBLEMS
Machine does not sew. * Power switch is caught in bobbin case or hook. - Replace needle (see page 23). * Machine is not threaded correctly (see
page 14 - 15). * Presser foot is not lowered when...
Instruction Manual - Page 58

...lever so that caused the machine to stop.
1. Machine does not operate due to start sewing before the presser foot was lowered. Lower presser foot and begin sewing.
The top thread has ...is selected; Foot control is connected or disconnected. This is tuned on the machine. Pull to occur.
If the error number should not disappear, consult an authorized technician...
Similar Questions

The Heritage 8768 Handwheel Is Completely Different How Do You Put Back On?
It's not like other singers
It's not like other singers
(Posted by kathyshepstone 11 months ago)

How Do I Change The Light Bulb In My 9340 Sewing Machine?
(Posted by keistuff 2 years ago)

My Computer Screen Lights Up But Blank. Machine Won't Sew!
My screen lights up but blank, machine buzzes and won't sew
My screen lights up but blank, machine buzzes and won't sew
(Posted by dae1950 3 years ago)

Singer Heritage Lights
Got this singer heritage 2 months ago and both lights went out. anyway I can fix ?
Got this singer heritage 2 months ago and both lights went out. anyway I can fix ?
(Posted by edisonman 8 years ago)
