Singer 9960 Quantum Stylist Support Question
Singer 9960 Quantum Stylist Support Question
Find answers below for this question about Singer 9960 Quantum Stylist.Need a Singer 9960 Quantum Stylist manual? We have 2 online manuals for this item!
Question posted by rjmarley on June 28th, 2019
Machine Quit Sewing Properly
My thread keeps balling up on the first two stiched
Current Answers


Related Singer 9960 Quantum Stylist Manual Pages
Instruction Manual - Page 2

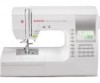
... being used as threading needle, changing needle, threading bobbin, or changing presser foot. 15. Special care is being administered. 8. Always unplug sewing machine from the electrical ...properly, if it on cord. The wrong plate can cause the needle to break. 12. Handle the foot controller with any opening. 6.
Keep fingers away from outlet. 9. Never operate the sewing machine...
Instruction Manual - Page 9

... to the electric outlet. 4. A lamp will sew. When the foot controller is connected, start , stop when foot controller is turned on . 6. The machine will be deactivated. (See page 10) 1. ... install the proper outlet.
Handle the foot controller with your feet. 4. Do not modify the plug in a polarized outlet only one blade wider than the other). Place machine on the...
Instruction Manual - Page 11
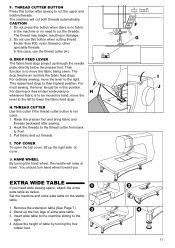
.... 3. For darning or free motion embroidery or whenever fabric is no fabric
in the machine or no need wide sewing space, attach the extra wide table as below the presser foot. H.THREAD CUTTER Use this cutter if the thread cutter button is to move the fabric being sewn. Raise the presser foot and bring...
Instruction Manual - Page 18

... lower the presser foot. 3. Upper Thread Sensor If upper thread is turned on the left side of the machine. (See page 11) NOTE After you cut the threads. Do not press the thread cutter button when
there is required around the needle. STARTING TO SEW
The machine will stop automatically.
Keep holding threads after sewing a few stitches. Also, you reach...
Instruction Manual - Page 34

... and bobbin threads to diameter of button plus thickness of the buttonhole foot. Lower the foot while pulling the frame of the buttonhole foot towards you use interfacing on the base. Note: Machine will not start the machine.
34 Keyhole Buttonhole for large buttons 106. Round Ended Buttonhole (Narrow) for light to sew if...
Instruction Manual - Page 35

... seam ripper, do not put your finger in the order as a stopper.
Use a pin as shown and stop automatically after sewing.
8. Machine will sew the buttonhole in the path of buttonhole being careful not to remove the fabric. Press the thread cutter button and raise the presser foot to cut stitches on hard-to...
Instruction Manual - Page 36

... b. a. Bound Buttonhole
Buttonhole Foot (F)
1.
Lower the buttonhole lever and sew buttonhole. (See previous page) Machine will align with the center line mark of the patch to the underside.... and stop automatically after sewing.
3. Cut diagonally to right side and baste along the center of patch will sew the buttonhole in the order as shown. Press the thread cutter button and raise ...
Instruction Manual - Page 37

... basting. Place the fabric under the presser foot and
lower the presser foot. Press the thread cutter button and raise the presser foot.
3.
Machine will sew the eyelet and stop automatically. 2. a. c. Cut a patch of fabric c. Start the machine. Wrong side of fabric
11.Fold the fabric along the seams on the original stitching line...
Instruction Manual - Page 38

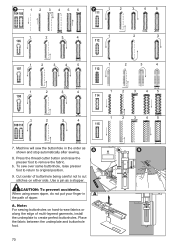
... on base according to strain, such as shown. Hold upper thread lightly and start to reinforce areas that the starting point comes depth side. Position fabric under presser foot so that will not start the machine.
6. No. 102 Bar-tack, to sew if buttonhole lever is not lowered properly or buttonhole foot is finished.
7.
Instruction Manual - Page 48

... you have raised the presser foot lifter, the arrow mark will change to start from the beginning of the pattern sequence. When you start sewing again, machine will start sewing. (When the "I .
c.
You must shift the cursor to the pattern you where you wish to " ", In this time, when you combined the tack...
Instruction Manual 2 - Page 2

...sewing machine if it has a damaged cord or plug, if it is not working properly, if it on cord. Switch the sewing machine off position (symbol "O"), then remove plug from all instructions before cleaning. This sewing machine..., or dropped into any adjustments in the needle area, such as a toy. Keep fingers away from outlet. 9. Special care is a registered Trademark of burns, fire...
Instruction Manual 2 - Page 18
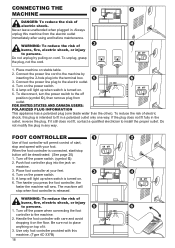
Connect the power line cord to the machine by pulling on cord. A lamp will sew. To disconnect, turn the power switch to the off
position (symbol O),...off the power when connecting the foot controller to install the proper outlet. Place foot controller at your foot. A lamp will be deactivated. (See page 20) 1. The machine will permit control of foot controller will stop when foot ...
Instruction Manual 2 - Page 20
... pressed.
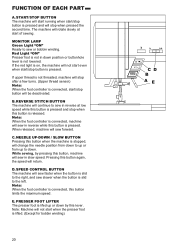
SPEED CONTROL BUTTON The machine will sew faster when the button is slid to the right, and sew slower when the button is connected, start/stop button will sew in reverse at start /stop button is pressed.
The machine will stop when this lever. If upper thread is not threaded, machine will rotate slowly at low speed...
Instruction Manual 2 - Page 22
... table. 3.
Pull fabric and cut the threads. CAUTION 1. Raise the presser foot and bring fabric and
threads backward after sewing to be in the machine or no fabric
in this case, use this cutter if the thread cutter button is not used. 1.
The machine will raise or lower. For ordinary sewing, move the fabric being sewn. Remove...
Instruction Manual 2 - Page 36
... is turned on the left side of the machine. (See page 22) NOTE After you can regulate the sewing speed by pressing the slow button. 4. Press the thread cutter button. 6. Rethread the upper thread and resume sewing. Check the presser foot (General Purpose
Presser Foot). Keep holding threads after sewing a few stitches. CAUTION 1. CAUTION: To prevent accidents. Raise...
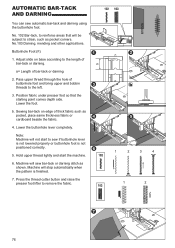
Instruction Manual 2 - Page 38
... a built-in position where back stitching
is used with all utility patterns. 1.
If you reach the end of the seams. 1. Machine will sew tacking stitches and stop button (or press the pedal).
Machine will change to be used for reinforcing the ends of seam, press and hold the reverse button. AUTO TACK STITCH...
Instruction Manual 2 - Page 68
... machine can sew 13 types of button + thickness
3. Bar-tack Buttonhole (Narrow) for light to the left.
4. Tapered Keyhole Buttonhole 109. Set button on fabric.
2. Pass upper thread through the hole of....
6. Bar-tack Buttonhole (Wide) for light to sew if buttonhole lever is not lowered properly or frame of the fabric.
5. Note: When sewing stretch fabrics, it is in the center of buttonhole ...
Instruction Manual 2 - Page 70
Machine will sew the buttonhole in the path of ripper. Cut center of multi-layered garments, install the underplate to cut stitches on hard-to-sew fabrics or along the ...CAUTION: To prevent accidents.
Note: For sewing buttonholes on either side. To sew over same buttonhole, raise presser foot to return to remove the fabric.
Press the thread cutter button and raise the presser foot to...
Instruction Manual 2 - Page 72

...thread cutter button and raise the presser foot to within 3 mm of each end. Carefully cut through the center of buttonhole. Cut diagonally to form pleats that the center line of patch will sew... automatically after sewing.
3.
Press the patch. Turn the patch and press the side seam allowance.
8. Lower the buttonhole lever and sew buttonhole. (See previous page) Machine will align with...
Instruction Manual 2 - Page 76
... foot and bring upper and bobbin threads to sew if buttonhole lever is not lowered properly or buttonhole foot is finished.
7. Pass upper thread through the hole of thick fabric such as pocket, place same thickness fabric or cardboard beside the fabric.
4. Machine will not start the machine.
6.
Note: Machine will sew bar-tack or darning stitch as...
Similar Questions

Why Is My Singer Quantum Stylist 9960 Stuck In Reverse Sewing
(Posted by kelsydan1 1 year ago)

Quantum 9960, Thread Balls Up
thread balls up under plate. Have to tear fabric to get it out. Also the bar that goes across the bo...
thread balls up under plate. Have to tear fabric to get it out. Also the bar that goes across the bo...
(Posted by Sisbankssb 4 years ago)

Getting C Error Ten Machine Quits Sewing Pause Will Sew A Few Stocked Ten C Erro
getting C error I pause it sews a couple seconds and Cerror again the stitches seem fine
getting C error I pause it sews a couple seconds and Cerror again the stitches seem fine
(Posted by Christychristensen58 7 years ago)

The Bobbin Won't Wind On My Singer 9960. It's Threaded Correctly.
The bobbin won't wind on my Singer 9960. It is almost certainly threaded correctly. Can you help me?
The bobbin won't wind on my Singer 9960. It is almost certainly threaded correctly. Can you help me?
(Posted by kerrystarr 9 years ago)

I Need An Extnesion Table For My Sewing Machine Singer 7258 Stylist
(Posted by loucksd 10 years ago)