Singer 9960 Quantum Stylist Support Question
Singer 9960 Quantum Stylist Support Question
Find answers below for this question about Singer 9960 Quantum Stylist.Need a Singer 9960 Quantum Stylist manual? We have 2 online manuals for this item!
Question posted by skchasey on April 20th, 2013
Mounting 9960 In Cabinet
I have an old Horn Sewing Machine / Serger Cabinet. How do I mount my 9960 in the cabinet? The machine doesn't seem to sit flat on the mounting board, there is a center "foot" that makes the machine wobble.
Current Answers
Related Singer 9960 Quantum Stylist Manual Pages
Instruction Manual - Page 1

INSTRUCTION MANUAL 9960
Instruction Manual - Page 2

... to the nearest authorized dealer or service center for use . SAVE THESE INSTRUCTIONS
Servicing should always be used as described in the instruction manual. 16. Return the sewing machine to lift and move the machine. 18. Always unplug sewing machine from the electrical outlet when removing covers, lubricating, or when making any other user servicing adjustments mentioned...
Instruction Manual - Page 3

...TURNING CORNERS 20 E. SEWING HEAVY FABRIC 20 F. MIRROR/REVERSE STITCH 22 D. NOTE 29
BLIND HEM STITCHING 30 PATCH WORK 31 APPLIQUE 31 INSERTING ZIPPERS CENTERED INSERTION 32 LAPPED ...MACHINE 16
A. START AND END OF SEAM 18 B. DIRECT STITCH PATTERN 22 B. SELECTING OTHER UTILITY STITCH PATTERNS 22 C. ATTACHING THE DARING/ EMBROIDERY FOOT 26 B. BASTING 26
ELASTIC STITCH SEWING...
Instruction Manual - Page 4

...the plug or adaptor or at the distribution board. Children should be connected to this booklet ...As the colors of the wires in the mains lead of this sewing machine when considered necessary without notification or obligation. fuse must be connected... is used , a 5 Amp. This machine intended for their safety.
2. EU only
1. MODEL 9960
PREFACE Thank you for radio and television interference...
Instruction Manual - Page 6
...
8
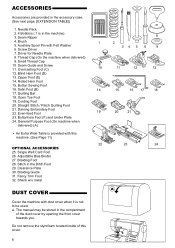
4. Button Sewing Foot
16. Satin Foot (B)
14
15
16 17
18
17. Open Toe Foot
19. Darning Embroidery Foot 22. General Purpose Foot (On machine when
delivered) (A)
• An Extra Wide Table is provided with this cover.
6 Stitch in the accessory case. (See next page, [EXTENSION TABLE])
7
1. Shank w/o metal
22
23
24
DUST COVER
Cover the machine with...
Instruction Manual - Page 7

... the left . Tighten the thumb screw.
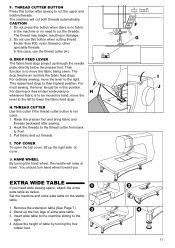
7 EXTENSION TABLE
a. b.
A.
Removing the presser foot holder When attaching the special presser foot or cleaning the machine, you change the presser foot.
Place desired foot with its highest point. 2. Lower the presser foot lifting lever and the
presser foot will go from bottom of accessory case and pull toward you until...
Instruction Manual - Page 9

... not fit fully in any way. Do not modify the plug in the outlet, reverse the plug. Place foot controller at your foot. A lamp will sew.
Handle the foot controller with care and avoid dropping it . 3. Place machine on the power switch. 5. Connect the power line cord to fit in . Turn on stable table. 2. To...
Instruction Manual - Page 10

.... SPEED CONTROL BUTTON The machine will sew forward.
When released, machine will sew faster when the button is slid to the right, and sew slower when the button is pressed. D. Note: When the foot controller is released. Pressing this button is connected, machine will return. PRESSER FOOT LIFTER The presser foot is lifed up to sew in down by pressing...
Instruction Manual - Page 11
...in the machine or no need wide sewing space, attach the extra wide table as below the presser foot. For ordinary sewing, move the lever to the left to the right. For most sewing, the lever... thicker than #30, nylon thread or other speciality threads. Raise the presser foot and bring fabric and
threads backward after sewing to cut the upper and bobbin threads. J. In this cutter if the ...
Instruction Manual - Page 13

J. TWIN NEEDLE BUTTON If you can check and edit combined patterns or letters by pressing these buttons. I. L. Machine will not turn off the stitch with a locking stitch. DECORATIVE & LETTER STITCH SEWING By pressing this button is
turned off. SCROLL BUTTONS During stitch pattern selection, 5 patterns or letters will stop automatically at the end...
Instruction Manual - Page 18

... pull or push the fabric. Check the presser foot (General Purpose
Presser Foot). Place the fabric under the presser foot and lower the presser foot. 3. Keep holding threads after sewing a few stitches. CAUTION 1. Rethread the upper thread and resume sewing. STARTING TO SEW
The machine will stop sewing or release the foot controller pedal. 5. Refer to cut the threads by...
Instruction Manual - Page 19

..., press the reverse button once.
REVERSE STITCHING Reverse stitching is to sew the selected pattern. 3. This function can be made and lower the presser foot. 2. Machine will sew tacking stitches and stop button (or press the pedal). Start to forward sewing. 4. If you want to sew this function, press the tack button again. Tack mark " " will...
Instruction Manual - Page 20

... fabric. 2. The presser bar lifter can be feeded smoothly. SEWING OVER OVERLAPPED AREAS Guide the fabric with your hand when sewing over overlapped areas. D. Raise the presser foot. 2.
Stop the machine when you reach a corner.
TURNING CORNERS 1. Lower the presser foot and resume sewing. SEWING HEAVY FABRIC When sewing heavy fabrics, the toe end of seam allowance, guide...
Instruction Manual - Page 21

...machine adjusts the thread tension automatically when pattern is decreased.
Bobbin thread will return to the previous mode (Stitch information mode).
When thread tension is selected.
Thread tension except for straight stitch
Thread tension except for the correct setting. If your sewing...pre-set . You can change tension while sewing. You will return to the thread tension ...
Instruction Manual - Page 23

...you pressed clear "C" button, machine will return to regular length (also mirror/reverse will return to the patterns may be made while sewing.
23 For narrower width, ...width buttons will be changed.
D. Elongated A pattern cannot be elongated from the original length. You can make changes by pressing the function button (F3) directly under the width and length mark.
2.
LCD will ...
Instruction Manual - Page 40

... stitch width so that the stitches are just cover the cord. Insert three cords into spiral of rolled hem foot. Lower the foot and sew slowly, guiding the cord. SINGLE CORDING 1. Insert the cord in the
center groove of fabric over about 3 mm (1/8 inch), then fold it over again 3 mm for Triple Cording
Cording...
Instruction Manual 2 - Page 3

...SEWING THE SELECTED PATTERNS 96 I . Removing the presser foot holder 14
INSERTING THE NEEDLE 16 FABRIC, THREAD AND NEEDLE TABLE ........ 16 CONNECTING THE MACHINE 18 FOOT...foot 14 B. ATTACHING THE DARING/ EMBROIDERY FOOT 52 B. BASTING 52
ELASTIC STITCH SEWING 54 QUILTING 54
A. NOTE 58
BLIND HEM STITCHING 60 PATCH WORK 62 APPLIQUE 62 INSERTING ZIPPERS CENTERED... 2 MODEL 9960 8 FOR ...
Instruction Manual 2 - Page 8

...with the machine by persons (including children) with the colored markings identifying the terminals in the plug or adaptor or at the distribution board.
To get the most modern sewing capabilities,...pin plug.
8 MODEL 9960
PREFACE Thank you with letter L or colored red. Please refer to the terminal which is to be connected to this sewing machine when considered necessary without ...
Instruction Manual 2 - Page 40

... the right side of
general purpose foot and lower the foot. 3. To keep the width of presser foot tends to guide the fabric. Raise the presser foot. 3. F. SEWING OVER OVERLAPPED AREAS Guide the fabric with your hand when sewing over overlapped areas. Stop the machine when you reach a corner. SEWING HEAVY FABRIC When sewing heavy fabrics, the toe end...
Instruction Manual 2 - Page 80

... the stitches are just cover the cord. Lower the foot and sew slowly, guiding the cord. Insert three cords into front of rolled hem foot.
Insert the cord in the
center groove of fabric.
2. Fold edge of cording foot.
80
3 mm 5 cm Lower the presser foot and start sewing slowly, while guiding raw edge of fabric scroll...
Similar Questions

Why Is My Singer Quantum Stylist 9960 Stuck In Reverse Sewing
(Posted by kelsydan1 1 year ago)

Bobbin Case On Singer 9960 Quantum Stylist Noisey
when I sew I hear a clicking sound and some rattling of the bobbin occurs. more so when I sew on the...
when I sew I hear a clicking sound and some rattling of the bobbin occurs. more so when I sew on the...
(Posted by sdshowen 9 years ago)

Thread When Sewing Doesn't Catch Bobbin Thread, What Do I Do?
How do I fix this problem? When I pull the thread it was only the spool thread.
How do I fix this problem? When I pull the thread it was only the spool thread.
(Posted by arcand1772 9 years ago)

Help! My Bobbin Will Not Thread Properly.
My bobbin threads very loosely, with large loops. I've already removed the plate and brushed out any...
My bobbin threads very loosely, with large loops. I've already removed the plate and brushed out any...
(Posted by Blakkonyx 9 years ago)

Mounting In Cabinet
I have a singer sewing cabinet from the 1950-1960 time period, can the 4432 be mounted in this cabin...
I have a singer sewing cabinet from the 1950-1960 time period, can the 4432 be mounted in this cabin...
(Posted by sewing123 10 years ago)