Singer Futura XL-400 Support Question
Singer Futura XL-400 Support Question
Find answers below for this question about Singer Futura XL-400.Need a Singer Futura XL-400 manual? We have 1 online manual for this item!
Question posted by ann393bla on February 10th, 2013
Hoop Size Is Smaller Than Embroidery Data. Attach Appropriate Hoop And Restart
The person who posted this question about this Singer product did not include a detailed explanation. Please use the "Request More Information" button to the right if more details would help you to answer this question.
Requests for more information
Request from ann393bla on February 10th, 2013 3:00 PM
but that is the right hoop it is not seeing that I have the big hoop on I have tried every unplugging the machine and taking the embroidery piece off Turing the machine off and unplugging every thing and turning it back on
but that is the right hoop it is not seeing that I have the big hoop on I have tried every unplugging the machine and taking the embroidery piece off Turing the machine off and unplugging every thing and turning it back on
Current Answers
Related Singer Futura XL-400 Manual Pages
Instruction Manual - Page 2

... as a toy. Close
cover
before carrying out maintenance or
replacing lamps." 12. All rights reserved. Close attention is being used by pulling on disposal, this sewing machine." Use only attachments recommended by a person responsible for its affiliates. "Switch off („0") position, then remove plug from the accumulation of electric shock:"
1. "Never...
Instruction Manual - Page 5

... SEWING Before attaching embroidery unit 58 - 61
Attaching embroidery foot, Inserting the bobbin, Threading the top thread, Extension table, Attaching embroidery unit 62 - 63 Removing embroidery unit 62 - 63 Securing fabric in embroidery hoop 64 - 65 Using fabric and stabilizer 66 - 69 Preparing the machine before installing the hoop -------- 70 - 71 Attaching and removing embroidery hoop...
Instruction Manual - Page 8

...21. Needle 24. Foot release button
28. General purpose foot
33
30. Carriage 36. Hoop bracket 39. Foot control 49. Threading lever
4
5. Face cover
6. Operation buttons
11....NOTE: B e s u r e t h e U S B c a b l e i s
44
attached to your machine when doing embroidery.
45
44 45
47
48
49
50
6 Hand wheel
14. Buttonhole lever
17. Feed dog control
12
18. ...
Instruction Manual - Page 10

... (short)
The Foot that comes on your
7
Sewing machine is called the
General Purpose Foot and will
be used for the majority of the machine and the software providing powerful option and capabilities. The Satin Foot (14) is "system" of your
sewing.
Needles
2. Embroidery software CD
19
FUTURA embroidery is another
12
very useful foot and should...
Instruction Manual - Page 12

...sewing machine only.
Place felt disc over it. Place a thread spool on . NOTE: In sewing mode, the machine ...XL-550-P04-1.Ceonptrsol por pedal
Power/light switch "OFF" Interrupteur moteur/lumière "OFF" Interruptor corriente/luz "OFF"
Power/light switch "ON" Interrupteur moteur/lumière "ON" Interruptor corriente/luz "ON"
SPOOL PINS HORIZONTAL SPOOL PIN for large thread spool
Attach...
Instruction Manual - Page 60

... EMBROIDERY SEWING
BEFORE ATTACHING EMBROIDERY UNIT ATTACHING EMBROIDERY FOOT
Foot holder Support du pied Sujetador prensatelas
Always be sure to machine CAUTION before changing presser foot.
* Raise presser foot lifter. Screw Vis Guia
* Turn the hand wheel counter clockwise (toward you ) until the needle is above the needle clamp. Secure it by tightening presser foot screw.
3.
Attach...
Instruction Manual - Page 64

... embroidering process. Doing so may be sure to turn off power to the left while pressing release lever. ATTACHING EMBROIDERY UNIT
1
Always be distorted. Turn off the machine. * Remove embroidery hoop from machine.
(Refer to close for general sewing.
3
Handle Poignée Mango
1
Release lever Support de cerceau Palanca de liberación
Handle
2
Poignée Mango
Release...
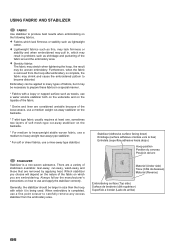
Instruction Manual - Page 66

... the two frames together by pressing down on inner hoop will come to remove slack. d. SECURING FABRIC IN EMBROIDERY HOOP
1
NOTE: For information about using appropriate stabilizer, see page 66 - 67.
2. Pull fabric edges to front side (Large hoop only). a. b. Once fabric is properly positioned in embroidery frame with no slack, securely tighten the screw.
Once...
Instruction Manual - Page 68
...'s instructions on how to carefully remove any excess stabilizer from the hoop after embroidery is being used. Generally, the stabilizer should be larger in size than the hoop with a loopy or napped surface such as shrinkage and puckering of the fabric around the embroidery area. Stretchy fabrics The fabric may stretch when tightening the...
Instruction Manual - Page 70
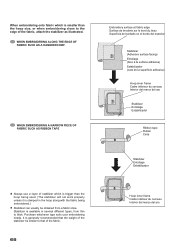
... to thick. When embroidering onto fabric which is bigger than the hoop size, or when embroidering close to the edge of the fabric.
68
Hoop inner frame Cadre intérieur du cerceau Interior del marco del aro Stabilizer is smaller than the hoop being used. (The stabilizer will not work properly unless it is...
Instruction Manual - Page 72

... de liberación del aro
70
NOTE: Before attaching small hoop, turn on power switch to move the carriage to its highest position. Carriage Chariot Carro
Hoop mounting plate Plaque de montage de cerceau Placa de montaje de aro
Hoop release lever Levier de retrait du cerceau. ATTACHING AND REMOVING EMBROIDERY HOOP
1
(A)
1. PREPARING THE MACHINE BEFORE
INSTALLING THE...
Instruction Manual - Page 76

... your computer and sewing machine.
1. Attach the hoop that you will indicate the stage at which the installation procedure is finalizing all the selections made during the installation set-up the Futura Software.
4. It will automatically close the Futura software and then turn on "Cancel".
Make sure the needle has been moved to your embroidery unit.
3. A progress...
Instruction Manual - Page 78

... broderie seulement) Pulsador de comienzo/parada (Sólo para bordado)
THREAD TENSION CONTROL
Set it is recommended to the first stitch of the machine.
76 Note: The embroidery hoop will stop sewing and the needle stops at a time. To reverse continuously, press and hold this button. Design may wish to re-adjust thread tension...
Instruction Manual - Page 82

... tension. Check the thread. Refer to hang up and not advance through the machine. Refer to pucker.
If the thread is not correctly attached. Embroidery hoop is tangled on the spool pin or somewhere along the thread path. Check around the hoop and remove things which cause obstruction. This can cause fabric to page 20...
Instruction Manual - Page 84
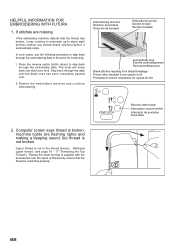
... HELPFUL INFORMATION FOR EMBROIDERING WITH FUTURA
1. Upper thread is not broken.
Restart the embroidery machine and continue embroidering.
The hoop will move back one stitch at...embroidery data. Reverse stitch button Interrupteur couture arrière interruptor de puntadas hacia atrás
82 Computer screen says thread is broken, machine lights are missing
If the embroidery machine...
Instruction Manual - Page 86

... the stitches correctly.
4. Left click, drag a box around the desired letter, and size accordingly. The Futura software will keep the design integrity. Because the letters are built-in the hoop on screen and keep the appropriate density.
84 When sizing designs in the Futura software you have a limitation of the stitching is either too tight or...
Instruction Manual - Page 90

...hoop.
A single hoop appears on cross lines that have been marked onto the fabric. Multi-Hoop
Multi-Hooping is a special feature in the Futura software that will allow embroidery data which is very important to the accuracy of the final outcome of the embroidery. and then sews... hoop or a combination of smaller embroidery elements and/or lettering, that is positioned into the hoop according...
Instruction Manual - Page 92

... appear as the design parts flow out of the embroidery data that is a Center Hoop line which together define the maximum sewing area for sewing.
There are markings which indicates the exact center of the hoop there is built into the hoop, aligning cross lines of data 1 within the guide line markings of markings on the fabric as...
Instruction Manual - Page 94

... borrado
A
B
C
If a mistake is made when entering the points, press the clear button, (twin needle/clear button) to point A on the machine to move the hoop, until the needle comes to clear the point(s). The next screen prompts you to indicate the "cross line" positions of the fabric in the...
Instruction Manual - Page 96

... Envie el diseño
10. The buttons on Exit in the Machine Navigator Box to send design portion of the design from the data 2 area. In a case where the three points were input wrong... an opportunity to enter in the hoop: and the button that is blinking is indicating the point to enter the information from hoop 1 have been entered, the Machine Navigator Box will show the following...
Similar Questions

Keep Getting 'hoop Is Too Small For Design' Error Code
How do I clear the "Hoop is too small for design" error code when the machine stopped while it was s...
How do I clear the "Hoop is too small for design" error code when the machine stopped while it was s...
(Posted by mschatty1 4 years ago)

Embroidery Error 10
After connecting the embroidery arm and turning it on my machine gives me an error #10 and the arm d...
After connecting the embroidery arm and turning it on my machine gives me an error #10 and the arm d...
(Posted by ebroughton36 5 years ago)

Sewing Machine Model 5523 Page 53 In Manual Does Not Show Me How To Attach Pres
The page in your instructions I had and was reading it when it deleted
The page in your instructions I had and was reading it when it deleted
(Posted by ramseyrobert 7 years ago)

Thread Guide Has Come Off My Singer Seqs 6000 Embroidery/sewing Machine.
I cannot figure out how to get the thread guide back on. It came off when the part that holds the ne...
I cannot figure out how to get the thread guide back on. It came off when the part that holds the ne...
(Posted by sharonrn 9 years ago)

Hoop Issues
Software indicates hoop is too small for design. What am I doing wrong?
Software indicates hoop is too small for design. What am I doing wrong?
(Posted by Nanallamas 11 years ago)