Singer Quantum Stylist 9960 Support Question
Singer Quantum Stylist 9960 Support Question
Find answers below for this question about Singer Quantum Stylist 9960.Need a Singer Quantum Stylist 9960 manual? We have 1 online manual for this item!
Question posted by preciouspam9 on November 29th, 2022
How To Solve Bobbin Error When Trying To Spool Bobbin?
I keep getting an error when trying to spool the bobbin on my Singer Quantum 9960, and the bobbin would not spool, how do I solve this problem
Current Answers
Answer #1: Posted by SonuKumar on November 29th, 2022 9:16 AM
SonuKumar

Member since:
May 9th, 2021 Points: 16,633,680

Member since:
May 9th, 2021 Points: 16,633,680
Please respond to my effort to provide you with the best possible solution by using the "Acceptable Solution" and/or the "Helpful" buttons when the answer has proven to be helpful.
Regards,
Sonu
Your search handyman for all e-support needs!!
Related Singer Quantum Stylist 9960 Manual Pages
Instruction Manual 2 - Page 2

... by an authorized service representative.
2 SINGER is a registered Trademark of The Singer Company Ltd. Use only the handle to sunlight directly. This sewing machine is not intended for examination, repair,... area, such as threading needle, changing needle, threading bobbin, or changing presser foot. 15. Always unplug sewing machine from the accumulation of burns, fire, electric shock, or...
Instruction Manual 2 - Page 3

... 84
TWIN NEEDLE SEWING 86 DECORATIVE & LETTER STITCH SEWING ... 88
A. NEEDLE UP-DOWN / SLOW BUTTON 20 D. PRESSER FOOT LIFTER 20 F. PATTERN CHART 24 D. DIRECT STITCH SELECTION BUTTONS 24 E. DECORATIVE & LETTER STITCH BUTTON 24 G. SCROLL BUTTONS 26 K. CURSOR BUTTONS 26 L. INSERTING THE BOBBIN 30
THREADING THE MACHINE 32
A. SETTING SPOOL OF THREAD ON SPOOL PIN 32...
Instruction Manual 2 - Page 8

To get the most modern sewing capabilities, the manufacturer reserves the right to change the appearance, design or accessories of this sewing machine.
Blue: neutral (N) Brown: live (L)
As...your plug, proceed as follows:
EU only EU seulement Sólo para Estados Unidos
1.
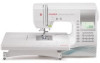
MODEL 9960
PREFACE Thank you for proper use and optimum service. Children should be fitted, or if any other...
Instruction Manual 2 - Page 10
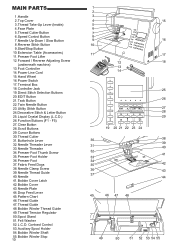
... 43.Needle Plate 44.Drop Feed Lever 45.Pattern Chart 46.Thread Guide 47.Thread Guide 48.Bobbin Winder Thread Guide 49.Thread Tension Regulator 50.Spool Stand 51.Felt Washer 52.L.C.D. MAIN PARTS
1.Handle 2.Top Cover 3.Thread Take-Up Lever (Inside) 4.Face Plate 5.Thread Cutter Button 6.Speed Control Button 7.Needle Up...
Instruction Manual 2 - Page 12
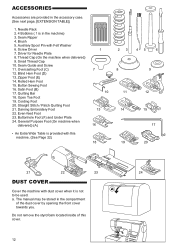
... Hem Foot 15. Button Sewing Foot 16. Open Toe... Auxiliary Spool Pin with dust cover when it is in the machine) 3. Overcasting Foot (C) 12. Darning Embroidery Foot 22. General Purpose Foot (On machine when
... 4 Bobbins ( 1 is not to be stored in the accessory case. (See next page, [EXTENSION TABLE])
1. Seam Ripper 4. ACCESSORIES
Accessories are provided in the compartment
of this machine. ...
Instruction Manual 2 - Page 20
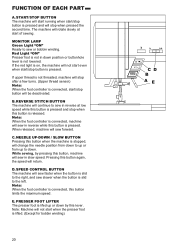
... slow speed. Note: When the foot controller is pressed. E. START/STOP BUTTON The machine will start running when start when the presser foot is slid to the right, and sew slower when the button is lifted. (Except for bobbin winding)
20 If the red light is pressed. NEEDLE UP-DOWN / SLOW BUTTON Pressing...
Instruction Manual 2 - Page 22
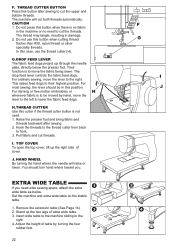
... thicker than #30, nylon thread or other speciality threads. Pull fabric and cut the upper and bobbin threads. J. HAND WHEEL By turning the hand wheel, the needle will cut the threads. You ... plate, directly below . Adjust the height of extra wide table. 3. The machine will raise or lower. For most sewing, the lever should turn hand wheel toward you need to lower the fabric feed...
Instruction Manual 2 - Page 28
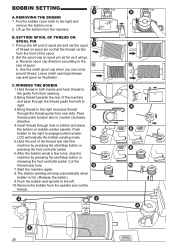
... spindle to the right and
remove the bobbin cover. 2. Cut the thread near hole. 7.Start the machine again. 8.The bobbin winding will go.
b. Pull the bobbin cover latch to the left.
10.Remove the bobbin from left end of spool pin and set the spool of thread on spool pin so that the thread unrolls from front opening...
Instruction Manual 2 - Page 34
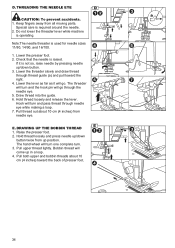
Do not lower the threader lever while machine
is raised. Check that the needle is operating. E. Hold thread loosely and press needle up/down button. 3. Hold thread loosely and release the lever. Pull both upper and bobbin threads about 10 cm (4 inches) from all moving parts.
If it will go through the needle...
Instruction Manual 2 - Page 36
... may tangle, resulting in the machine or no need to draw up the bobbin thread)
36
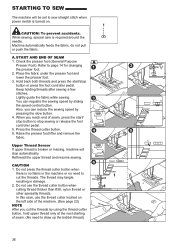
Place the fabric under the presser foot and lower the presser foot. 3.
A. Check the presser foot (General Purpose
Presser Foot). Hold back both threads and press the start / stop button to sew straight stitch when power switch...
Instruction Manual 2 - Page 38
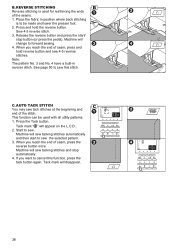
... pedal). Note: The pattern No. 3 and No. 4 have a built-in position where back stitching
is used with all utility patterns. 1. Machine will change to sew. Press and hold reverse button and sew 4-5 reverse stitches.
Press the Tack button.
When you reach the end of seam, press and hold the reverse button.
Start to...
Instruction Manual 2 - Page 42

... decrease the upper thread tension, press the function F4 (-) button.
If after checking the top thread and the bobbin thread is selected, thread tension will return to a slightly weaker tension than when sewing straight stitch. THREAD TENSION
This machine adjusts the thread tension automatically when pattern is decreased. Preset thread tension Upper and...
Instruction Manual 2 - Page 50

...50 Place hand lightly on the fabric while sewing.
3. No. 1. Center needle Position No. 2. Straight Stitch 1. Hold the upper thread and bobbin thread
loosely and start sewing. Straight Stitch With Auto-lock Stitch (Pattern No. 3, 4)
1. B. Machine will sew a few stitches backward and sew a few stitches forward and stop sewing. 4. Position the fabric under the presser foot and...
Instruction Manual 2 - Page 52
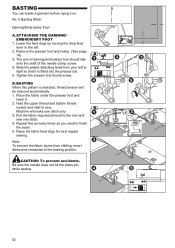
...sewing.
52 Hold the upper thread and bobbin thread
loosely and start to the left to the rear and sew one stitch only. 3. Lower the feed dogs by moving the drop feed lever to sew...You can baste a garment before trying it . 2. BASTING When this as many times as you need to the basting position. ATTACHING THE DARNING/ EMBROIDERY FOOT
1. Machine will be reduced automatically. 1. ...
Instruction Manual 2 - Page 68
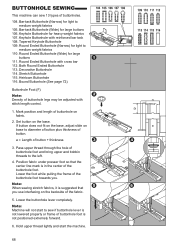
...Heirloom Buttonhole 116. Mark position and length of buttonhole foot and bring upper and bobbin threads to medium weight fabrics
105. Pass upper thread through the hole of buttonhole... may be adjusted with cross bar 112.
BUTTONHOLE SEWING
This machine can sew 13 types of the buttonhole foot. Note: Machine will not start the machine.
68 Round Ended Buttonhole (Narrow) for large
buttons...
Instruction Manual 2 - Page 76
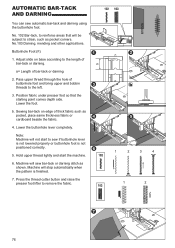
... areas that the starting point comes depth side. b.
Machine will not start the machine.
6. a= Length of bar-tack or darning. Sewing bar-tack on base according to remove the fabric.
1
2
3
4
1
2
76 Adjust slide on edge of buttonhole foot and bring upper and bobbin threads to sew if buttonhole lever is not lowered properly or buttonhole...
Instruction Manual 2 - Page 78
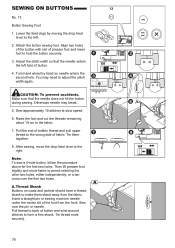
... the first two holes. Attach the button sewing foot. Sew approximately 10 stitches at slow speed.
6. Pull the end of bobbin thread and pull upper thread to the wrong side of presser foot and lower foot to adjust the stitch width again. Insert a straight pin or sewing machine needle under the center slit of button...
Instruction Manual 2 - Page 96
....
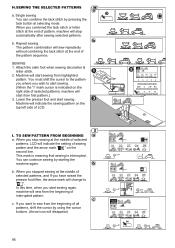
If you start from the beginning of pattern, machine will disappear)
96 Single sewing You can continue sewing by pressing the tack button at the end of interrupted pattern. TO SEW PATTERN FROM BEGINNING a. b. Machine will indicate the sewing pattern on the second line. SEWING 1. When you stop automatically after sewing selected patterns.
This mark is meaning that...
Instruction Manual 2 - Page 102
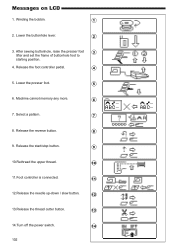
Machine cannot memory any more.
6
7. Release the foot controller pedal.
4
5. Release the reverse button.
8
9. Lower the presser foot.
5
6. After sewing buttonhole, raise the presser foot
3
lifter and set the frame of buttonhole foot to
... power switch.
14
102 Lower the buttonhole lever.
2
3. Select a pattern.
7
8. Winding the bobbin.
1
2. Messages on LCD
1.
Instruction Manual 2 - Page 104

... tight.
Lower the foot.
20
Buttonhole Sewing Mode;
* Buttonhole lever is not balanced. Clean the holder.
100
Machine skips stitches
Needle inserted incorrectly. bobbin holder and clean the
hook race and feed dog. HELPFUL HINTS
PROBLEM CAUSE
CORRECTION
Page
Machine not properly threaded. loose stitches or Machine not properly threaded.
Choose correct thread...
Similar Questions

Function Buttons Not Working.
I am just learning this QS 9960. The function buttons do nothing when I press them. I want to adjust...
I am just learning this QS 9960. The function buttons do nothing when I press them. I want to adjust...
(Posted by lrcampbell 1 year ago)

Machine Randomly Stops
machine randomly stops sewing and beeps. Start/stop button turns red and then tells me the presser f...
machine randomly stops sewing and beeps. Start/stop button turns red and then tells me the presser f...
(Posted by kswillie 1 year ago)

My 9960 Not Sewing
My 9960 turns on but does not make the self adjusting sound it used to on startup and it will not se...
My 9960 turns on but does not make the self adjusting sound it used to on startup and it will not se...
(Posted by cyn57 1 year ago)


I Get E7 Error Message On My Singer Model 7258 Sewing Machine. There Is No Refe
Error message E7 is up on my Singer Stylist model 7258 sewing machine. It is not working at all. I t...
Error message E7 is up on my Singer Stylist model 7258 sewing machine. It is not working at all. I t...
(Posted by ebellamybellamy9 5 years ago)