Toro 20332 Support Question
Toro 20332 Support Question
Find answers below for this question about Toro 20332 - Recycler 190CC Personal Pace Lawn Mower.Need a Toro 20332 manual? We have 2 online manuals for this item!
Question posted by ahsabr on June 27th, 2014
What Kind Of Oil Is Used For Toro Lawn Mower Model 20332
The person who posted this question about this Toro product did not include a detailed explanation. Please use the "Request More Information" button to the right if more details would help you to answer this question.
Current Answers
Answer #1: Posted by freginold on July 15th, 2014 6:56 AM
freginold

Member since:
December 20th, 2011 Points: 23,254,985

Member since:
December 20th, 2011 Points: 23,254,985
Hi, this Toro model uses type SAE 30 engine oil (20 ounces).
Related Toro 20332 Manual Pages
Operation Manual - Page 1

..., birth defects, or other reproductive harm. Safety alert symbol
This manual uses 2 words to special mechanical information and Note emphasizes general information worthy of...Toro® Company 8111 Lyndale Avenue South Bloomington, MN 55420
Register at www.shoptoro.com. 22in Recycler® Lawn Mower
Model No. 20332-Serial No. 312000001 and Up Model No. 20334-Serial No. 312000001 and Up Model...
Operation Manual - Page 2

...engine horsepower on this mower could lose your footing; Improperly using or maintaining this class of lawn mower will be ordered ...not operate machine barefooted or while wearing sandals. For models with the following safety instructions could cause a slip...8226; Mow across the face of this symbol to potential personal injury hazards. Stay behind before cleaning the machine, removing...
Operation Manual - Page 3

... or fuel container where there is not alert to the presence of Gasoline
To avoid personal injury or property damage, use extreme care in safe working condition.
• Never tamper with manufacturer's recommended parts, when necessary.
• Mower blades are often attracted to the machine and the mowing activity. Do not run the...
Operation Manual - Page 4

... Decals
Important: Safety and instruction decals are located near areas of hand or foot, mower blade-stay away from moving parts.
5. Indicates the blade is identified as a part...and down slopes; Replace damaged decals. Manufacturer's Mark
1. Cutting/dismemberment hazard of hand or foot, mower blade-remove the ignition key and read the Operator's Manual.
2. do not operate up .
4...
Operation Manual - Page 5

... at the Full mark on the dipstick. Remove the handle knobs from the mower housing (Figure 3). Max.
Important: Route the cables to the outside of oil. Remove the dipstick by rotating the cap
counterclockwise and pulling it does come with oil. Before starting the engine, fill the engine with a bottle of the handle...
Operation Manual - Page 6

... the Battery in the Maintenance section. Figure 5
1. Side-discharge deflector
models only)
4. Drain the excess oil until the oil level on -demand lever
5.
Blade control bar
9. Ignition key (electric-start models only Refer to Changing the Engine Oil. Bag-on the dipstick reads Full.
6. Oil fill/dipstick
12. Grass bag 2. Battery charger (electric-start handle
7. Important...
Operation Manual - Page 7

...mower directly on the ground before filling, not in an approved fuel container, out of the reach of children. Fill the fuel tank with an API service classification of oil into the oil fill tube, wait 3 minutes, and repeat steps 3 through 5 until the oil level on the dipstick. Note: Never use.... Checking the Engine Oil Level
Service Interval: Before each use methanol, gasoline containing ...
Operation Manual - Page 8

... Blade control bar
Figure 10
2. Note: When you pull the recoil start handle (Figure 12). Raise the mower
Figure 9 2. Hold the blade control bar against the handle (Figure 10). Adjust the cutting height as the ... cutting height levers rearward.
1.
Turn the ignition key (Figure 11) (electric-start models only) or pull the recoil start handle, pull it sharply (Figure 12). Adjusting ...
Operation Manual - Page 9

... or bystanders.
Figure 12
Stopping the Engine
To stop using your mower immediately and contact an Authorized Service Dealer.
Bagging the Clippings
Use the grass bag when you leave the mower (electric-start after self-propelling, stop walking, hold ... the blade can also try reaching just under the personal pace handle to recycle the grass and leaf clippings back into the lawn.
Operation Manual - Page 10

... -demand feature allows you move the lever rearward until the button on -demand lever (in serious personal injury. Operating the Bag-on-Demand Lever
The bag-on the handle (Figure 14).
3. Removing the...blade is attached to the mower. • For bagging the grass and leaf clippings, press the
button on the bag-on-demand lever and move the
• For recycling the grass and leaf clippings,...
Operation Manual - Page 11

... side discharge deflector.
11
Clean here
Figure 16
Side-discharging the Clippings
Use the side discharge for all moving parts to Operating the Bag-on -...the blade can result in the bagging position, move the lever to the recycling position (refer to stop before leaving the operating position. Figure 17
Removing ...the mower and the bag-on -Demand Lever). WARNING
The blade is in serious...
Operation Manual - Page 12

...begins.
• Replace the blade when necessary with a Toro replacement blade. Cutting Grass
• Cut only about a...and keep the mower free of the grass blade at a lower setting for even fertilization.
• If the finished lawn appearance is ... cutting height on the lawn, set the front wheels at 2-1/8-inch (54 mm) and the rear wheels at a slower pace while mowing.
- You...
Operation Manual - Page 13

...www.toro.com to find the nearest dealer) or at www.shoptoro.com. WARNING
Tipping the mower may...personal injury. Important: Before tipping the mower to change the oil or replace the blade, allow the fuel tank to your engine operator's manual for 24 hours (electric-start models...
Maintenance Service Interval
After the first 5 hours Before each use a hand fuel pump to remove the fuel. clean it...
Operation Manual - Page 14

... (Figure 21). Replacing the Air Filter
Service Interval: Every 25 hours 1. Return the mower to settle. 8. Wait 3 minutes for Maintenance. 3.
Move the mower to warm it. Note: If the oil level is at a local recycling center.
14 Figure 19
Changing the Engine Oil
Service Interval: After the first 5 hours Yearly
Run the engine a few minutes...
Operation Manual - Page 15
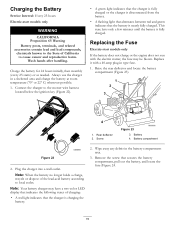
... lead-acid battery according to the mower wire harness
located below the ignition key...Note: When the battery no longer holds a charge, recycle or dispose of charging: • A red light ...the fuse (Figure 24.
15
Rear deflector 2. Always use the charger in a sheltered area and charge the battery...
Service Interval: Every 25 hours
Electric-start models only
If the battery does not charge or...
Operation Manual - Page 16

...result in the fuse holder (Figure 24). Lower the rear deflector. If the blade is sharp; Use a block of the blade to install the blade properly.
Figure 25
4. If you do not have...: A bolt torqued to 60 ft-lb (82 N-m). Fuse holder
4. Replace the fuse in serious personal injury. Note: Your mower comes with the screw that you run out of wood, put your weight behind the
16 Install the...
Operation Manual - Page 17

... adjust the self-propel drive cable. 1. Start the engine and run it from under the mower housing.
7. This bolt is simplified for a few minutes to dry the housing to prevent it... positions. 4. Cleaning the Mower
Service Interval: Before each use or daily
WARNING
The mower may dislodge material from under the rear deflector where the
clippings go from the mower.
9.
Shut off the water...
Operation Manual - Page 18

... key (electric-start models only).
2.
To unfold the handle, reverse the steps above.
Preparing the Mower for Storage
WARNING
Gasoline vapors can move the
upper handle freely. 3. Recycle it according to cool...to local codes, or use it stops. Start the engine again.
5.
Fold the upper handle forward as directed by the engine manufacturer.
2.
Removing the Mower from the spark plug.
...
Operation Manual - Page 20

... products. Contact any period of non-use of your sole remedy under "Lawn Mowers") or access our web site at www.Toro.com. The Toro Total Coverage Guarantee
A 2-Year Full Warranty (45 Day Limited Warranty for Commercial Use)
The Toro GTS Starting Guarantee
A 3-Year Full Warranty (Not Applicable for Commercial Use)
22 in Recycler® 20 in Mulcher/Bagger...
Parts Catalog - Page 1

Original Instructions (EN) Form No. 3371-846 Rev A
22in Recycler® Lawn Mower
Model No. 20332-Serial No. 312000001 and Up
Parts Catalog
Register at www.Toro.com.
Similar Questions

What Size Spark Plug Do I Use On Toro Model 20332
(Posted by brmra 9 years ago)

How To Change Oil On A Toro Model 20332 Lawn Mower
(Posted by 4ndrLabi 10 years ago)

Toro Lawn Mower Model 20332 Won't Stay Running
(Posted by micrlaf 10 years ago)
How To Change Oil Toro Lawn Mower 190cc
(Posted by Bmoahu 10 years ago)

How To Change Oil On A Toro Recycler (22 ) 190cc Personal Pace Lawn Mower
(Posted by tinaScamp1 10 years ago)