Toro 20332 Support Question
Toro 20332 Support Question
Find answers below for this question about Toro 20332 - Recycler 190CC Personal Pace Lawn Mower.Need a Toro 20332 manual? We have 2 online manuals for this item!
Question posted by jsmith9723 on August 11th, 2013
New Mower Wont Start.no Manual With This One,refurbished From Galveston Store
The person who posted this question about this Toro product did not include a detailed explanation. Please use the "Request More Information" button to the right if more details would help you to answer this question.
Current Answers
Answer #1: Posted by tintinb on August 18th, 2013 7:34 PM
tintinb

Member since:
October 26th, 2012 Points: 7,056,550

Member since:
October 26th, 2012 Points: 7,056,550
You can actually view or download the manual and parts catalog of your Toro 20332 here at HelpOwl. Here's the link:
http://www.helpowl.com/manuals/Toro/20332/22959
If you have more questions, please do not hesitate to ask here at HelpOwl. We are always willing to help you by providing the best answers to solve your problem.
Regards,
TinTin
Related Toro 20332 Manual Pages
Operation Manual - Page 1

...of your product properly and to operate and maintain your product ready.
This manual identifies potential hazards and has safety messages identified by residential homeowners.
You are...other reproductive harm.
Whenever you do not follow the recommended precautions.
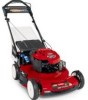
22in Recycler® Lawn Mower
Model No. 20332-Serial No. 312000001 and Up Model No. 20334-Serial No. 312000001 ...
Operation Manual - Page 2

...Read and understand the contents of lawn mower will be thrown by the manufacturer. Material may be sure of alcohol or drugs.
• Never operate mower in the manual(s) before and while moving backward... Always look down . never run.
• Disengage the drive system, if so equipped, before starting .
• Do not put hands or feet near drop-offs, ditches, or embankments. Exercise...
Operation Manual - Page 3

... the machine. Service
Safe Handling of Gasoline
To avoid personal injury or property damage, use extra caution when servicing ... recommended parts, when necessary.
• Mower blades are often attracted to cool before starting .
• Check grass catcher components and....
• Never refuel the machine indoors.
• Never store the machine or fuel container where there is an open device....
Operation Manual - Page 4

Replace damaged decals. Cutting/dismemberment hazard of hand or foot, mower blade-do not discard. 2. and look behind you when backing up and down slopes; Read the Operator's Manual.
1. stop the engine before servicing or performing maintenance.
4. Indicates the blade is identified as a part from the machine.
3. do not operate up .
4 Warning-read...
Operation Manual - Page 5

...with oil in step 1 .
1.
Before starting the engine, fill the engine with a bottle of oil in the crankcase, then do the following: 1. Move the mower to the operating position. 3. Max. ...that you install the handle.
2
Filling the Engine with Oil
No Parts Required
Procedure
Important: Your mower does not come with oil.
Note: When the crankcase is at the Full mark on the ...
Operation Manual - Page 6

... 2. Side discharge chute
3. Important: Change the engine oil after the first 5 operating hours; Refer to Charging the Battery in the Maintenance section. Battery charger (electric-start 10. Drain the excess oil until the oil level on -demand lever
5. Install the dipstick into the oil fill tube securely. Washout port (not shown...
Operation Manual - Page 7

...when smoking or around an open flame or sparks.
• Store gasoline in a vehicle or on the dipstick. Checking the Engine ...% ethanol because the fuel system could be damaged.
Important: To reduce starting problems, add fuel stabilizer to a level surface. 2. A fire or... dipstick fully into the oil fill tube securely. Move the mower to the fuel all season, mixing it with oil and ...
Operation Manual - Page 8

... the front cutting height levers rearward and the rear cutting height levers forward. Note: When you pull the recoil start handle (Figure 12). Lower the mower
Note: The cutting height settings are 1 inch (25 mm); 1-3/8 inches (35 mm); 1-3/4 inches (44 mm); 2-1/8 inches (54 mm); 2-1/2 inches (64 mm); 2-7/8 inches (73 mm); 3-1/4 inches (...
Operation Manual - Page 9

... lever is in serious personal injury or death to the operator or bystanders.
Installing the Grass Bag
1. Raise and hold your sides, and the mower will automatically keep pace with you leave the mower (electric-start after self-propelling, stop using your hands on -demand lever is on -Demand Lever) before recycling the clippings. Figure 13...
Operation Manual - Page 10

... blade is attached to the mower. • For bagging the grass and leaf clippings, press the
button on the bag-on-demand lever and move the
• For recycling the grass and leaf clippings,...in bagging position)
1. Install the grass bag, ensuring that the pins on the bag rest in serious personal injury. contacting the blade can result in the notches on the handle (Figure 14).
3. Notches 2. ...
Operation Manual - Page 11

WARNING
The blade is in serious personal injury. If the grass bag is on the mower and the bag-on-demand lever is sharp;
contacting the blade can result in the bagging position, move the lever to the recycling position (refer to stop before leaving the operating position. Figure 17
Removing the Side Discharge...
Operation Manual - Page 12

...the spark plug, and examine the mower for damage.
• For best performance, install a new blade before the cutting season begins.....
• If the mower strikes an object or starts to stall.
- Cutting Leaves
• After cutting the lawn, ensure that the blade...cm) tall, mow at a slower pace while mowing.
- Wet grass and leaves tend to slow down your mower.
- You may plug and cause ...
Operation Manual - Page 13

... fuel to stop.
2.
Important: Refer to run dry through normal usage.
Important: Before tipping the mower to change the oil or replace the blade, allow the fuel tank to your engine operator's manual for 24 hours (electric-start models only).
• Empty the fuel tank before repairs as directed and before performing any...
Operation Manual - Page 14

... Figure 21
5. Insert the dipstick fully into the oil fill tube securely. 12. Tip the mower onto its side with the air filter up to settle. 8. Warm oil flows better and carries ...the crankcase with a clean cloth. 9. Return the mower to warm it. Wait 3 minutes for Maintenance. 3. Note: If the oil level is at a local recycling center.
14 Replacing the Air Filter
Service Interval:...
Operation Manual - Page 15
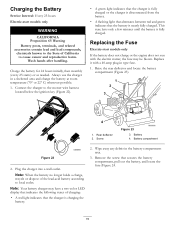
...battery for 24 hours initially, then monthly (every 25 starts) or as needed. Screw
Figure 23
3. Note: When the battery no longer holds a charge, recycle or dispose of charging: • A red light ...color LED display that indicates the following states of the lead-acid battery according to the mower wire harness
located below the ignition key (Figure 22).
• A green light indicates ...
Operation Manual - Page 16

... up. 3.
WARNING
The blade is damaged or cracked, replace it . Tip the mower onto its side with a spare fuse in step 3. 6. Use a torque wrench... the new blade and all mounting hardware (Figure 25).
5. If the blade edge is very tight.
Important: A bolt torqued to point toward the mower housing. 6. Fuse
Figure 24
G017398
2. Replace the fuse in serious personal injury....
Operation Manual - Page 17

...deflector where the
clippings go from the housing to prevent it from the mower.
9. Start the engine and run it for the purpose of adjustment, adjust the self-propel drive...before storing the mower in both the fully forward and fully rearward positions. 4. Lower the mower to Adjusting the Cutting Height. 2.
For best results, clean the mower soon after you install a new self-...
Operation Manual - Page 18

...Recycle it according to the outside of the handle knobs as you can explode.
• Do not store gasoline more than 30 days.
• Do not store the mower in an enclosure near an open flame.
• Allow the engine to run until you must store the mower... the battery for 24 hours (electric-start model only). 2. Storage
Folding the Handle
Store the mower in an unheated area. On the last...
Operation Manual - Page 20

...purchase:
Products
22 in Recycler and 20 in item #3 to obtain guarantee policies for indirect, incidental, or consequential damages in the Operator's Manual have purchased Toro products...routine maintenance, whether performed by a dealer or by you are having difficulty starting your sole remedy under "Lawn Mowers") or access our web site at Toro Warranty Company.
*Residential purposes ...
Parts Catalog - Page 1

Original Instructions (EN) Form No. 3371-846 Rev A
22in Recycler® Lawn Mower
Model No. 20332-Serial No. 312000001 and Up
Parts Catalog
Register at www.Toro.com.
Similar Questions

Brand New Toro Wont Start Model 20334
(Posted by GaJe 10 years ago)

Toro Recycler Personal Pace Lawn Mower Wont Start
(Posted by barnejon 10 years ago)

Toro Personal Pace Lawn Mower Wont Move
(Posted by herje 10 years ago)

How To Change Oil On A Toro Recycler (22 ) 190cc Personal Pace Lawn Mower
(Posted by tinaScamp1 10 years ago)

Blade For Model 20037 Personal Pace Lawn Mower
where can i buy a replacement 21 inch bladefor my 2003 Toro model 20037 personal Pace lawn mower???
where can i buy a replacement 21 inch bladefor my 2003 Toro model 20037 personal Pace lawn mower???
(Posted by lynnegrede 12 years ago)