Via EPIA ME6000 Support Question
Via EPIA ME6000 Support Question
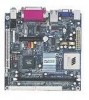
Find answers below for this question about Via EPIA ME6000 - VIA Motherboard - Mini ITX.Need a Via EPIA ME6000 manual? We have 1 online manual for this item!
Question posted by debbiekaikaka on February 8th, 2014
Why Are None Of The Questions On The Material I Studied In Class
I am concerned as I have not gotten any quesions that I have been studying for the past week from the school class and prep class for sales associate on your questions??? I dont want to waist time as my test is next week? Can you please get back to me.
Current Answers
Related Via EPIA ME6000 Manual Pages
User Manual - Page 3

... not installed and used in a commercial environment. Operation of the FCC rules.
Notice 1
The changes or modifications not expressly approved by the party responsible for a class B digital device, pursuant to part 15 of this equipment in a residential area is operated in order to comply with the emission limits.
User Manual - Page 8

... comes with an embedded VIA Processor, boasting ultra low power consumption and cool, quiet operation. Chapter
1
Specifications
The ultra-compact and highly intergrated VIA EPIA-M Mini-ITX Mainboard is the smallest form factor mainboard specification available today, developed by VIA Technologies, Inc. This chapter includes the following sections:
Mainboard Specifications
1-2
Mainboard...
User Manual - Page 10

...-in; can be switched to 6 channel
output with Smart 5.1 (See Appendix A)
BIOS
• AwardBIOS with 2 / 4Mbit flash memory
Form Factor
• 17 cm X 17 cm Mini-ITX (4 layers)
1-3
User Manual - Page 15

... GND. FAN3 is correctly installed as shown.
2-2 Ensure that the red wire is Ground and should be connected to the +12V. Chapter 2
CPU
The VIA EPIA-M Mini-ITX Mainboard includes an embedded VIA Eden Processor or VIA C3TM E-Series Processor. When connecting the wire to the connectors, always be aware that the CPU...
User Manual - Page 16

Installation
Warning: This motherboard is not recommended. Any attempt to support overclocking. The VIA Eden Processor
Providing ultra-low power consumption and advanced thermal dissipation properties, the VIA Eden ...
User Manual - Page 17

... slot outwards. 2. The modules will only fit if placed in place (see picture below).
2-4 DDR SDRAM Module Installation Procedures
1. Chapter 2
Memory Module Installation
The VIA EPIA-M Mini-ITX Mainboard provides one 184-pin DIMM slot for DDR266 SDRAM memory modules.
User Manual - Page 19

... the power supply are inserted in the proper orientation and the pins are installed correctly to be caused. Chapter 2
Connecting the Power Supply
The VIA EPIA-M Mini-ITX Mainboard requires an ATX power supply to ensure that all components are correctly aligned.
User Manual - Page 31

...
35 GND
36 GFPD21
37 5V
38 GFPD22
39 5V
40 GFPD23
LVDS
2-18 The LVDS connector may not be available on your vendor or sales contact for more
information. This is an option that is added during the manufacturing process. Chapter 2
LVDS Module Connector: LVDS (Optional)
This connector allows you...
User Manual - Page 32

... on the dual-purpose port. Clear CMOS: CLEAR_CMOS
The onboard CMOS RAM stores system configuration data and has an onboard battery power supply. If you want to the 2-3 pin position. Jumpers
Installation
The mainboard provides jumpers for your mainboard's functions through the use the CLEAR_CMOS (Clear CMOS jumper). This section will...
User Manual - Page 39

Date -
Drive A/B
Set the type of the week, for all non-key errors. Settings are:
All Errors
System halts when any error.
Day - Read-only. the month from 1999 to 2098. Time
The time format is detected. the year, range from Jan to 31.
day of floppy drive installed. All, But Disk/Key System...
User Manual - Page 41

... warning message display on screen. Settings: Enabled and Disabled
Quick Power On Self Test
Shorten Power On Self Test (POST) cycle and enable shorter bootup time. Facilitates error detection/correction when data passes through Level 2 cache. Settings: Enabled and
Disabled
3-8
User Manual - Page 43

System
A password prompt appears every time when the computer is enabled, this item allows you enter Setup. Settings: Enabled and Disabled
...Settings: 6, 8, 10, 12, 15, 20, 24 and 30
Typematic Delay (Msec)
When Typematic Rate Setting is required every time the System boots, or only when you to select the delay between when the key was first pressed and when the acceleration begins...
User Manual - Page 48

...This field is only available if Onboard Fast IR is used . Disable the controller if you want to use other controller cards to connect to an audio device. Settings: 6, 5
3-15 if... if not, it is disabled. Settings: Auto and Disabled
VIA OnChip LAN
This setting allows you want to use other controller cards to connect to a modem. Settings: Enabled and Disabled
Onboard Fast IR...
User Manual - Page 52

...Delay 4 Sec Instant-Off
The system is only necessary for more than four seconds. BIOS Setup
HDD Power Down
Set the time to run VGA BIOS if resumed from S3 state.
Power Off by PWRBTN
This field configures the power button function. This ...button is turned off buttton. Settings: Disabled and 1~15 (minutes)
Power Management Timer
Set the idle time before system enters power saving mode.
User Manual - Page 54

... and Enabled RTC Alarm Resume The field is used to wake-up the system on a scheduled time/date. BIOS Setup PS2KB Wakeup from suspend Select which Hot-Key to enable or disable the feature... up the system or resume from suspend state. Resume Time (hh:mm:ss) This field can wake the system from suspend state. The field specifies the time for RTC Alarm Resume. Settings: Disabled, Ctrl+F1,...
User Manual - Page 60

...item adjusts the speed it to a higher setting. Settings: 2, 2.5
3-27 This field is only available when DRAM Timing is not recommended unless you should change it takes for the memory module to Manual. Changing the value from the factory...frequency. Settings: 66 MHz, 100 MHz, 133 MHz, and
By SPD
DRAM Timing
The value in this field depends on the memory modules installed in your system.
User Manual - Page 61

... setting equals faster command rate. Settings: 4,
8
3-28 Longer values are safer but may not offer the best performance. This field is only available when DRAM Timing is set to Manual. Settings:
2T, 3T
DRAM Command Rate
This field controls how fast the memory controller sends out commands. Longer settings equals better...
User Manual - Page 65

... enter the password. There are prompted to eight characters in length, and press Enter. To clear a set , you will be prompted to enter it every time you can enter Setup without entering any part of passwords you try to abort the selection and not enter a password. A Supervisor password and a User password...
User Manual - Page 66

... determine when the password prompt is required is booted. BIOS Setup Additionally, when a password is enabled, you can also have BIOS to request a password each time the system is the Security Option of your computer. If set to System, the password is required both at boot and at entry to enter...
User Manual - Page 67

A message as below will appear on the screen:
Entering Y will return to the Setup Utility.
3-34 Chapter 3
Save & Exit Setup
When you want to quit the Setup menu, you to quit the Setup Utility and save the changes and quit. Entering N will allow you can select this option to save the user setup changes to RTC CMOS.
Similar Questions

How An A Teen Make Money Online?
(Posted by RevyThe2Hands 11 years ago)

Where can I find VIA Technologies motherboard warranty information?
After a few months, my VIA Technologies motherboard stopped working on me. I think it is still under...
After a few months, my VIA Technologies motherboard stopped working on me. I think it is still under...
(Posted by Anonymous-11446 14 years ago)