
Weider Pro 9940 Support Question
Weider Pro 9940 Support Question
Find answers below for this question about Weider Pro 9940.Need a Weider Pro 9940 manual? We have 1 online manual for this item!
Question posted by pgreen337 on August 24th, 2022
Cable Broke For Leg Lift
were can i get a new cable for leg lift
Current Answers
Answer #1: Posted by helpowl1989 on November 4th, 2023 3:17 PM
helpowl1989

Member since:
July 21st, 2015 Points: 7,130

Member since:
July 21st, 2015 Points: 7,130
The best place to start is the manufacturer's website. Most fitness equipment manufacturers sell spare parts for their machines, including cables. If you can't find the part listed online, you can usually find contact information for their customer service, and they can assist you in ordering the right cable. Also, Websites like Amazon, eBay, or specialized fitness equipment parts suppliers might have the cable you need.
Regards,
Rachel
Where every question meets its answer
Related Weider Pro 9940 Manual Pages
English Manual - Page 2
... immediately and make sure the cables are on a foot plate when performing an exercise that could cause the home gym to ensure that does not use of this manual. Never release the press arms, butterfly arms, leg lever, lat bar or ab strap while weights are attached in a commercial, rental or institutional setting...
English Manual - Page 3

... Seat
Low Pulley Station
Foot Plate
Weight Stacks
Leg Press Lever
3 HELPLINE at 1-800-736-6879, Monday through Saturday, 7 a.m. For your cardiovascular system, the WEIDER® PRO 9940 makes it easy to familiarize yourself with the major parts and how they fit together. The WEIDER® PRO 9940 offers a unique selection of weight stations designed to...
English Manual - Page 4

...each assembly stage to open the parts bag labeled for each stage are exercising. Cable Assembly This assembly completes the cables and pulleys that our products can be assembled successfully by anyone. Arm ...; Tape, such as clear tape or masking tape
Assembly will be sure that support your new equipment is not in the shipping box. Identifying Parts To help you identify the small parts...
English Manual - Page 6
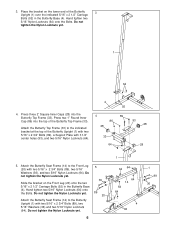
...Locknuts (64). Hand tighten two 5/16" Nylon Locknuts (64) onto the Bolts. 3.
Attach the Butterfly Seat Frame (14) to the Front Leg (20) with two 5/16" x 2 3/4" Bolts (89), two 5/16" Washers (36) and two 5/16" Nylon Locknuts (64).
Press... Locknuts yet.
1
64
4 92
4. Place the bracket on the Front Leg (20) onto the two 5/16" x 2 1/2" Carriage Bolts (92) in the Butterfly Base (4).
English Manual - Page 7
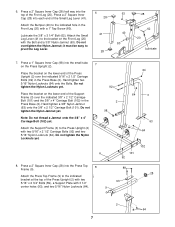
... indicated 3/8" x 2 1/2" Carriage Bolt (101) and the 3/8" x 4" Carriage Bolt (102) in the Front Leg (20) with two 5/16" x 2 1/2" Carriage Bolts (92) and two 5/16" Nylon Locknuts (64). ... Do not overtighten the Nylon Jamnut; Press a 2" Square Inner Cap (28) into the small tube
7
on the Front Leg (20) with 3 1/2"
93
center holes (93), and two 5/16" Nylon Locknuts (64).
9
2 64
7
Hand...
English Manual - Page 8

...(16) onto the Weight Guides (15). Hand tighten two 5/16" Nylon
28
Locknuts (64) onto the Bolts. Attach the Leg Press 10 Lever (83) to the Press Base (6) with two 5/16" x 2 3/4" Bolts (89), two 5/16"
...and a 3/8" Nylon Locknut (50). Note: Make sure the Top Weight is turned so the groove fits over the indicated holes in the Weight Base (5). 9.
Slide the Weight Tube into each of the Short...
English Manual - Page 9

Note: Make sure the Top Weight is turned so the groove fits over the indicated
12
holes in the Weight Base (5). Attach the Weight Top Frame (66) to the Butterfly Top Frame (33) with two 3/8" x 2 3/4" Bolts (46), a Support Plate with a Cable Trap (25) onto a 3/8" x 4" Bolt (78). Do not tighten the Nylon Locknuts yet...
English Manual - Page 11

...
Repeat this step to the bracket on top of the Right Butterfly Arm (11). Wrap the Butterfly Cable (73) around a "V"-Pulley (27) in the inset drawing. Lubricate the indicated axle on pages ... the axle. Locate and open the parts bag labeled "CABLE
19
ASSEMBLY." Note: Place the Retainer Rings on the back of the Pro Pulley. Leave the remaining pulleys in the bag for
identification...
English Manual - Page 12

...end and a threaded
shaft on the other. Wrap the Butterfly Cable (73) around a 3 1/2" Pulley (24) in the direction shown. Identify the Ab Cable (74). Attach the Pulley to the indicated hole in the ...Bracket (22) with the ball.
59 48
Wrap the Ab Cable (74) around a 3 1/2" Pulley (24) in the direction shown. Attach the Butterfly Cable (73) to the bracket on the Upright.
47
Pin
74...
English Manual - Page 15

... the Bolt, since you will later
attach another Pulley to the lower hole in the cable guide on the other. Route the Low Pulley Cable (75) under a Pro Pulley (26) as shown.
60 1
24 25 63
75
33.
Remove a Pro Pulley (26) from the
34
3/8" x 4 3/4" Bolt (60) inserted into the Butterfly
Upright (1) in the...
English Manual - Page 16
...
2
25 24 72
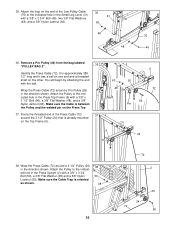
59 Attach the Pulley to the indicated hole in the Small Leg Lever (41)
41
with a 3/8" x 3 3/4" Bolt (59), a 3/8" Flat Washer (48) and a 3/8" Nylon Locknut (50). Remove a Pro Pulley (26) from the bag labeled "PULLEY BAG 2".
36
Identify the Press Cable (72). Attach the loop on the Press Top
37. 35.
English Manual - Page 17

...tube, last hole
27 62
32 72
62
48 72 8
24
50
42. Make sure the
Cable Trap is oriented as shown. Please make sure that you will later
attach another Pulley to the ...x 3 1/4" Bolt (62), a 3/8"
Flat Washer (48) and a 3/8" Nylon Locknut (50).
Make sure the Cable Trap is mounted on the far side
of
40
the Press Frame. Note: The small tube has four adjustment holes. Then,...
English Manual - Page 18

... 83
60 25
50
24 8
72 63
46. 43. Wrap the Press Cable (72) around a 3 1/2" Pulley
43
(24) in the hole closest to near side of the Leg Press Lever (83) with the 3/8" Nylon
2
Jamnut (63). Attach the Pulley and a
Cable Trap (25) to the near side of the Press Upright (2). Mount the...
English Manual - Page 19

...Locknut (64). Note: Do not completely tighten the Nylon Locknut; Route the threaded end of the Press Cable (72) to
49
the remaining "U"-Bracket (97) with
a 3/8" x 1 3/4" Bolt (57) and a 3/8" Nylon ...Locknut
(50). Attach the threaded end of the Press Cable (72)
47
around the 3 1/2" Pulley (24) that the cables and the pulleys move smoothly.
72
72
68 97
72
97 96
70
64...
English Manual - Page 22
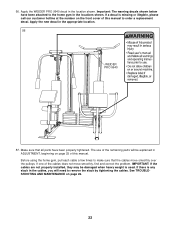
... weight is any slack in the cables, you will need to order a replacement decal. Apply the new decal in the location shown. IMPORTANT: If the cables are not properly installed, they may...to make sure that the cables move smoothly, find and correct the problem. Important: The warning decals shown below have been properly tightened. Apply the WEIDER PRO 9940 decal in the appropriate ...
English Manual - Page 25

... Plate
To adjust the position of the Leg Press Plate (55), pull out
the Lock Pin (91) and slide the Adjustment Tube (90)
backwards or forwards in the correct starting position for each exercise. Refer to the exercise poster accompanying this manual to the cables and pulleys, the amount of resistance at each weight...
English Manual - Page 26

... (105), remove the 2" Square Inner Cap (28) from the Adjustable Pulley Plates (23). Remove the cable and re-install it fur- Remove the Cable Trap (25) and Pulley from the Front Leg (20) and insert the Curl Post (104) into the Front Leg. There are still too loose, move the other Pulley until the...
English Manual - Page 27

... (lbs.)
16 37 58 79 100 121 142 163 184 205 226
Leg Press (lbs.)
21 48 75 101 128 155 181 208 235 262 ...Cable (72) can also be tightened by using the Adjustable Pulley Plates (23) as described on the previous page.
top weight;
Tighten the 1/4" Nylon Locknut (68) at each exercise station. All three cables will go. The Butterfly Cable (73), the Ab Cable (74), and the Low Pulley Cable...
English Manual - Page 30

...16
Cable Trap
79
5
1/4" x 2 1/2" Bolt
26
2
Pro Pulley
80
1
1" Tap Screw
27
4
"V"-Pulley
81
1
Ab Strap
28 13
2" Square Inner Cap
82
2
4 1/2" Pulley
29
2
Butterfly Foam Pad
83
1
Leg ...
52
1
3/8" x 8" Bolt
#
1
User's Manual
53
2
3/8" x 2 1/2" Bolt
#
1
Exercise Poster
54
4
3/8" x 2" Bolt
Note: "#" indicates a non-illustrated part. Qty. Description
Key No...
English Manual - Page 32

... MODEL NUMBER of the product (831.159730)
• The NAME of the product (WEIDER® PRO 9940 Home Gym)
• The KEY NUMBER and DESCRIPTION of the PART (see the PART LIST/EXPLODED ... and SEARS will repair or replace the WEIGHT SYSTEM EXERCISER, free of this manual).
When requesting help assembling or operating the WEIDER® PRO 9940 Home Gym
• a part is used commercially ...
Similar Questions

I'm Looking To Order Complete Cables To The Weider Pro 9940
(Posted by Hef2324 1 year ago)

It Is Alot Harder To Use The Leg Lift. 20 Pounds Seems Like 50 Pounds
it is alot harder to use the leg lift like something is binding it. The cable is set in all the pull...
it is alot harder to use the leg lift like something is binding it. The cable is set in all the pull...
(Posted by Jlstultz54 2 years ago)

Cables Slack
My Weider pro 9940 cables on leg press go slack and the wieght will not return to the stack when try...
My Weider pro 9940 cables on leg press go slack and the wieght will not return to the stack when try...
(Posted by ljhartsock 6 years ago)
Cant Find Cable For Leg Press Machine 9645 Can You Help Its 64 Inch Long
[email protected]
[email protected]
(Posted by wilbertblackmon 7 years ago)
