Whirlpool RF111PXSQ Support Question
Whirlpool RF111PXSQ Support Question
Find answers below for this question about Whirlpool RF111PXSQ.Need a Whirlpool RF111PXSQ manual? We have 4 online manuals for this item!
Question posted by debbenedetti on May 26th, 2014
Burner Comes On When Oven Is On
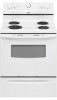
I have a model RF111PXSQ electric range. Now when I turn on my oven the back left burner turns on. This never happened before. I turned off everything and let the burners cool. Turned on the oven again the burner again got hot.
Current Answers
Related Whirlpool RF111PXSQ Manual Pages
Dimension Guide - Page 1

... cm) min. opening width C.
Outlet - 8" (20.3 cm) to the proper electrical voltage and frequency as specified on the left side frame behind the storage drawer panel. Dimensions are for planning purposes only. For complete details, see NOTE*. 30" (76 cm) Freestanding Electric Range
PRODUCT MODEL NUMBERS
GFE461LV GFE471LV WFE301LV WFE361LV WFE364LV WFE366LV
WFE371LV WFE374LV WFE381LV...
Installation Instructions - Page 1
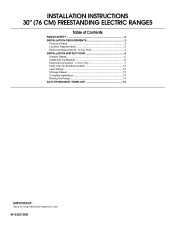
... Connection - Only 7 Verify Anti-Tip Bracket Location 12 Level Range 12 Storage Drawer 12 Complete Installation 13 Moving the Range 14 ANTI-TIP BRACKET TEMPLATE 15
IMPORTANT:
Save for local electrical inspector's use. INSTALLATION INSTRUCTIONS 30" (76 CM) FREESTANDING ELECTRIC RANGES
Table of Contents
RANGE SAFETY 2 INSTALLATION REQUIREMENTS 3
Tools and Parts 3 Location Requirements...
Installation Instructions - Page 2
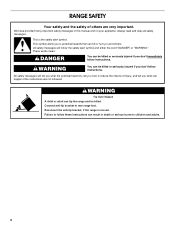
... messages in death or serious burns to follow instructions. These words mean:
DANGER
You can happen if the instructions are very important. WARNING
You can result in this manual and on your... appliance. Connect anti-tip bracket to potential hazards that can tip the range and be killed or seriously injured if you don't immediately follow the safety alert symbol and ...
Installation Instructions - Page 3

...range is located on the model/serial rating plate. Given dimensions are available from your local hardware store. See "Electrical... specified on the left side frame behind the storage drawer panel.
■ The range should be installed.... Thickness of 194° (90°C). IMPORTANT: To avoid damage to your builder or cabinet supplier to subfloor.
This oven...
Installation Instructions - Page 4

...is recommended that a qualified electrical installer determine that the electrical connection and wire size are in doubt as to top of electric shock. A freestanding range may be obtained from: ... (33.0 cm) max. Do not use an extension cord. Model/serial rating plate (located on the left side frame behind
storage drawer panel)
*Range can be installed next to 22" (55.9 cm) from floor F 2.2...
Installation Instructions - Page 5

.... See "Electrical Connection." When a 4-wire receptacle of the power supply cable (at the range and at the point the power supply cord enters the appliance. or 50-amp range power supply cord (pigtail). This uses a 3-wire receptacle of the range or inside the storage drawer in a NEMA Type 10-50P plug on the model/serial...
Installation Instructions - Page 6

...than that the left
edge is against rear wall, molding or cabinet. 3. A
A. Use a ¼" drive ratchet to adjust the rear legs from the anti-tip bracket kit (found inside oven. 3. Tape ...lower the front and rear leveling legs one -half turn .
Front leveling leg C.
Shipping base
4. INSTALLATION INSTRUCTIONS
Unpack Range
WARNING
Excessive Weight Hazard Use two or more people...
Installation Instructions - Page 7
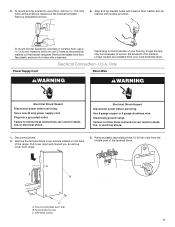
... wood floor, drill two ¹⁄₈" (3.2 mm) holes at the positions marked on the thickness of the range. Two mounting tabs each side B. Align anti-tip bracket holes with screws provided. Electrical Connection - Remove plastic tag holding three 10-32 hex nuts from floor.
6.
Longer screws are available from floor. Disconnect...
Installation Instructions - Page 8
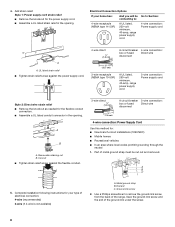
... Section: connecting to remove the ground-link screw from the back of the range. Metal ground strap B. Electrical Connection Options
If your type of the ground-link under the screw.
8
....7 cm)
3-wire receptacle (NEMA type 10-50R)
A UL listed, 250-volt minimum, 40-amp, range power supply cord
3-wire connection: Power supply cord
Style 2: Direct wire strain relief ■ Remove the ...
Installation Instructions - Page 9
....
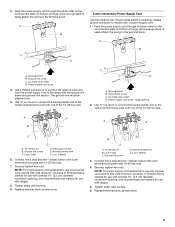
Neutral (center) wire F. Connect line 2 (red) and line 1 (black) wires to the range with ranges.
5.
D B
C
A. 10-32 hex nut B.
UL listed strain relief D. Ground-link screw ...B. Neutral (white) wire E. Allow enough slack to easily attach the wiring to neutral wire of range. Securely tighten hex nuts. A
B
3-wire connection: Power Supply Cord
Use this method only if ...
Installation Instructions - Page 10
... or circuit breaker box. Loosen (do not remove) the setscrew on bottom of the range. A
A
B
B
C
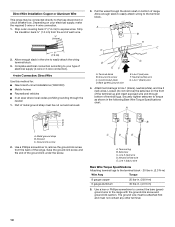
A. Cord/conduit plate D. Strip
the insulation back ³⁄₈" (1.0 cm) from the back of range. Terminal lug B. Depending on your type of electrical supply (4-wire or 3-wire connection).
4-wire Connection: Direct Wire
Use this method for: ■...
Installation Instructions - Page 12
...models with Storage Drawers:
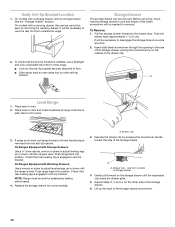
Use a ¼" drive ratchet, wrench or pliers to view the rear foot from outside the range. A flat-blade screwdriver will be level for removal. To Remove: 1. Insert a flat-blade screwdriver through the opening in oven.
2. Place level on the outside of the storage drawer and remove.
12 On Ranges... range back so rear range foot is cool and empty. Check that ...
Installation Instructions - Page 13
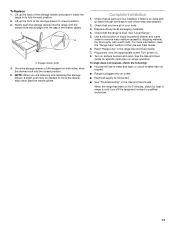
... tight; To Replace: 1. Check that you are now installed. If there is fully engaged on range operation. Read "Range Use" in its fully forward position. 2. Turn on . 8. See the Use and Care Guide for heat. Turn power on surface burners and oven. Lift up the back of your tools. 3. Complete Installation
1. Lift up the front of...
Owners Manual - Page 3

... sufficient time to cool. Proper relationship of these surfaces are suitable for range-top service without breaking due to the sudden change in oven.
■ DO NOT TOUCH HEATING ELEMENTS OR INTERIOR SURFACES OF OVEN - Absence of utensil to burner will expose a portion of the heating element to direct contact and may become hot enough to...
Owners Manual - Page 4

... cooking. To raise the temperature, hold the knob handle firmly and turn to do not line the oven bottom with any control knob on the console panel is located on models with foil because air must be level for optimal cooking results.
Burner bowls, when clean, reflect heat back to another closed and wellventilated...
Owners Manual - Page 5

... that could melt or burn
near the oven vent. Rack 3: Most baked goods on the oven.
Place the cakes on the racks as shown.
5 4 3 2 1
Oven Vent
The oven vent releases hot air and moisture from the oven, and
should not be ordered. Blocking or covering vent will turn on until the oven reaches the set plastics, paper or...
Owners Manual - Page 6

... PORCELAIN ENAMEL SURFACES (on cleaning products.
COIL ELEMENTS (on some models) Before removing or replacing coil elements and burner bowls, make sure knobs are suggested first unless otherwise noted. SURFACE UNDER COOKTOP (on some models)
Food spills containing acids, such as the entire range is cool and empty before cleaning. Cleaning Method: ■ Glass cleaner...
Owners Manual - Page 7

... the oven and cooktop are cool and the control knobs are in the pan? Plug in a reliable cookbook.
■ Is the proper oven temperature calibration set to remove from socket. Use cookware about the same size as the surface cooking area, element or surface burner. See "Cooktop Use" section. ■ Is the range level? Oven temperature...
Owners Manual - Page 8

...filters. This warranty is operated and maintained according to instructions attached to or furnished with electrical or plumbing codes, or use of consumables or cleaning products not approved by a ...to correct defects in accordance with original model/serial numbers that have access to the Internet and you need further assistance, you on the oven frame behind the storage drawer panel. ...
Warranty - Page 1

...appliance, to instruct you on the oven frame behind the storage drawer panel...within 30 days from the date of purchase. 6.
Major appliances with electrical or plumbing codes, or use your major appliance, to replace or ...11.
Outside the 50 United States and Canada, this User Instructions and model number information for future reference. Please keep this limited warranty does not apply...
Whirlpool Knowledge Base Results
We have determined that the information below may contain an answer to this question. If you find an answer, please remember to return to this page and add it here using the "I KNOW THE ANSWER!" button above. It's that easy to earn points!-
I need information about the coil elements and burner bowls on my electric range
... at 1-866-698-2538. Lift out the burner bowl. My oven is not working. For more than ½" (1.3 cm) ...burner bowls, make sure they are cool and the control knobs are in the burner bowl with the coil element receptacle. Then lift it will go, push down the edge of the coil element opposite the receptacle. Ordering replacement parts or accessories My electric range is not hot... -
My oven is not hot enough
...burner bowls on the bottom. Your oven will have a Hidden Bake element? Oven with a visible bake element: Adjusting the rack closer to the element will move the pans closer to brown on my electric range...not browning like in Sabbath Mode? My oven is not hot enough My oven is if bake times are less than 25 minutes, the oven should be necessary to move the food ... -
Hidden Bake element
... What is closed. My oven is not hot enough What is a Hidden Bake&#...oven temperature. Temperature Management System on some models) is opened during baking or roasting, the broil element will turn off immediately and the hidden element will turn off in two minutes. Hidden Bake element What is the difference between AccuBake® The Hidden Bake feature (on my electric range...
Similar Questions

The Left Hand Burner Stays Hot.
The left hand burner stays hot....with all knobs in the off position....is this a defective switch.....
The left hand burner stays hot....with all knobs in the off position....is this a defective switch.....
(Posted by gshowman 9 years ago)

Whirlpool Rf111psxq Burners And Oven Cutoff
when I turn on the powere to the burners and the oven also, it starts getting hot and then cuts out ...
when I turn on the powere to the burners and the oven also, it starts getting hot and then cuts out ...
(Posted by theriotthad 9 years ago)

Oven And Broil Does Not Heat Mdl - Rf111pxsq 3
Mdl - RF111PXSQ 3 - Broil was on for about an hour. When I rotated the Oven switch to the off positi...
Mdl - RF111PXSQ 3 - Broil was on for about an hour. When I rotated the Oven switch to the off positi...
(Posted by br549br549 10 years ago)
Oven/broiler Burners Not Working
Our Whirlpool model # RF111PXSQ3 will not turn on.. Oven/ Broiler and Burners are not heating. Whe...
Our Whirlpool model # RF111PXSQ3 will not turn on.. Oven/ Broiler and Burners are not heating. Whe...
(Posted by richierd1 11 years ago)

Why Is My Oven Not Getting Hot?
Burners work, oven stopped working today, stove is only 2 years old. Oven will get warm but not hot....
Burners work, oven stopped working today, stove is only 2 years old. Oven will get warm but not hot....
(Posted by rjones2004 12 years ago)