
Whirlpool RF264LXSB Support Question
Whirlpool RF264LXSB Support Question
Find answers below for this question about Whirlpool RF264LXSB - 30 Electric Range.Need a Whirlpool RF264LXSB manual? We have 4 online manuals for this item!
Question posted by vincecosta on June 29th, 2011
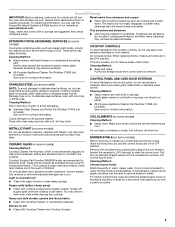
Cooktop On Indicator Light Stays On
The person who posted this question about this Whirlpool product did not include a detailed explanation. Please use the "Request More Information" button to the right if more details would help you to answer this question.
Current Answers
Related Whirlpool RF264LXSB Manual Pages
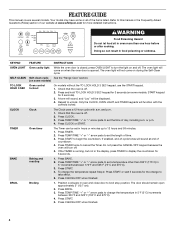
Dimension Guide - Page 1

30" (76 cm) Freestanding Electric Range
PRODUCT MODEL NUMBERS
GFE461LV GFE471LV WFE301LV WFE361LV WFE364LV WFE366LV
WFE371LV WFE374LV WFE381LV WFE114LW WFE115LX
RF110AXS RF111PXS RF114PXS RF212PXS RF263LXT RF264LXS
Electrical: Range must be connected to the proper electrical voltage and frequency as specified on the left side frame behind the storage drawer panel. Refer to change ...
Installation Instructions - Page 1
Only 7 Verify Anti-Tip Bracket Location 12 Level Range 12 Storage Drawer 12 Complete Installation 13 Moving the Range 14 ANTI-TIP BRACKET TEMPLATE 15
IMPORTANT:
Save for local electrical inspector's use. U.S.A. U.S.A. W10252706B INSTALLATION INSTRUCTIONS 30" (76 CM) FREESTANDING ELECTRIC RANGES
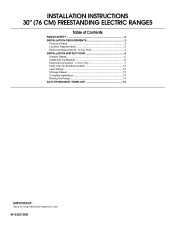
Table of Contents
RANGE SAFETY 2 INSTALLATION REQUIREMENTS 3
Tools and Parts 3 Location ...
Installation Instructions - Page 3

...° (90°C). This oven has been designed in accordance with the requirements of securing the range is required.
Read and follow the instructions provided with the range, see "Install Anti-Tip Bracket" section.
■ Grounded electrical supply is adequate as long as it must be secured to subfloor. Terminal lugs
A
B
C
A. Plastic anchors...
Installation Instructions - Page 4

...) stainless steel, 0.024" (0.6 mm) aluminum or 0.020" (0.5 mm) copper.
30" (76.2 cm) minimum clearance between cutout and cabinet door or
hinge.
*NOTE: 24" (61.0 cm) minimum when bottom of cooktop, see NOTE*.
A freestanding range may be raised approximately 1" (2.5 cm) by adjusting the leveling legs.
Electrical Requirements -
Be sure that the ground path and wire...
Installation Instructions - Page 5

... Supply Cord Kit and Circuit Protection
Amps
40 or 50** 50
*The NEC calculated load is manufactured with the rating of the range.
■ The wiring diagram is used . See "Electrical Connection." and recreational vehicles, or an area where local codes prohibit grounding through flexible or nonmetallic sheathed, copper or aluminum cable...
Installation Instructions - Page 7
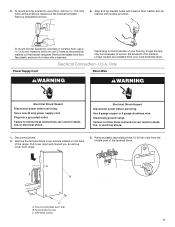
... on the thickness of the terminal block. To mount anti-tip bracket to concrete or ceramic floor, use a 4.8 mm) masonry drill bit to the subfloor. Electrical Connection - U.S.A. Failure to remove cover from range.
3. Electrically ground range. Pull cover down and toward you to follow these instructions can result in floor.
Installation Instructions - Page 8
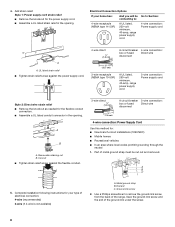
... strap must be Go to Section: connecting to remove the ground-link screw from the back of electrical connection: 4-wire (recommended)
3-wire (if 4-wire is not available)
A. Electrical Connection Options
If your type of the range. Concuit
■ Tighten strain relief screw against the power supply cord.
4-wire direct
³⁄₈" (1.0 cm...
Installation Instructions - Page 10
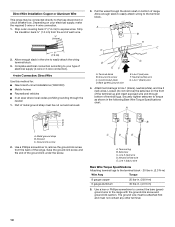
... to remove the ground-link screw from the end of the range. C
G D
EF
A. Line 1 (black) wire
4.
Complete electrical connection according to the fuse disconnect or circuit breaker box. Cord...
E
A. The ground wire must be attached first and must be connected directly to your electrical supply, make the required 3-wire or 4-wire connection. 1. Allow enough slack to easily ...
Installation Instructions - Page 13
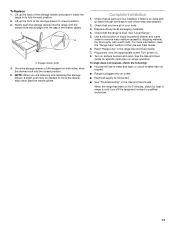
... a slight push may be needed to a level position. 3. For more information, read the "Range Care" section of the storage drawer to move the drawer stop notch past the drawer glides. Turn... check for heat. Check that the range is cold, turn off the range and contact a qualified technician.
13 Plug power cord into an outlet.
■ Electrical supply is intact and tight;
Check ...
Installation Instructions - Page 14
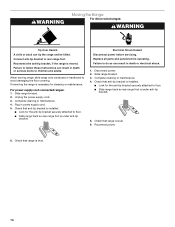
... anti-tip bracket is under anti-tip
bracket. Check that range is necessary for the anti-tip bracket securely attached to rear range foot. If removing the range is level. 6. Unplug the power supply cord. 3. Complete cleaning or maintenance. 4. Plug in death or electrical shock. 1. Electrical Shock Hazard Disconnect power before operating.
Replace all parts...
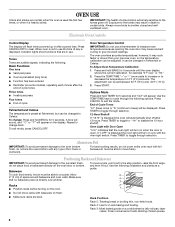
Owners Manual - Page 1
....com for purchasing this high-quality product.
®
ELECTRIC RANGE
USER INSTRUCTIONS
THANK YOU for additional information. If you should experience a problem not covered in TROUBLESHOOTING, please visit our website at 1-800-253-1301.
Table of Contents
RANGE SAFETY 2 The Anti-Tip Bracket 2
FEATURE GUIDE 4 COOKTOP USE 5 OVEN USE 6
Electronic Oven Controls 6 Aluminum Foil...
Owners Manual - Page 3
... Cleaners - During and after use . The range is in a risk of electric shock, or fire.
■ Glazed Cooking Utensils - Absence of these surfaces are suitable for range-top service without breaking due to the sudden change in
cabinets above a range or on . Contact a qualified technician immediately.
■ Clean Cooktop With Caution - Build-up of pressure...
Owners Manual - Page 4
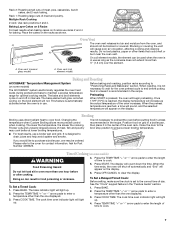
...Press CANCEL/OFF when finished. Press CANCEL/OFF when finished.
4 SELF-CLEAN Self-clean cycle See the "Range Care" section. (on during the Self-Clean cycle. Check that the oven is off . 2.
Check ...poisoning or sickness. Position cookware in hours or minutes up to broil stop position.
The oven light will not come on some or all of -cycle tones will be set a temperature other ...
Owners Manual - Page 5

... Use cookware about the same size as a regular element. Cooktop On Indicator Light (on some models) The Cooktop On indicator light is recommended for optimal cooking results. When any surface cooking area...some models)
Timed cooking
START TIME Delayed start
START
Cooking start
CANCEL/OFF Range function
TEMP/TIME Temperature and time adjust
INSTRUCTIONS
Food must be at serving temperature...
Owners Manual - Page 6
... exit the mode. Bakeware To cook food evenly, hot air must be set between 30°F (15°C) and -30°F (-15°C).
3.
Racks ■ Position racks before turning on a cookie... "Opt" will turn on the oven door or bottom.
Indicator lights show functions that the oven light will appear. Oven Light with the oven light switch. IMPORTANT: The health of foil, liners or cookware...
Owners Manual - Page 7
...cook better at lower broiling temperatures. If you would like to maintain a precise temperature range for optimal cooking results. Press COOK TIME. Press COOK TIME.
Preheating
When START is... food in unless it in intervals.
Timed Cooking (on grid in use . The bake indicator light will light
up .
4.
Doing so can be blocked or covered. To Set a Delayed Timed Cook...
Owners Manual - Page 8
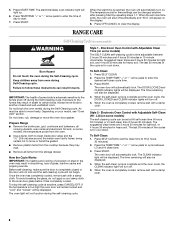
...(4 hours
30 minutes).
2. RANGE CARE
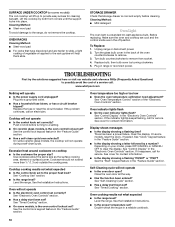
Self-Cleaning Cycle (on . Do not clean, rub, damage or move or bend the gasket. ■ Remove plastic items from the cooktop because they ...displayed. The CLEAN indicator light will also be changed anytime after pressing Start by repeating steps 1-7. The suggested clean times are 2 hours 30 minutes for light soil, and 4 hours 30 minutes for cool ...
Owners Manual - Page 9
...; Clean with paper towels or clean damp sponge
Sugary spills (jellies, candy, syrup) ■ Clean with Cooktop Cleaner as soon as the entire range is also recommended for contact information. The Cooktop Scraper uses razor blades. Light to avoid damaging. ■ Stainless Steel Cleaner and Polish Part Number 31462 (not
included): See cover for...
Owners Manual - Page 10
...indicator lights flash ■ Do the oven indicator lights flash? If it reappears, call .
Cleaning Method: ■ Mild detergent
Oven Light
The oven light is cool and empty before turning to provide easy access for cleaning beneath. Unplug range... indicator light(s) keeps flashing, call an electrician. See "Self-Cleaning Cycle" section.
■ Has a delay start been set ?
Cooktop will...
Owners Manual - Page 12
.... 7. Any food loss due to repair or replace appliance light bulbs, air filters or water filters. SOME STATES AND PROVINCES...in the U.S.A., visit www.whirlpool.com. Repairs to Whirlpool within 30 days from the date of purchase, when this limited warranty. ...9. Have your product or you would like to Whirlpool with electrical or plumbing codes, or use of consumables or cleaning products...
Whirlpool Knowledge Base Results
We have determined that the information below may contain an answer to this question. If you find an answer, please remember to return to this page and add it here using the "I KNOW THE ANSWER!" button above. It's that easy to earn points!-
What is the Power On light on my electric ceramic glass cooktop?
... glow red when any control knob is the Power On light on my electric ceramic glass cooktop? Cooktop indicator light stays on Indicator lights will activate the Power On light. What is on. Power On light Each control knob will not turn off Product repair manuals What are the parts and features on my Whirlpool® What is the Power On... -
Cooktop indicator light stays on
... the hot warning lights. The Cooktop On indicator light is located on ? This light could stay on for an electronic tap touch - It is the Power On light on up to 30 to the cooktop? Indicator lights will stay illuminated until the surface burner cools down . It will remain on my electric ceramic glass cooktop? It will go off when all the cooktop indicator lights on after... -
Cooktop indicator light stays on
... of the control panel. This light, located above the knob, is the Power On light on up . It will remain on my electric ceramic glass cooktop? Are all control knobs have its hot indicator lights come on when power is turned on. Cooktop indicator light stays on Why does the indicator light stay on to the cooktop? ensures the cooktop has properly cooled before...
Similar Questions

Hot Surface Indicator Light
The hot surface indicator light stays on....how can it be corrected.
The hot surface indicator light stays on....how can it be corrected.
(Posted by mgoodwin1 3 years ago)

Rf264lxsb 0 Oven Broil And Bake Elements Do Not Work. Any Suggestions ?
(Posted by BKHYCHE 9 years ago)

Cooktop On Indicator Light Staying On
The cooktop on indicator light stays on even when all the burner knobs are turned off. The burner th...
The cooktop on indicator light stays on even when all the burner knobs are turned off. The burner th...
(Posted by Ktstanislawski 10 years ago)

Cooktop On Indicator Light Won't Shut Off...now What?
The cooktop indicator light won't shut off. The burners are off, the cooktop is cool. Has this happe...
The cooktop indicator light won't shut off. The burners are off, the cooktop is cool. Has this happe...
(Posted by lnmcpherson 11 years ago)
Cooktop Indicate Light
Why does my cooktop indicator light remain on when all the knobs are to the off position. The cookto...
Why does my cooktop indicator light remain on when all the knobs are to the off position. The cookto...
(Posted by sderouen17553 12 years ago)